Showing posts with label square. Show all posts

While I love folding origami kusudamas, over the past few years, I find it more pleasing to fold geometric modular shapes. And for those who are interested in polyhedral origami, Tomoko Fuse's book 'Unit Origami Essence' is an absolute treasure trove! As is the case with most of her other books, this book too is entirely in Japanese. But that is no hindrance, since the pictorial steps are very clear and fairly easy to follow. And in the few places that one might get stuck, Google Translate comes to the rescue.

One of the drawbacks of using a Japanese books is that I was not able to figure out the names of each of the models. The book is divided into 4 chapters. The first chapter is on cubes. The second chapter deals with solids made from triangular bases, the third - solids made from pentagonal bases and finally, the fourth deals with solids from star-shaped bases.

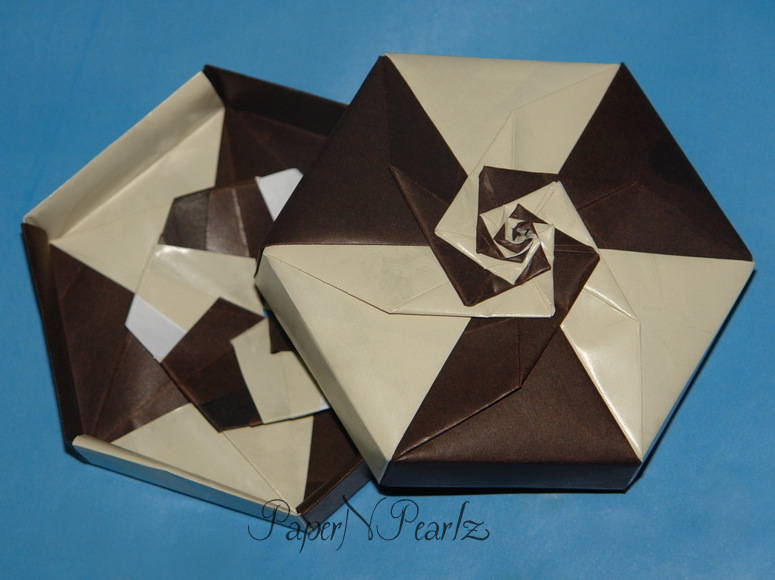
My first attempt from the book was from the Cubes section. I tried out pretty much all the cube models. The individual modules are pretty easy to fold. The second of the models (in brown and yellow in the pic) was very unique - made from boat-shaped units, 4 units in all. Most of the other cubes were from 6 modules. A couple of the cubes were pretty nice variations.

All the models have a recommended size listed. For all the cubes I had tried, it was given as 15 cms * 15 cms (6 inches * 6 inches). But I had used 9 cms * 9 cms (3.5 inches * 3.5 inches) squares and didn't have much difficulty folding or assembling the pieces.

Model Details:

Model: Various Cubes

Creator: Tomoko Fuse

Book: Unit Origami Essence

Author: Tomoko Fuse

Language: Japanese

Difficulty Level: Low Intermediate

Paper Ratio: Square

Paper Size: 3.5 inches

Model Size: ~1.4 inches side

Number of Modules: 3 to 6


This origami star, designed by Enrica Dray, is a modular star made from 8 modules. It is really simple to fold and beautiful and elegant when completed. The star has a slight 3-D effect, since the top layer does not lie flat against the lower layer. The back of the star (Second pic), I thought, was as beautiful as the front!

2 contrasting colours work best for this model. Since I have a very bad eye for colour selection, I used the net to find out 2-colour combinations and liked the black-beige yellow the best. Origami 60 gsm paper, 3 inch squares, 4 of black and 4 of beige yellow, resulted in a star about 4 inches across.

Previously, I have folded the Mina Kusudama, also designed by Enrica Dray. Like the star, the mina kusudama was also easy to fold and assemble. It is of course, made from 30 modules, so it is more time-consuming than the star, but equally satisfying to work on.


Model Details:

Model: Star 

Creator: Enrica Dray

Difficulty Level: Low Intermediate

Paper Ratio: Square

Paper Size: 3 inch squares

Model Size: ~4 inches across

Modules: 8

Tutorial: Youtube 

We had recently been on a short trip to the sea, for the summer. And while doing some shopping, I came across an amazing shop which had some fabulous wrapper paper in some awesome colours and patterns. So I ended up picking up a whole lot of paper and now I have enough to last me a lifetime!!

The cream and chocolate brown papers in this hexagon box were a couple of sheets I picked up there. The moment I saw the paper, I fell in love with it and have been trying to decide on the model. Finally I decided to make one of Tomoko Fuse’s beautiful boxes from her book on spirals.

The paper was thicker than regular origami paper, so the box turned out to be quite sturdy, though it required more effort in folding and assembling. The spirals were difficult because of handling 6 arms simultaneously but the end result was so satisfying that I just sat and admired the box for about half an hour after I had completed it!


Model Details:

Model: Hexagon Box 

Creator: Tomoko Fuse

Book: Let’s Fold Spirals
 

Author: Tomoko Fuse
 

Difficulty Level: High Intermediate

Paper Ratio: Square

Paper Size: 6 inches

Modules: 12 (6 + 6)

Well, Little Miss's interest in origami continues. But now it is more managerial - which means she decides what I should fold and what colours I should use and then she waits for me to complete folding it before she proceeds to 'teach' me how to photograph them 😄 

So this is her next pick - a heart bracelet. This is designed by Henry Pham. While most of his origami is complex, this heart bracelet is pretty easy to do. 

Little Miss picked out the colours. We decided we wanted small hearts, so used 2 inch squares and ended up with each module measuring about 1.5 inches in length. Connecting the modules is just a matter of sliding one into the next. We glued the connecting points so they do not slide out. We used a total of 6 hearts (7 would have been more comfortable for Little Miss) to form the bracelet. 

Little Miss is as thrilled with the bracelet as she was with the backpacks. And I await more instructions from Her Highness 😀 

Model Details:

Model: Heart Bracelet

Creator: Henry Pham

Difficulty Level: Low Intermediate

Paper Ratio: Square

Paper Size: 2 inch squares

Model Size: ~6 inches in length

Modules: 6

Tutorial: Youtube 

My daughter, Little Miss, wanted to try out some origami with me, so we went searching on YouTube for something she could try out. Finally decided on this rather cute Japanese school bag, designed by Fumiaki Shingu. Like most of his origami, this one is also fairly easy to do. It is made from 3 squares - one forms the back, one the front and the third one forms the front flap and the back straps. 

Little Miss decided to go for a multi-coloured bag, so it is easy to make out where each of the squares fit in. We used 6 inches squares and the final bag ended up around 2 inches tall. 


The front flap opens up, so it is possible to fill the little bag with tiny, little things to carry along! Talk about impractical!! But Little Miss simply adores the bags :) 

Model Details:

Model: Backpack

Creator: Fumiaki Shingu

Difficulty Level: Low Intermediate

Paper Ratio: Square

Paper Size: 6 inches

Model Size: 2 inches

Modules: 3

Diagram: Origami-club

Tutorial: Youtube 

Sonobes are beautiful, decorative origami created by Mitsunobu Sonobe. In addition to the original sonobe, thanks to its versatility and ease of folding, there are many, many variations created by Tomoko Fuse, Meenakshi Mukerji and quite a few other origamists.  

Narong Krined's variations caught my eye, while I was searching for my next model to fold. The one I have folded is the first of his variations that I was able to find. 

I used 7.5 cms squares, 30 in all for this model. As for the eye-popping colours, well, I wanted something attractive and multi-coloured. Since I am not very good with colour selections, Internet gave me this suggestion - Dark Purple, Mustard Yellow and Dark Coral. How does it look? Attractive or too candy-coloured? 

Model Details:

Model: Narong Krined's Sonobe Variation 1 

Creator: Narong Krined

Difficulty Level: Low Intermediate

Paper Ratio: Square

Paper Size: 3 inch squares

Model Size: ~3 inches in diameter

Modules: 30

Tutorial: Origamee.net 

I have started the year 2018 with a bang! I completed my first paper weaving project (a magazine holder) and here is my first origami of this year. This model is one of Tomoko Fuse's kusudamas, named Fuufuki Asagao Kusudama. It is taken from her book Unit Origami Fantasy. 

The kusudama is made from 30 smaller squares, folded and assembled together (I did the assembly with glue). I used fairly thick paper, by origami standards - 80 gsm regular printer paper, cut into 3*3 inch squares. I am not sure 60 gsm paper would have worked quite so well. 

What I loved about this kusudama was its angular, sharp appearance, something you don't usually see in kusudamas. Kusudamas, I think, are usually more flowery, soft and flowing. But here, I love the sharp dips that reveal the stars and the triangular peaks that remind me of Fuse's Little Turtle kusudama

Model Details:

Model: Fuufuki Asagao Kusudama 

Creator: Tomoko Fuse

Book: Unit Origami Fantasy
 

Author: Tomoko Fuse
 

Difficulty Level: High Intermediate

Paper Ratio: Square

Paper Size: 3 inch squares

Model Size: ~5 inches in diameter

Modules: 30

Tutorial: Youtube 
Every once in a while, I get obsessed with an origami design and keep making it again and again. My last one was Dasa Severova's Origami Woven Star, a modular star made from 16 units.

I tried the model with ombré shades of green, blue and pink and would have continued if I had managed to get my hands on more colours!!

The design is simple and works well with small squares - I had used 3 inch squares and this resulted in a star of about 5.5 inches diameter. The star is also very stable and the units lock well, so no glue required.


Model Details:

Model: Woven Star  

Creator: Dasa Severova

Difficulty Level: Low Intermediate

Paper Ratio: Square

Paper Size: 3 inches

Model Size: ~5.5 inches in diameter

Modules: 16

Tutorial: How to fold the units, How to join the units 


After completing my last 2 Tomoko Fuse designs made from 120 units each, I decided to try one of her simpler models - this simple open frame cube, made from 12 square units.

I have used 3 colours and 4 units of each colour. The squares had a side of 4 inches and the end result was a frame of about 3 inches.

Model Details:

Model: Open Frame - Cube

Creator: Tomoko Fuse

Book: Unit Origami

Difficulty Level: Low Intermediate

Paper Ratio: Square

Paper Size: 4 inches

Model Size: ~3 inches in diameter

Modules: 12

Tutorial: Youtube
Maria Vakhrusheva's Fiesta Kusudama origami is a model that I discovered recently. It is a fairly simple and elegant model and I love the way mine has turned out. I had used origami paper that was dark blue on one side and light blue on the other.

There are 2 ways of assembly - the 3-unit cones look more traditional, so I opted for the 5-unit cone.

Model Details:

Model: Fiesta Kusudama

Creator: Maria Vakhrusheva

Diagram: The Fold Magazine (for registered members only)

Difficulty Level: Low Intermediate

Paper Ratio: Square

Paper Size: 3 inches

Model Size: 5 inches diameter

Number of Modules: 30

Tutorial: Youtube
The next model that I tried from my recently bought copy of Ekaterina Lukasheva’s new book ‘Modern Kusudama Origami' is the Centaurea Flower. It is a very pleasant looking model which requires duo-coloured paper. I used paper that was solid pink on one side and had little flowers on the other.

The model was of intermediate difficulty. I liked the way the petals shaped up. While the suggested paper size was 7 cms, I used 7.5 cm squares. The end result was a kusudama ball, about 5 inches in diameter.

Model Details:

Model: Centaurea Cyanus

Model: Ekaterina Lukasheva

Book: Modern Kusudama Origami

Author: Ekaterina Lukasheva

Difficulty Level: Low Intermediate

Paper Ratio: Square

Paper Size: 3 inches

Model Size: 5 inches diameter

Number of Modules: 30

After a long gap, I am back to folding and updating my blog! Recently I bought Ekaterina Lukasheva's new book 'Modern Kusudama Origami'. And now I am enjoying folding the models. I decided I will start folding from the beginning and start with the models that needed square sheets of paper. There are quite a few models folded from rectangles too.

The first few models are stars and flowerets which I haven't tried out as yet. I was more keen on trying the actual kusudamas and started with the model named 'Rio'. It reminds me of Mio Tsugawa's 'Arabesque'.

The kusudama is made from 30 square modules. The book recommends paper of size 7 cm * 7 cm. I used 7.5 cm by 7.5 cm, orange/yellow paper. For some reason, initially I found connecting the modules very difficult. I think my origami brain has rusted! Finally I did figure out how the flap goes into the pocket. After that, the process was quite easy.

Model Details:

Model: Rio

Creator: Ekaterina Lukasheva

Book: Modern Kusudama Origami

Author: Ekaterina Lukasheva

Difficulty Level: Low Intermediate

Paper Ratio: Square

Paper Size: 3 inches

Model Size: 6 inches diameter

Number of Modules: 30

The Icosahedral Kit is yet another of the Polyhedron kits from Miyuki Kawamura's book 'Polyhedron Origami'. In this modular origami, 2 kinds of modules are used - the Edge module and the Vertex module. The icosahedron kit is made from a total of 12 vertex modules and 30 edge modules - a grand total of 42 modules.

Double-sided paper works best, since the back of the vertices are visible through all those gaps. The modules are fairly easy to fold and assemble. I used glue as a precaution, but it is not absolutely needed. The size of the paper that I had used was 3 inches and it resulted in a fairly big icosahedron - about 6 inches in diameter.

Model Details:

Model: Icosahedron Kit

Creator: Miyuki Kawamura

Book: Polyhedron Origami

Author: Miyuki Kawamura

Difficulty Level: High Intermediate

Paper Ratio: Square

Paper Size: 3 inches

Model Size: 6 inches diameter

Number of Modules: 42

Tutorial: Youtube

A very cute mouse folded from a square. It is not very difficult to fold and works well with origami paper, 6 inch square.

I like these little guys, they are about 3 inches in size, excluding the tail.

This is the second model I am folding from the book 'Origami - 30 Fold-by-Fold Projects'. The other one I have folded was Francis Ow's Double Hearts. So far I have found the models fairly easy to fold. Hopefully I will try out a few more in the days to come. Specifically the elephant!

Model Details:

Model: Mouse

Creator: Eduardo Clemente

Book: Origami - 30 Fold-by-fold Projects

Author: Paulo Mulatinho

Difficulty Level: Low Intermediate

Paper Ratio: Square

Paper Size: 6 inches

Tutorial: Youtube 

I love these little heart stud earrings that I had made recently! A wonderful hand-made gift for a friend.

This was the first time I am trying out stud earrings instead of hanging ones. Well, I have made star earrings in the same way before, but this, I found, was much more delicate than the stars, so that meant I had to use additional reinforcements to ensure it doesn't bend. So, a lot of experimentation later, voila! A couple of pretty, delicate yet strong heart earring studs.


Model Details:

Model: Heart Earrings 

Origin: Traditional

Difficulty Level: Simple

Paper Ratio: Square

Instructions: Origami Instructions
 This Christmas has been a very busy time for me. I had participated in a couple of Christmas sales and have been busy making paper jewelry! And paper jewelry is time-consuming work! So I didn't get a lot of time to make anything special for Christmas 2014.

One thing that I did try was this modular star. The star is actually made from Bascetta Star modules. The star requires a total of 24 modules. The modules are folded as usual. For assembly, instead of using 3 modules for the pyramids, here we use 4. From then on, it is pretty straight forward. Keep adding modules in a circle. I found it easier to assemble the circle first and then worry about fixing the centre. I used glue to hold the joints well, since I had planned on adding it to my Christmas tree.

The first star that I did was in rainbow colours. I think a better choice of paper would have been paper coloured on both sides, like copy paper. So I did another star with Christmas colours. Very happy with the result this time :)

So that is my Christmas decoration for this year. Hope you have fun with this model :)

A very merry and joyous Christmas to my readers. Have a wonderful day :)


Model Details:

Model: Modular Star

Creator: Paolo Bascetta

Difficulty Level: Low Intermediate

Paper Ratio: Square

Paper Size: 3 inches

Model Size: ~ 6 inches diameter

Number of Modules: 24

Tutorial Link (for making the modules): Youtube
Fumiaki Kawahata's most well-known origami is probably the Origami Yoda. But, I doubt I will ever make it - for one, I am not very clear on who exactly Yoda is (Star Wars and I are galaxies apart!!) and two, I am not really good at folding people/animals/birds from paper. Somehow my models don't come out with a smooth finish and end up looking very unrealistic!

The modular ball, on the other hand, is one of only 3 modular origami designed by Fumiaki Kawahata. I have always been put off by how complex it looks, until I finally gave it a try today. Surprisingly, it is pretty easy to make. There are 6 modules that are basically pleated. Each corner is folded perpendicularly to the initial pleat, to form 2 perpendicular arms.

Now the way the model is put together is something I have not seen before! There is none of the usual tabs and pockets to assemble the model. Instead, 2 modules are placed facing each other, so that their perpendicular arms meet in the centre. Now, these 2 arms hold in place a third module. It is a little tricky initially, but pretty simple once you get the hang of it. Only thing to remember is that, if one module is taken out, the whole model will come undone.

Model Details:

Model: Modular Ball

Creator: Fumiaki Kawahata

Difficulty Level: Low Intermediate

Paper Ratio: Square

Paper Size: 3.5 inches

Model Size: ~ 3 inches

Tutorial - Modules: Youtube

Tutorial - Assembly: Youtube

After attempting Fumiaki Kawahata's Diplodocus in my previous post, I decided to try the origami dinosaur earrings for my Little Miss.

I tried out different sizes and finally this was the pair that I liked the best. I used red kami paper with print on it.

How do you like it? As for my daughter, she is very pleased! So yay for mummy!! 😀

Model Details:

Model: Dinosaur Earrings 

Creator: Fumiaki Kawahata

Book: Origami Dinosaurs 2

Author: Fumiaki Kawahata

Difficulty Level: High Intermediate

Paper Ratio: Square

I know zilch about dinosaurs! But Little Miss happened to see some origami dinosaur earrings on Etsy and wanted one for herself.

So I set about experimenting, since single-sheet origami isn't my cup of tea. Fumiaki Kawahata's book on Origami Dinosaurs has this folding for the Diplodocus, which was an interesting origami to fold. For the uninitiated, a diplodocus is a large, long-necked dinosaur, with a long tail. The animal is said to grow to a length of 24 metres (79 feet!!)

Since I wanted to make a small earring, I started of with a fairly large square first, just to see if I was able to fold it. The big grape coloured one is folded from a 7-inch square. And then, using progressively smaller squares, I refolded the origami. My smallest is folded from a 2-inch square. It is still too big to be an earring, but I will get there!


Model Details:

Model: Diplodocus (Dinosaur)

Creator: Fumiaki Kawahata

Book: Origami Dinosaurs 2

Author: Fumiaki Kawahata

Difficulty Level: High Intermediate

Paper Ratio: Square
The origami spiral is yet another beautiful modular origami by Tomoko Fuse. Because of how colourful it looks, I had tried this out a long time back - about 3 years back, when I was pretty much a newbie to origami. While folding the modules was pretty easy, I just couldn't figure out how to connect one unit with the next. And finally gave up.

Now, since I have gained a little more experience, I gave it another try. It still required some figuring out, but I was able to get the principle at last :)

I wanted to make a spiral with at least 10 rings in it. Since each ring has 8 modules, I needed at least 80 modules. I added a few more, till I had 100 modules in all and finally set about assembling the modules. So now, based on the number of modules used in a model, the spirals is my biggest project!


The basis for the spiral is the ring which is made from 8 modules. The ring itself will make a good Christmas decoration I think. It would be better to use 80 gsm paper, though this might make it a little difficult to assemble the modules. If making the spiral, I would suggest 60 gsm origami paper. Colourful paper is best for the spirals, resulting in some very colourful and attractive origami.

Be sure to glue the joints, especially for the spirals - rest assured, everyone who sees it will want to handle it and you will end up with many modules that have come undone, unless it is glued in place.

I had used 3-inch squares for making the modules and ended up with a spiral that measured about 6 inches in diameter - a little too big to be used as a slinky! But in spite of that, everyone who has seen it has attempted using it as a slinky!


Model Details:

Model: Rings and Spirals

Creator: Tomoko Fuse

Book: Floral Origami Globes

Author: Tomoko Fuse

Difficulty Level: High Intermediate

Paper Ratio: Square

Paper Size: 3

Model Size: ~ 6 inches in diameter

Diagram: OrigamiModular