Merry Christmas, dear readers! Hope this season brings you much joy and peace, despite the problems that still persist with the virus! 

Here are my latest favourite projects - Leaf trays made from newspaper tubes, using red and green tubes to add a little Christmas vibe to it! 


And check out these pretty Christmas baubles - yet another eco-friendly project. Though not by me! This is done by a group called PeopleKraft. Do check out their Insta page for more of their work. These baubles are made from scrap fabric, left over from various other projects. I thought it was an innovative way of reusing such material and so, ordered a couple of these baubles for my Christmas tree! 

Once again, a Merry Christmas!

Its that time of the year! A time of joy and cheer! And on my blog, this is the time to create some Christmas themed newspaper weaving crafts! So this year, I decided to go ahead and redo the leaf tray from my previous post! Using Christmas colours of red and green - naturally! 


 And let me say, I am absolutely delighted with the way this tray has turned out! I used random red/green tubes, and I love the effect produced by this random mix. The handle was also attached differently. I like this method better. 

Overall, a nice bit of work to end this year! 

Model Details:

Model: Leaf Tray

Difficulty Level: Complex

Tutorial (making newspaper tubes): Youtube

 
A little experiment for making a small, leaf-shaped tray, in time for Christmas! This little tray has been on my to-do list for quite some time now, especially since I have already made a couple of leaf trays using the coiling technique of weaving.  

Since I had already coloured some tubes green and red, in anticipation of some Christmas themed newspaper weaving projects, I decided to use a few of them to try out this little leaf tray. Well, it turned out not to so little after all - measuring around 10-inches at the maximum length!


While I quite liked the leaf stalk that I added, I think I need to figure out a better way, or rather,  a more aesthetically pleasing way of adding it! 

Other than that, I am in love with this tray and I think I will do one more using Christmas colours! What say??

Model Details:

Model: Leaf Tray

Difficulty Level: Complex

Tutorial (making newspaper tubes): Youtube

This time of coronavirus has meant that I have received very few orders for my newspaper weaves during this year. But well, there is always a silver lining - I was able to work on my weaves, experiment with colours, try out new weaving techniques... 

Let me assure you, trying to achieve a certain level of mastery in anything is difficult. While perfection is impossible to achieve - practice definitely does not make perfect, but it sure does make one better - striving towards that perfection, for me, is key to success. As far as my weaving goes, this means a lot of hours, plenty of effort and boat loads of experiments! 


So time of quarantine has been that opportunity for me to better my work. I have done a ton of reading (a lot of sites in other languages, so thank you, Google Translate!!), a whole bunch of research, hours of video-watching, many, many experiments with colours, techniques, designs and rolling so many newspaper tubes that I can probably do it blind-folded now! 

And the result? Now I can say that my work has definitely improved. In the next few months I will be able to show that on my blog too. And hopefully, I would love to share some of my learning and if you are interested in paper weaving, I am sure that would benefit you.


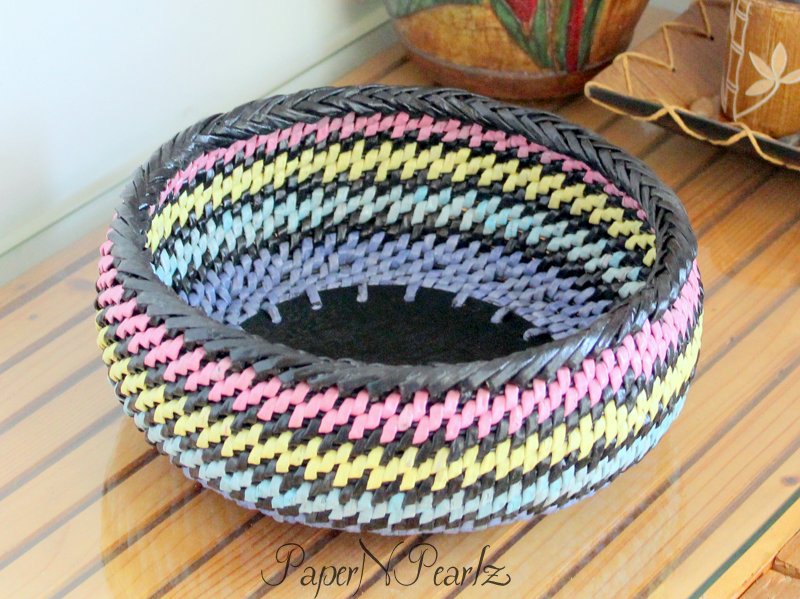
Coming to this big box - this is one of the biggest projects I have had the pleasure to work on. The client wanted something to store toys in, something in pleasing pastel colours and something with a lid. She also wanted decoupage. That was all the requirements. And what a pleasure it has been! 

I worked based on the patterns on the decoupage tissue - roses in pale peach. So my chosen colours were peach and white. This project involved a loooot of tube-rolling!! 😅😅 I started with a cardboard base, with decoupage done on that cardboard. The weaving was pretty straight-forward - the lower half was an experiment in random combinations of peach and white and the upper half was completely done in white. I absolutely loved the lid, with its little peach knob! Initially I had thought of adding a wooden know, but am quite happy I went with this paper knob instead. 

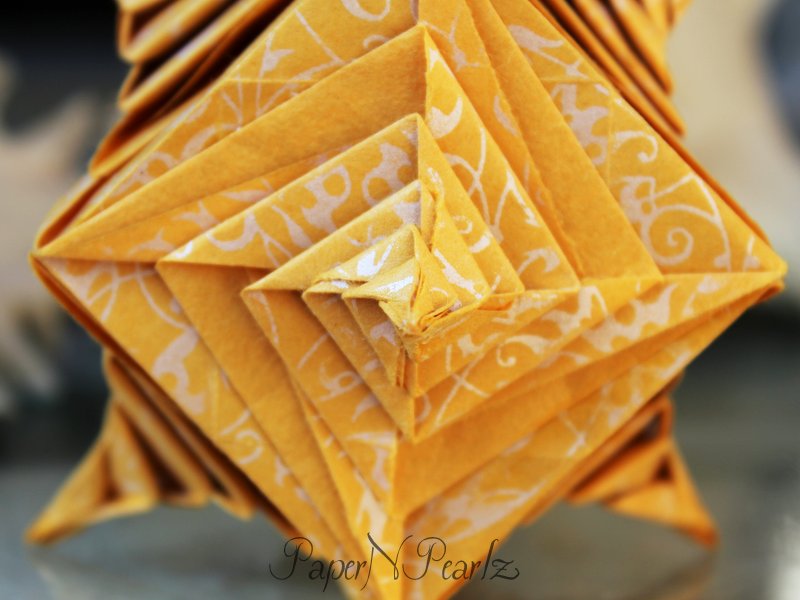
Decoupage is quite interesting, but I think this will also take a back seat to the actual weaving. I love the way it accentuates the beauty of the box though. 

Overall, a wonderful project and a pleased client 👍😀

After the lovely origami that I folded last month, I decided that I wanted to do something in newspaper weaving that is a little big - big enough to contain a fair amount of stuff, rather than the usual, small pieces that I do. 
 
So that is what I did! This box, made of olive green and corn yellow, is the first of these boxes that I decided to weave. The idea was derived from some decoupage tissue, presented to me by my daughter, Little Miss. I am not sure decoupage will look good on small, woven works. Anyway, I have to try it out! But for now, this is what I did. 

The base of the box was cardboard, since I wasn't too keen on weaving such a big bottom! The box measures 8 inches in diameter and the cardboard is 6 inches in diameter. From that, I started my weaving.

Once I started weaving the sides, I wanted to try out some new techniques of weaving. Unfortunately, I don't know of the names! But I guess the pictures provide enough information! 😆


 Once the weaving was done, it was decoupage time. Frankly speaking, I am not too happy with the way this decoupage turned out! I think the bees and the flowers merge a little too much with the weaving! But, all is not lost! I will try this same technique again with a different decoupage paper and hopefully that will come out well!

Model Details:

Model: Leaf Tray

Difficulty Level: Complex

Tutorial (making newspaper tubes): Youtube


 Hmm.. My attempt at making a little woven pumpkin pot! Is that a yay or a nay?? 

Can't say I am very impressed with this 😁 I think the top of the pumpkin should flatten down a lot more. Don't you think so? And I think the lid should be entirely of orange with no green in it. Well, live and learn, folks!! 

Model Details:

Model: Pumpkin Pot

Difficulty Level: Complex

Tutorial (making newspaper tubes): Youtube


After folding the long-pending origami whale in my last post, I worked on another of my pending origami - this one is Armin Täubner's origami dragon. 

This very cute dragon (cute and dragon in the same sentence?? Talk about an oxymoron! 😆😅) is folded from a 15-cm square and will take about 20 minutes to complete! It starts with a fish base and builds up on that. The final shaping adds a lot of beauty to this model and I am quite delighted with the way it has turned out! 

Model Details:

Model: Dragon

Creator: Armin Täubner

Book: Kreativ Workshop Origami
 

Author: Armin Täubner
 

Difficulty Level: Low Intermediate

Paper Ratio: Square

Paper Size: 6 inch square

Model Size: ~ 4 inches across

Tutorial: Youtube


The idea of the "Inktober" art challenge is to improve drawing skills. One of the groups I am a part of (Artrangi United) has taken up this challenge. The participants are provided with a list of prompts - 1 per day for the month of October and are challenged to draw based on the prompt. 

Frankly speaking, I am very bad at drawing/painting etc! So what am I doing with this challenge?? Today's theme was "whale"! And there is this Robert Lang's whale that I have been thinking of folding for a long time now. So, I decided to take up the prompt for the Inktober challenge and finally, finally folding this long pending origami! 

The folding is fairly simple. Using black single-sided paper (15 cms in my case) gave me a nice little killer whale. You might be wondering why I have added all these bells and whistles in the pic?? 😆 That is because the Artrangis have been asked to post there creations on Instagram. And in case you have an Instagram account and wish to follow me, please do so! I would be delighted to have some followers!! 

Model Details:

Model: Whale

Creator: Robert Lang

Book: Origami Under the Sea
 

Author: John Montroll & Robert Lang
 

Difficulty Level: Low Intermediate

Paper Ratio: Square

Paper Size: 6 inch square

Model Size: ~4 inches in length 

Tutorial: Youtube


Origamists around the world seem to be putting the quarantine to good use! Instagram and Facebook are rife with origami enthusiasts teaching various models, origami conventions are being organized online and in general, a lot of people are putting their time to good use. 

Once such origami demonstration I happened upon was in Instagram. The author of the model, Fabian Correa was interviewed online and then he demonstrated to the host and to the viewers, how to fold this really cute hummingbird. The entire session was in Spanish, so I did not understand anything that was spoken, but origami is a universal language and the folding was something I understood quite well. It was well demonstrated and folding along wasn't a hardship. 

I used 6 inch origami single-sided paper. The final shaping took some time, but otherwise it was a good, fun origami to fold. 

Model Details:

Model: Hummingbird

Creator: Fabian Correa

Difficulty Level: Low Intermediate

Paper Ratio: Square

Paper Size: 6 inches

Model Size: ~2 inches across

Link to demonstration: Instagram


My mega Mette Ring project is finally completed! Whew!! After working on and off for nearly a year, I finally completed it! 

And I am absolutely thrilled by how well it has come through. I had made a total of 20 rings which were linked together to form a slinky. Finally inserted the last module into the first, forming a ring of ring of Mette rings. 
Absolutely love the colours that were chosen by Little Miss. Apparently, I am incapable of even choosing the rainbow colours for these rings 😄😄 But as always, she chose impeccably, the perfect colours that show a good gradation of colour.

While this has been a tiring bit of work, I think the final outcome would give anyone, absolute satisfaction! But not to be forgotten, there are 360 modules to be folded. Which makes this the biggest origami work that I have ever attempted!!

Model Details:

Model: Mette's Ring

Creator: Mette Pederson

Book: Mette Units

Author: Mette Pederson

Difficulty Level: Low Intermediate

Paper Ratio: Square

Paper Size: 3 inches

Diagram: Mette Units

Modules: 18

The first order for a magazine rack came through during the covid lockdown. So I decided to hunker down and start working on the rack during the end of June. The client gave me the option of choosing my own colours, so decided to go with a combination of dark and light brown. The light brown was after consultation with Little Miss 😄And I must say I am quite happy with the result.

The base of the rack is made of plywood, and I had drilled holes through the wood. Then it was just a matter of decoupaging paper onto the base, so that the plywood is not visible. The wood base ensured that the magazine rack would be sturdy even if a number of books are placed in it.


I liked the pattern in the lower half of the rack. Would have loved to continue in the top bit too, but I guess that would not have looked that great in the middle. So there, it was a regular weave with 2 tubes of paper.

I must say my weaving skills have improved quite a bit and am quite pleased with the way the magazine holder has turned out. Obviously, there are a few mistakes, but nothing glaringly obvious. And I am sure I would get better with a little more practise. What say?


Overall, this has been a fun bit of work and I am truly grateful that the client trusted me with the whole project. I am also supposed to make a pen holder and a tissue holder that goes along with the rack. I will soon get cracking on that!

Paolo Bascetta's stellated dodecahedron, also known as the Bascetta Star is, I think, the most well-known of Bascetta's creations. I also love this Compass Rose folded quite some time back. 

During these coronavirus times, I tried out yet another of his modulars - a modular 2D star, called the New Year's Day Star. While folding it, I was wondering if it was possible to restart this year, minus the pandemic! 

Coming back to the modular, it is folded from 18 modules and is similar to the Mette Ring. In the mette ring, the final step is folding the module into 2. This step is not included in the New Year's star. Instead, the unfolded modules are slipped into the little pockets to form the star. Though I assembled it with glue, it can be done without glue. I used 2 inch squares and 2 colours, in the classic black and white combination. And I quite like the way it has turned out. 


Model Details:

Model: New Year's Day Star

Creator: Paolo Bascetta

Difficulty Level: Low Intermediate

Paper Ratio: Square

Paper Size: 2 inches

Model Size: ~ 4 inches across

Number of Modules: 18

Tutorial: Youtube

Diagram: Free Download

Continuing with the project from my last post, I worked on a pen stand, using the same colour combination - dark purple, mauve and cream. It was again done using the coiling technique, using newspaper tubes.

Weaving the tray was easier because of the larger surface area. And another problem was maintaining evenness in the sides of the pen stand. I haven't completely succeeded in this regard!


The close up shows the colours and the smooth weave. And once I glazed it, I ended up with an incredibly strong pen stand! I just hope my brother likes it and finds it useful :)

And finally, here is a picture of the pen stand and the tray. I am quite pleased with how they have both turned out, but I think I will take a break from weaving using the coiling technique! It is quite time-consuming and frankly speaking, very addicting 😅😅


Model Details:

Model: Triangular Pen Stand

Difficulty Level: Complex

Tutorial (making newspaper tubes): Youtube

Tutorial (coiling or root-weaving technique): Youtube

After completing the woven Mother's Day bowl, it appears that I still am a glutton for punishment 😅😅 I tried out more of the coiling technique, using newspaper tubes. Well, I had a second reason for going ahead with this tray - my brother's birthday had just gone by and thanks to coronavirus, I was unable to gift him what I had wanted. So handmade it was!

The triangle is a shape I haven't attempted before and I am happy with the way it has turned out. I love the slight curve in the sides. I also added some tubes in the edge, as handles for the tray. I don't know what purpose they would serve, but I like the way they look!


As far as the colours go, I went with a combination of purple and cream tubes. The purple was in 2 shades, since I wanted to do a gradient in the weaving. The darker purple was achieved by adding a little black acrylic to mauve acrylic paint. This resulted in a rich dark purple which was a pleasure to work with! The lighter purple was mauve with a dab of white acrylic paint mixed in. I wasn't too happy with the way the cream turned out! I wanted a mellower version. I need to experiment more with this colour.


I love this closeup of the weaving! Absolutely adore the way it has turned out. The weaving is the smoothest I have achieved since I started experimenting with coiling or root weaving technique.

I have also decided on weaving a pen stand, using the same technique and the same colours. Will have to see how that works out!

Model Details:

Model: Triangular Tray

Difficulty Level: Complex

Tutorial (making newspaper tubes): Youtube

Tutorial (coiling or root-weaving technique): Youtube


Apparently, tissue holders continue to be my Achilles heel, when it comes to newspaper weaving! After my previous attempt at weaving a snail-shaped tissue holder, my second attempt did not turn out to be much more of a success! 

This time, my attempt was weaving an oval base with a couple of half rings. This is based on a combination of pictures I had seen on Pinterest. But while the theory was quite fine, the execution still needs work. 

On the plus side, I am very happy with the way the oval base turned out! This is one of the few times I have managed to weave an oval without distorting its shape! The rings, of course, need a lot of work! 

Model Details:


Model: Tissue holder


Difficulty Level: Complex

Tutorial (making newspaper tubes): Youtube


I love making origami earrings, especially since Little Miss is at an age where she appreciates and wears them! So recently I managed to dig out some of the earrings that I had made in the past and put them together so that she could use them as and when she wanted to. 

Her absolute favourite was the one made from red/gold chiyogami paper. This paper is amazing to make origami jewelry from - it has that rich look to it that adds so much elegance to the product. A couple of dangles and fish hooks completed this beautiful pair!


These pink earrings were folded from pearlised momogami paper. A couple of artificial pearls and the earring was ready to be worn. 


The final set that she liked was this black set made from black/gold chiyogami paper. I added some gold chains to the earrings and I thought it went well with the look and feel of this pair.


Today being Mother's Day, I wanted to make something for my mom. Well, with the lockdown in place due to the coronavirus, shopping was out of question. Which means, I decided to try out one of my newspaper weaving projects. And so was born the Mother's Day Bowl.

The idea behind the bowl was to use one theme colour, in this case black, along with other coordinating colours, for which I chose blue, yellow and pink.

I also wanted a very sturdy base, so made use of some plywood and drilled holes into them to form the centre of the bowl. I then coated them with black acrylic paint. This was the starting point of the bowl. From there, I decided on going with the coiling or root weaving technique. This is woven freestyle, without any form.

While I love the colour combination, the finish is still not up to the mark. Naturally, this will only come with practice and as the lockdown continues, hopefully I will master this technique of newspaper weaving!


Model Details:

Model: Mother's Day Bowl

Difficulty Level: Complex

Tutorial (making newspaper tubes): Youtube

Tutorial (coiling or root-weaving technique): Youtube

As I had said in my previous post, while making the origami spiral cube, I wanted to retry this model using A5 paper instead of A4. A4 paper resulted in a fairly large cube which wasn't very appealing to me.

The coronavirus lockdown has given me ample time, so I decided to redo the model, using some lovely kami paper that I had. The paper turned out perfect for this model, since it was light enough that I could fold the spirals and assemble it easily.

Usually smaller origami models are more difficult to do than bigger ones, but in this model, I found the smaller one easier to assemble! Mainly because it was small enough to hold in hand while folding. I would definitely recommend the A5 size to the A4!


Model Details:

Model: Spiral Cube

Creator: Tomoko Fuse

Book: Let's Fold Spirals

Author: Tomoko Fuse

Difficulty Level: High Intermediate

Paper Ratio: Rectangle

Paper Size: 8.3 inches * 1.45 inches

Model Size: ~2.5 inches across

Number of Modules: 12

Tutorial: kusuda.ru

Stay home, Stay safe is the need of the hour! Well, during this coronavirus lockdown, this little horse by Oriol Esteve is one of the first origami that I tried out. Check out his Facebook post on the origami horse.

What I liked best about the origami is the suddenness with which the horse turns up! I mean, up to the 15th step, we are just folding along and there is no sign of a horse. But in 2 steps, 16th and 17th, there are 2 reverse folds and boom! You have a horse! 😄 And a super-cute little fella at that.

60 gsm paper would be the best, I thought, since there are multiple layers that are folded in the reverse folds. I used some lovely Momigami paper that I had (15 cms) which turned out to be a good decision. The final horse was about 5.75 cms.


Model Details:

Model: Horse 

Creator: Oriol Esteve

Difficulty Level: Low Intermediate

Paper Ratio: Square

Paper Size: 6 inches

Model Size: ~2.2 inches in height

Diagram: Facebook


Stay Home Stay Safe! Who would have thought that a microscopic virus could bring the world virtually to a halt?? While this pandemic has had a terrible impact around the globe, it is during the lockdown that I have been able to connect with friends from long back, get back into my blogging, work on some incomplete projects.

One of the projects is this newspaper weaving project - Making coasters from newspaper tubes, using the root weaving or coiling technique. I was kinda bored of circular shapes, so attempted something a little different. Not sure how well it turned out, but I can say for certain that the coasters are rock solid.


The holder was a last minute idea, since I had plenty of rolls left over. Turned out pretty useful too, since I didn't end up losing a coaster or two, just because they were left lying around! The edges of the holder leaves a lot to be desired and even now, I am not too sure how to go about making this, but hopefully in the future, it will get better.

On the whole, I am happy with the outcome.


Model Details:

Model: Coiled Coasters with Holder

Difficulty Level: Complex

Tutorial (making newspaper tubes): Youtube

Tutorial (coiling or root-weaving technique): Youtube


Here is another of my newspaper weaving trials - a tissue holder shaped like a snail! A couple of years back, I had tried a pot holder shaped like a snail. And had been quite happy with the way it had turned out. So, this is my next attempt to use a snail shape in my weaving. Can't say I have succeeded quite well this time! 

Anyway, my lessons learnt - need to make it bigger next time, so that the entire tissue fits in well! 

Notice in the background, my pot holder from my last post? Complete with its pot?? Quite liked how it turned out 😄


Given the intense newspaper weaving session from the last post, I decided to do something a little simpler. So here is my pair of pot holders, made in aqua and white - the colours of my parents' living room. For quite some time now, they have been asking me to weave them something that goes with their room colours. And for a looong time now, I have been putting it off - mainly because I wasn't too sure that I would do justice to their aesthetically pleasing room! 

 So finally, after much deliberation, I decided to try out a couple of pot holders, to be kept over their piano, along with a candle stand in the same colour combination. Since I needed a pair, I used the exact opposite colours, in the same pattern. 

I am quite pleased with the way it has turned out. The centre portion, made from a single tube that is twisted around the base tube, was something new. While this is not always even, I quite like the effect produced. I believe I will use the same pattern in a few more weaves in the future!


A few months back, I had made a leaf-shaped tray using the technique of coiling with newspaper tubes. I decided to revisit the tray, this time using wood-stained tubes, the same ones I had used for this box with lid. This tray is bigger than my previous attempt, measuring about 15 inches at the longest length.


I had sprayed the tubes with water mixed with a little fabric softener, about half an hour before I started weaving. This resulted in very flexible tubes that did not break or crack while weaving. I will try out other methods of coating the tubes as I make other objects using the same technique.

Very happy with how even the weaving turned out. The closeup of the tray brings that out very well.


Finally tried out a new finish. I came across this style of finishing the edges, during my usual perusals on Pinterest and was quite fascinated by this. I feel this style is much better than the usual edging. This gives a very professional look to the product and has a very leathery appearance. I messed up the ending, but I have learnt from that and should do better next time.

Model Details:

Model: Tray

Difficulty Level: Complex

Tutorial (making newspaper tubes): Youtube

Tutorial (coiling or root-weaving technique): Youtube 

Tutorial for the edge: Youtube