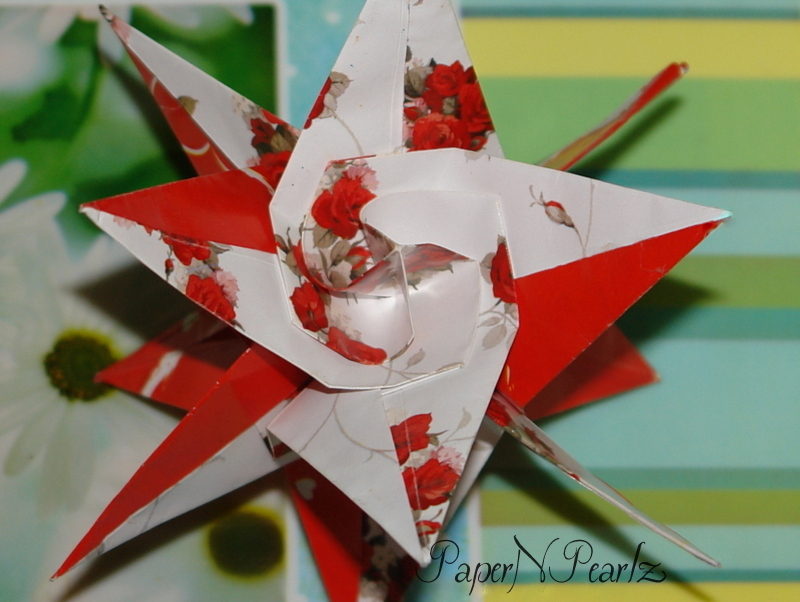
The Snow-capped Sonobe is another variation on the Sonobe created by Mitsunobu Sonobe. This variation is created by Meenakshi Mukerji and is from her book 'Marvelous Origami'. 

Two-sided paper, coloured on one side works best for this model, though that is not what I have used!

Model Details:

Model: Snow-capped Sonobe 

Creator: Meenakshi Mukerji

Book: Marvelous Origami
 

Author: Meenakshi Mukerji
 

Difficulty Level: High Intermediate

Paper Ratio: Square

Paper Size: 3 inch squares

Modules: 12
Christmas is almost here!! I love this time of the year. And this year, to add to the usual joy of Christmas, I will also try and add as many posts on Christmas origami as possible :) And to kickstart this season of love, here is a Sunken Sonobe 3 unit assembly.

The usual 3 unit sonobe assembly is called Toshie's Jewel, folded by Toshie Takahama. The sunken sonobe is a variation from the sonobe units, one I like a lot! The units are not that easy to assemble, at least the 3-unit version of sunken sonobes, but they make lovely Christmas tree decorations.

Model Details:

Model: Toshie's Jewel and Sunken Sonobe

Creator: Toshie Takahama

Difficulty Level: Low Intermediate

Paper Ratio: Square

Paper Size: 3 inch squares

Modules: 3

Instructions: Sonobe Unit, Assembly 

This is actually a very simple modular star, made from simple square bases. I had actually done this as a wealth-from-waste project, using some left over wedding invitations that my brother had given me. His invites were a gorgeous combination of red and white and I also loved the texture of the card. So I reused the card to make a simple star ornament. Just a bit of glitter and I was done.

And I will also post a tutorial on making the star. It is quite simple and would make lovely Christmas decorations..

Model Details:

Model: Simple Modular Star

Difficulty Level: Simple

Paper Ratio: Square

Paper Size: 5 inches

Number of Modules: 5

Instructions: PaperNPearlz

The Icosahedral Star is a modular origami from Miyuki Kawamura's book 'Polyhedron Origami'. The star is made from 30 Star Modules. The modules are quite simple to make and can be used to form quite a few other stars as well such as Cube Star, Octahedral Star, Cuboctahedral Star.

Each of the pointed ends in the Icosahedral Star is made from 3 modules. 19 such points are required for the star.

The model isn't very stable though, and does require some glue. It looks good in almost any paper.

Model Details:

Model: Icosahedron Star

Creator: Miyuki Kawamura

Book: Polyhedron Origami

Author: Miyuki Kawamura

Difficulty Level: Low Intermediate

Paper Ratio: Square

Paper Size: 4 inches

Number of Modules: 30

Tomoko Fuse's book 'Origami Rings and Wreaths' is an absolute treasure trove if you are interested in making origami rings and wreaths.

This model that I tried out, called the Ring 16, is made up of 12 modules. It works best with double-sided paper, so I used some of my very precious, very new double-sided paper to make this pretty ring.

Folding the individual modules is also simple but does involve popping out paper a couple of times. This should be done with care, since the paper might tear quite easily while pulling it out.

So, with yet another ring/wreath, it appears that I am getting ready early for Christmas this year!!

Model Details:

Model: Ring 16

Creator: Tomoko Fuse

Book: Origami Rings and Wreaths

Author: Tomoko Fuse

Difficulty Level: Low Intermediate

Paper Ratio: Square

Paper Size: 3 inches

Number of Modules: 12

Yet another ring from the book 'Origami Rings and Wreaths' by Tomoko Fuse. This one is just the perfect thickness that makes it a perfect addition to my Christmas wreath collection.

I had used some Christmas wrapping paper and I love the mix of red and green in the ring. The ring is made from 16 squares. I had used 3 inch squares and the final ring measured about 4.5 inches in diameter - not big enough to hang on the door, but would look good on our Christmas tree. I even added a loop at one end to help hang it up.

Model Details:

Model: Ring 10

Creator: Tomoko Fuse

Book: Origami Rings and Wreaths

Author: Tomoko Fuse

Difficulty Level: Low Intermediate

Paper Ratio: Square

Paper Size: 3 inches

Model Size: 4.5 inches in diameter

Number of Modules: 16

Tomoko Fuse's modular ring from her book 'Origami Rings and Wreaths'. This is among the first wreaths described in the book and is made from double sided paper.

I used some lovely double-sided paper, with pastel shades on one side and flowers on the other. The wreath is made form 8 modules and will make a great addition to my Christmas crafts!

Model Details:

Model: Wreath 

Creator: Tomoko Fuse

Book: Origami Rings and Wreaths
 

Author: Tomoko Fuse
 

Difficulty Level: Low Intermediate

Paper Ratio: Square

Paper Size: 3 inches
I recently bought Tomoko Fuse's 'Unit Polyhedron Origami' and I was immediately tempted to try out one of the first models described in the book - the regular polyhedron.

It is an interesting model to make and I must say I love the end result :) Assembly is slightly difficult in the initial stage, where you have each module trying to come apart. But after around 7 modules have been added, adding the rest is quite easy.

I will probably be trying out more from this book; there are quite a few lovely models explained in the book.

Model Details:

Model: Regular Dodecahedron 

Creator: Tomoko Fuse

Book: Unit Polyhedron Origami
 

Author: Tomoko Fuse
 

Difficulty Level: Low Intermediate

Paper Ratio: Square

Paper Size: 5 inches

Modules: 12

Isn't this guy really, really cute! Especially that little tail!

When I saw the tutorial on Youtube, I simply had to make one immediately. It is actually quite easy to make and resembles an elephant quite well :) This one that I had done was from a 4 inch square paper (since I didn't have a grey in any other size), but I was still able to finish the elephant quite easily.

Model Details:

Model: Elephant 

Origin: Traditional

Difficulty Level: Simple

Paper Ratio: Square

Paper Size: 4 inches

Tutorial: Youtube 

The Mette's rings were created by Mette Pederson. She has published 7 books based on the Mette Units.

This is actually a 2D ring, made from 18 modules. But a slight variation in the last fold makes it a 3D variation and is made of 12 modules.

Model Details:

Model: Mette's Ring Variation

Creator: Mette Pederson

Book: Mette Units

Author: Mette Pederson

Difficulty Level: Low Intermediate

Paper Ratio: Square

Paper Size: 3 inches

Diagram: Mette Units

Modules: 12
The Stellated Dodecahedron, commonly called the Bascetta Star is a very popular modular origami and was designed by Paolo Bascetta. This spiky star becomes especially famous during the Christmas season. Though there is still some time for Christmas, I decided to give this a go.

It is a very simple design to work on and will be a good one for beginner origamist who wish to do some modular origami. As with most modular origami, folding the individual modules is an easy job and creating the star from the modules is slightly more complicated.

The design works best with dual coloured paper.

Model Details:

Model: Stellated Dodecahedron (Bascetta Star)

Creator: Paolo Bascetta

Difficulty Level: Low Intermediate

Paper Ratio: Square

Paper Size: 4 inches

Number of Modules: 30 Units

Tutorial Link: Youtube

While I really do not understand this passion that most origamists have for folding birds and animals, I did not want to be left behind when it came to folding them :) And since I love dogs very much, when I came across this Scottish Terrier by Peterpaul Forcher, I decided to give it a go.

It wasn't a piece of cake and I was not able to fold it well during the first couple of attempts. But I did finally manage to make it. Sorry about all those creases that you see, but the paper I had used wasn't the best.

If you are attempting the origami, then note that if you follow the instructions accurately, there will be a little elevated fold in the dog's back (right next to the tail). To make this disappear, you will need to sink that jutting portion to get the shape right.

Model Details:

Model: Scottish Terrier 

Creator: Peterpaul Forcher

Difficulty Level: High Intermediate

Paper Ratio: Square

Paper Size: 8 inches

Model Size: ~3 inches in height

Instructions: Carmen's Origami 

The traditional origami butterflies are always great to make. They work with any kind of paper - origami paper, copy paper, gift wrapper and any other that we can lay our hands on.

These butterflies are easy to make and would be good as a little something on the wall I think. Small size is the key. Paper size 3-4 inches is a good size.

Model Details:

Model: Traditional Butterfly 

Origin: Traditional

Difficulty Level: Simple

Paper Ratio: Square

Paper Size: 3 inches

Instructions: David Petty's Origami

The butterfly for today is designed by Rikki Donachie. What I liked most about this butterfly is how beautiful and natural the wings came out. If you stick the body of the butterfly to a wall, the wings make it seem that the butterfly is really flying :) Loved it!

This butterfly looks great when using paper in contrasting colours on both sides. In that case, the butterfly wings would be in one colour and the rest of the butterfly in the contrasting colour.

Model Details:

Model: Rikki Donachie's Butterfly 2

Creator: Rikki Donachie

Book: It's Just a Bit of Paper
 

Author: Rikki Donachie
 

Difficulty Level: Low Intermediate

Paper Ratio: Square

Paper Size: 3 - 4 inches

Instructions: Its Just a Bit of Paper Origamik

Tutorial:Youtube

These simple butterflies were designed by Fatima Granadeiro, a Portuguese origamist.

All kinds of paper works for this model. Smaller sized squares are better. 2-4 inches squares work well. Paper in contrasting colours on both sides would result in a butterfly with one colour for the wings and another for the head.

Model Details:

Model: Fatima Granadeiro Butterfly 

Creator: Fatima Granadeiro

Difficulty Level: Low Intermediate

Paper Ratio: Square

Paper Size: 3 - 4 inches

Instructions: Paper Unlimted's post has the diagram. To go directly to the instructions pdf, click here

The Kawasaki butterfly is yet another easy butterfly, made from half a square - economical and pretty! The creator is the amazing Toshikazu Kawasaki, better known for his origami rose. The butterfly can be found in his book 'Origami Dream World - Flowers and Animals'. 

Model Details:

Model: Butterfly 

Creator: Toshikazu Kawasaki

Book: Origami Dream World - Flowers and Animals
 

Author: Toshikazu Kawasaki
 

Difficulty Level: Simple

Paper Ratio: Rectangle in ratio 1:2

Paper Size: 3 inches by 1.5 inches

Tutorial: Youtube


Akira Yoshizawa's butterfly is one of the prettiest butterflies I have folded. The butterfly starts from a waterbomb base. There are precisely 4 folds following the waterbomb base and voila! You have a beautiful butterfly.

The beauty of this butterfly lies in the simplicity of the folds. This was amongst the initial origami that I folded and I assure you, if you are a beginner origamist, this is a must-fold.

Have a go at it :)

Model Details:

Model: Butterfly 

Creator: Akira Yoshizawa

Difficulty Level: Simple

Paper Ratio: Square

Paper Size: 4 inches

Tutorial: Youtube 


We are already into the 7th month of the year! Amazing how time flies..

And to kickstart the second half of the year, here is Tomoko Fuse's Little Turtle kusudama. This is another favourite of kusudama folders since it is not very difficult to make but looks stunningly beautiful when made in wrapper paper. The name comes from the shape of the modules which kinda resembles a turtle :)

This kusudama is made from 30 units but can also be made from 4, 6, 12 and 24 units and there are also a lot of various possible as well.

Model Details:

Model: Little Turtle Kusudama 

Creator: Tomoko Fuse

Book: Multidimensional Transformations Unit Origami
 

Author: Tomoko Fuse
 

Difficulty Level: High Intermediate

Paper Ratio: Square

Paper Size: 4 inch squares

Modules: 30

Tutorial: Youtube

This heart bookmark, designed by the amazing Francesco Guarnieri, is an elegant yet simple bookmark. It would make a great Valentine day's gift I am sure :) 

The design includes a whole lot of pre-creasing followed by collapsing heart into shape. Step 8 in the diagram is the most difficult step I think. But if the mountain and valley folds are followed accurately, this shouldn't be a very difficult task. 

I used 80 gsm paper with little hearts printed on it. Small sized squares work best. The 3-inch square I had used, resulted in a 1.5 inch heart, perfect for a book corner. 

Model Details:

Model: Heart Bookmark 

Creator: Francesco Guarnieri

Difficulty Level: Low Intermediate

Paper Ratio: Square

Paper Size: 3 inch squares

Model Size: ~1.5 inches across

Diagram: Origami-cdo 

The Sham, designed by Mio Tsugawa, is a ball-like modular origami made from 30 units. The modules aren't very complicated to make and the assembly is also fairly easy. The model does not require glue to hold it together, but I did add some, so that it does not fall apart easily.

My model was supposed to be done entirely in purple but then I decided to add a band of modules in another colour. I love this combination of purple and pink. I had used a rectangle of size 6 inches by 3 inches and the resulting ball measured about 12 inches in diameter, a bit too big for my liking.

A note on the paper: I have used handmade paper for this model. This is not the best paper to use, since it does not crease well or hold shapes accurately. Hence the use of glue! But origami paper in the size 4:2 inches should result in an excellent Sham.

Model Details:

Model: Sham 

Creator: Mio Tsugawa

Difficulty Level: Low Intermediate

Paper Ratio: Rectangle in ratio 1:2

Paper Size: 6 inches * 3 inches

Model Size: ~12 inches in diameter

Modules: 30

Tutorial: Youtube

Instructions: Origamio.com

A Decahedron is a solid polyhedron with ten plane surfaces. As per the wiki, there are 32300 topologically distinct decahedra!

The decahedron is yet another design from John Montroll's 'A Plethora of Polyhedra in Origami'.  The design is for a decahedron made up of 10 equilateral triangles and is of intermediate difficulty.

The paper that I have used is hand made paper with streaks of gold in it. I found the paper great for folding the model. And I like the end result as well.

Model Details:

Model: Decahedron 

Creator: John Montroll

Book: A Plethora of Polyhedra in Origami
 

Author: John Montroll
 

Difficulty Level: Low Intermediate

Paper Ratio: Square

Paper Size: 7 inch squares

The Braided Paper, designed by J C Nolan, is a very beautiful origami to fold. It does require some practise to fold it and one that I had tried when I was just a beginner in origami and failed.. It was quite some time after that that I tried another of J C Nolan's design, Andrea's Rose. Now I finally had enough confidence to give Braided Paper another try. And I did it! It is such a beautiful design that I am thrilled that I finally managed to do it! :)

I loved the paper that I used for this design, the same banana paper that I had used for Floral Top. The paper is crisp and thin but strong and very good for folding this model.

A square of 8 inches are higher would be ideal when trying this design for the first time. Anything smaller would lead to a lot of frustration when making the reverse and pleat-sink folds for the model.

Model Details:

Model: Braided Paper 

Creator: J C Nolan

Book: Creating Origami
 

Author: J C Nolan
 

Difficulty Level: High Intermediate

Paper Ratio: Square

Paper Size: 9 inches

Tutorial: Origami CZ  

There are quite a number of origami butterflies that have been designed. But there are relatively few origami butterfly bookmarks. And of those few, I think the most beautiful is Grzegorz Bubniak's bookmark.

I have stagnated in my folding these days, haven't really tried new things. So this bookmark made an interesting change. I found the steps to be more complex than what I have attempted so far. But despite that, the instructions were clear enough that I could follow and complete them.

The difficulty level for the bookmark is intermediate, I would say. Moving from step 4 to 5 presented the first challenge for me. Going from Step 9 to 10 was also interesting. I had to closely follow the valley and mountain folds to complete the step. I also needed to figure out how to make a swivel fold.

Model Details:

Model: Butterfly Bookmark 

Creator: Grzegorz Bubniak

Website: GregOrigami
 
 
Difficulty Level: High Intermediate

Paper Ratio: Square

Paper Size: 5 inches

Tutorial: Youtube

Diagram: Dev.Origami

These baby booties, designed by Katsushi Nosho, are easy to make and look very pretty. They would look lovely as decorations or favours for a baby shower.

The booties are held together by a bow, just like real booties! I made these from 8 inch squares and they turned out to the size of a new born baby's foot! But, don't try it out on a baby though ;)

The booties can also be strung together to form a hanging ornament.


Model Details:

Model: Booties 

Creator: Katsushi Nosho

Book: Essential Origami
 

Author: Steve and Megumi Biddle
 

Difficulty Level: Low Intermediate

Paper Ratio: Square

Paper Size: 8 inches

Model Size: ~3 inches side

Instructions: Origamii 

The XYZ Diamonds is another planar origami model, made from 3 intersecting diamonds. The design is by Francis Ow, the well known folder/creator of origami hearts.

Though it looks like there are only 3 planes, joined in the middle as though by magic(!), the planar model is actually made of 6 modules. Accuracy is required in folding the modules, else fitting each unit into the next is almost impossible. The first 4 modules can be fitted in easily. The last 2 are not that easy and this is where accuracy of folds makes a difference.

The model works best with 3 colours and 2 modules of each colour.

Model Details:

Model: XYZ Diamond 

Creator: Francis Ow

Difficulty Level: Low Intermediate

Paper Ratio: Square

Paper Size: 5 inch squares

Modules: 6

Instructions: Dave's Origami Emporium

Tutorial: Youtube


I finally present the very famous Cherry Blossom Kusudama, designed by none other than Tomoko Fuse. Cherry blossoms are usually white or pink in colour but I decided that my kusudama need a bit more colour, so here is a vivid red(orange??)-with-flecks-of-white kusudama :)

The kusudama is made from 30 squares of paper; folding the individual units is the easy part, though it is more complex that most other kusudama units. The fun starts when you assemble the units. Assembly is in groups of 3. Inserting the third unit was a challenge at the beginning. Imagine doing that for all the groups! Phew! The 3-unit groups are put together in 5s and as soon as you assemble your first five, you can see the cherry blossoms emerging. You just need to round off the petals so that it looks more like a petal and less like a diamond..

And.. Tada!! Your very own cherry blossom kusudama! Ok, it does take time and effort and patience and the will to complete it, but it is soon done..It is recommended to use squares that are 5 inches or more, else it gets even more difficult to assemble it. I have used 4.5 inches square here.

The design first appeared in the Origami Tanteidan Magazine (Vol 12, Issue 72). It also includes a section on making little petals that can be folded and inserted into the flower, but I felt that the cherry blossom ball looks better without that. So I left that out.

Model Details:

Model: Cherry Blossom Kusudama 

Creator: Tomoko Fuse

Book: Origami Tanteidan (Vol 12, Issue 72)
 
 
Difficulty Level: High Intermediate

Paper Ratio: Square

Paper Size: 4.5 inches

Model Size: ~5 inches in diameter

Modules: 30

Tutorial: Youtube 

The Just Twist Twirls are these beautiful modular flowers created by Krystyna Burczyk. These twirly creations, when curled correctly and tightly, hold together very well and form quite sturdy structures.

This flower is made from 10 triangles cut out of a square on the diagonal. And there is absolutely no folding involved; only twirling :) The twirls come out much better when the paper is coated with a dab of water. The water helps the paper to bend much better and once it is dry, the shape is also held better.

Thick paper is recommended, since regular origami paper will not be sufficiently strong to hold the shape. I have used 120 gsm paper in 2 different colours and am very happy with the way these flowers turned out.

Model Details:

Model: Just Twist Flower 

Creator: Krystyna Burczyk

Difficulty Level: Low Intermediate

Paper Ratio: Triangle cut along the diagonal of a square

Paper Size: 3.5 inch squares

Modules: 10

Tutorial: Youtube 

The Blütenkreisel or the Floral Top, is designed by Carmen Sprung, the creator of the Kantenmodul. The origami starts from an octagon rather than a square. The flower is actually very realistic to look at (my photo does not do justice to the origami) and I enjoyed folding it.

The paper that I had used for this model was actually banana paper that I had bought during my last origami-paper-buying-spree. I loved the feel of the paper; it has a very crisp touch and folds beautifully and I just had to use it today. So there you have, a green coloured flower! :)

Model Details:

Model: Floral Top / Blütenkreisel 

Creator: Carmen Sprung

Difficulty Level: Low Intermediate

Paper Ratio: Octagon

Paper Size: 8 inches side

Instructions: Carmen's Origami Site 

Did you know that the Platonic Solids were named after the Greek philosopher Plato? He believed that these were the fundamental components of nature and associated fire to the tetrahedron, earth to the cube, air to the octahedron, water to the icosahedron and the element cosmos to the dodecahedron.

As the name suggests, the Octahedron has got 8 sides, each of them equilateral triangles. I had thought that folding it would be more difficult than the Cube, but surprisingly, I found it easier to fold this! It is completely folded as a 2-dimensional model, till the last step where it is inflated to form the 3-dimensional Octahedron. The dual of the Octahedron is the Cube.

Model Details:

Model: Octahedron 

Creator: John Montroll

Book: A Plethora of Polyhedra in Origami
 

Author: John Montroll
 

Difficulty Level: Low Intermediate

Paper Ratio: Square

Paper Size: 5 inch squares

The Rose Brooch designed by Sy Chen, is a modification of Toshie Takahama's Rose Brooch. It looks best when folded in a dual coloured paper, one side green and the other, possibly red.

The rose isn't very difficult to fold as there are clear instructions available for download, both from Sy Chen's website and from other sites. There is also a video on how to make the brooch.

Model Details:

Model: Rose Brooch 

Creator: Sy Chen

Difficulty Level: Low Intermediate

Paper Ratio: Square

Paper Size: 7 inches

Diagram: Sy's Paper Folding Page

Tutorial: Youtube

I have been trying out one of Tomoko Fuse's designs from her book, 'Floral Origami Globes'. And it has taken me quite some time to complete it, five days to be precise! Not something that should be attempted if you wish to complete your origami quickly.

The model is made from 60 rectangles, 30 for making the pyramid units and 30 for the bows that are seen in between those little pyramids. After making these, the bows are placed inside the pyramid units so that only the bows are seen. Then they are assembled as one unit. It looks best when the pyramid units and the bows are in different colours, so that the bows are more clearly seen.

The model isn't really difficult to make. Making the units is quite easy though it takes some time. Assemling has to be done carefully. Care should be taken that there are 5 pyramids at each meeting point.

6 of these units can also be assembled into a model, which is what I plan on doing next. I intend to convert this into a hanging ornament; you can see the thread that I had added before completing the assembly. So I will be combing this with the 6 unit model and making it into an ornament.

Model Details:

Model: Floral Origami Kusudama with Covered Bows 

Creator: Tomoko Fuse

Book: Floral Origami Globes

Author: Tomoko Fuse

Difficulty Level: High Intermediate

Paper Ratio: Square and Rectangle in ratio 1:2

Paper Size: 5 inches by 2.5 inches and 5 inch squares

Model Size: ~4 inches in diameter

Modules: 60

The WXYZ, created by Tung Ken Lam, had set in motion the creation a series of planar models by various origamists including Francis Ow, David Petty, Satoshi Kamiya and Meenakshi Mukerji. The WXYZ is among the simplest of the planar models and is made up of 4 intersecting triangles.

It is quite simple to fold though the assembly will take up some time. I am glad I finally managed to do a planar model though the colour combination isn't the greatest! The red and orange together don't stand out quite that well.

These models have a unique naming convention, which is based on geometric principles. The number of letters used is the same as the number of planes in the model. Thus WXYZ would mean it has 4 planes.

Model Details:

Model: WXYZ Planar Model 

Creator: Tung Ken Lam

Book: Origami A-B-C

Author: David Petty

Difficulty Level: Low Intermediate

Paper Ratio: Square

Paper Size: 4 inch squares

Model Size: ~5 inches from tip to tip

Modules: 12

Diagram: British Origami


The Congratulations Crane or the Kotobukizuru is a variation of the traditional crane and is also a traditional design. It is a Japan custom to fold these cranes when congratulations are in order, such as a wedding.

It isn't exactly easy to make but it isn't too complicated either. And though it is a traditional design, it isn't a very common one that we see in origami books. So it is a different design to try out and is bound to garner more interest than the traditional peace crane.

The Congratulations Crane is described in the book 'Essential Origami' by Steve and Megumi Biddle. The same crane is also described in the blog 'Origami Weekly', although there it is described as 'Hiroshima Crane'.

The only difference between the 2 cranes is in the way you arrive at Step 16 of the crane described in 'Origami Weekly' (Step 11 in 'Essential Origami'). Whereas 'Origami Weekly' describes steps including a sink and a couple of inside-out turns, the steps described in 'Essential Origami' are simpler to do. From then onwards, both the instructions are the same.

As for the paper to be used, origami washi paper is the best fit for this model since the squashes require paper that does not tear easily.

Model Details:

Model: Congratulations Crane 

Origin: Traditional

Book: Essential Origami

Authors: Steve and Megumi Biddle

Difficulty Level: Low Intermediate

Paper Ratio: Square

Paper Size: 6 inch squares

Tutorial: Youtube

Diagram: Origami Weekly 

This Cherry Blossom dish is made from 5 squares and includes glueing. It is quick to make and comes out looking really good. I didn't really like the choice of paper I had used but I did manage to make it.

There is a kusudama, made from these units as well. It is a dodecahedron (a 12 pentagon ball) and is made up of 12 flowers, each with 10 petals. So it is made of 120 modules! A bit too much for me right now :)

Model Details:

Model: Cherry Blossom Dish 

Origin: Traditional

Difficulty Level: Low Intermediate

Paper Ratio: Square

Paper Size: 4 inches

Modules: 5

Instructions: Origami-Instructions

Tutorial (for making the Cherry Blossom Kusudama): Youtube

As kusudamas go, this is an easy kusudama, in the sense that, instead of folding 20 to 30 units, this origami needs only 6 units per kusudama. So the time spent on each of these modulars is much lesser.

That said, each module is a little more complex than the usual kusudama modules. The unit starts with a water-bomb base and involves a squash fold at the tip. Finally, after completing the folds, the module is opened up, with extra care, as it is very easy to rip up the squash fold.

Assembly is just a matter of sliding one module under the adjoining one. Not to worry, it holds firm without any glue.

Finally, a word on the paper used. Regular printer paper works best for the model. With regular 60 gsm origami paper, the problem I faced was during assembly. Sliding one module under the other needed a lot of care since 60 gsm paper gets crushed very easily. But with 80 gsm printer paper, this was not much of an issue. Naturally, the printer paper kusudama was more sturdy than the origami paper one.


Model Details:

Model: Quick Kusudama 

Creator: Nina Ostrun

Difficulty Level: Low Intermediate

Paper Ratio: Square

Paper Size: 3.4 inches

Model Size: ~3 inches in diameter

Modules: 6

Diagram: Kusudamas.narod.ru

Tutorial: Youtube 

The Scaled Octahedron is yet another modular origami that I have had the pleasure to work on, in recent days. It is not the easiest piece that I have made, mainly because of all the different size square that are needed.

The one that I have made required a total of 24 squares and 12 rectangles. The 24 squares were converted into 6 pyramids of 4 levels each. The number of levels in the pyramids can be changed as desired - in multiples of 4. So instead of 4 levels, one can also do the same with 5 per pyramid or even with just 3 levels per pyramid. The number of rectangles remain the same - these are the units needed to connect the various pyramids together.

The size of square paper for making the pyramidal modules change for each level. If we assume 'x' is the side of the smallest level, then the side of the next level is 1.5x. Followed by 2x, 2.5x and so on. So in my case, I started with 2 inches squares, 3 inches, 4 inches and 5 inches. The rectangular connectors have one side that is the same as the largest square (5 inches in my case), the other size is a quarter of this side. For me, this was 1.25 inches. A total of 12 rectangles are needed.


Folding the individual modules is fairly easy. Assembly is a little more challenging. It is better to use printer or copy paper for this model. For one - it is firmer which makes assembly a lot easier. And for another, the back of the paper is also visible, which means the white part of single-sided paper will be seen and that is not a very pretty sight for this model.

Model Details:

Model: Scaled Octahedron 

Creator: Laura Azcoaga

Difficulty Level: Low Intermediate

Paper Ratio: Squares and Rectangles

Paper Size: 2 inches, 3 inches, 4 inches and 5 inches squares + 5 inches * 1.25 inches rectangles

Model Size: ~8 inches across

Modules: 36

Instructions: Origami Modular en Argentina

Tutorial: Youtube


Philip Chapman-Bell's origami creations on Flickr has got such beautifully flowing and aesthetically pleasing lines that, when I came across the instructions for making the Zhoubi bowl, I didn't hesitate to try it out.

He notes on his blog, The Fitful Flog, that the design is based on an illustration from an ancient Chinese mathematics text. The bowl, which starts with dividing into sevenths, is relatively easy to fold and results finally in an elegant piece of origami.

For folding this bowl, I used leftover wall paper in dark brown and ivory cream. The thickness of the wall paper meant the bowl was fairly sturdy and the patterns and texture of the paper stand out beautifully. A square of at least 8 inches is needed. Else the bowl would be too small to serve any purpose. The bowls I have made are now Little Miss's clip bowls.


Model Details:

Model: Zhoubi Bowl 

Creator: Philip Chapman-Bell

Difficulty Level: Low Intermediate

Paper Ratio: Square

Paper Size: 9 inch squares

Model Size: ~7 inches from tip to tip

Instructions: Steve's Paper


SaveSave

Today is Good Friday, the day when Christ's crucifixion and death on the cross is remembered by Christians world over.

On this day of sacrifice, I folded this traditional cross from a strip of paper in the ratio 1:30. We usually fold this cross from palm leaves on Palm Sunday, but to me, the meaning of the cross is more profound on Good Friday. So I love folding this cross every year on this day to remind myself of Christ's amazing sacrifice for man.

I usually make this cross from 10 mm quilling strip - the perfect paper for making strip origami, be it stars or crosses! Here though, I have used single-sided paper and this has given me a small square in the centre.

Model Details:

Model: Cross 

Origin: Traditional

Difficulty Level: Simple

Paper Ratio: Strip

Paper Size: 1 cm by 30 cms

Instructions: Origami Resource Center 

These earrings are made from a variation of the sonobe units, created by Mitsonobu Sonobe. They are easy to make and look very elegant. They actually look much prettier that this :) My photographic skills at fault here.

They are made up of 3 modules each. Each module takes about a minute to make, so creating the unit takes about 10 minutes maximum! Add a couple of beads and earring hooks and voila! You have a very nice pair of earrings.

I initially tried making it with 1 inch squares, but they turned out to be too small and all details were lost. This is made from 1.5 inch squares. I guess even 2 inch squares will look good.


Model Details:

Model: Diamond Earrings from Sonobe Units 

Creator: Mitsonobu Sonobe

Difficulty Level: Simple

Paper Ratio: Square

Paper Size: 1.5 inches

Modules: 3

Tutorial: Youtube 


The spiral star is very elegant, intricate-looking origami which is surprisingly easy to make. Assembling the piece is quite easy if you use a cheat's way out.. some paper clips to hold the sides together :D

The modules start with a bird base. They are then twisted into spirals and then the modules are attached along the arms.

I loved the colour combination of red and white that I had chosen for this piece. And I loved the way the photographs have come out too.

Model Details:

Model: Spiral Star 

Creator: Grzegorz Bubniak

Difficulty Level: Low Intermediate

Paper Ratio: Square

Paper Size: 5 inches

Modules: 6

Crease Pattern: Gregorigami

Tutorial: Youtube 

There are plenty of origami vases, ranging from the ultra simple to the super complex. This vase is a simple one and shouldn't take a few minutes to complete.

As with a lot of my origami, I folded this from wrapper paper. I love how both these vases turned out! The glossiness in the paper adds a shine which looks great in my opinion.

The vase does require glue to hold the folds in place, but is still a good design to fold.

Now all that remains is making the roses/flowers that should go into the vase :)

Model Details:

Model: Chinese Vase 

Origin: Traditional

Difficulty Level: Simple

Paper Ratio: Square

Paper Size: 6 inches

Tutorial: Youtube 

So, remember the kiddie bracelets that I had made about a month back? For my daughter and her friends? And remember I promised a tutorial for that?? So here is my promised tutorial. It is quite simple to make, so have a go..

What you will need:
  • Rectangular pieces of paper. You will need an even number of pieces. Around 20 - 22 pieces works for a regular size. You might need more or less depending on the size of the pieces.
  • If the paper you are using is thick (like copy paper, handmade paper, wrapper paper) and if the edges are smooth (if you have used scissors or a paper cutter, then the edges will be smooth), then cut out rectangles in the ratio 1:4. 1 inches by 4 inches is a good size to start with.
  • If the paper you are using is thin (like most magazine paper) or if the paper does not have even edges, then cut out rectangles in the ratio 1:2. 2 inches by 4 inches is the usual size I use for bracelets I make for adults. 1.5 inches by 3 inches works well for my daughter's bracelets.
  • Tweezers or something sharp to help insert the last bit
Instructions:

Making the Unit - Type 1


If you have cut rectangles in the ratio 1:4, then make units following these steps (Click the picture above for a larger image):
  1. I have used 3 colours for the bracelet. White, black/white, black.
  2. Fold the rectangle in half, along the longer edge.
  3. Fold in half to form a smaller version of the long rectangle. This is the completed unit. Repeat the same steps for the remaining units as well.
Making the Unit - Type 2


If you have cut rectangles in the ratio 1:2, then make units following these steps. There are a couple more steps involved, but the resulting braclet is sturdier than the first one. (Click the picture above for a larger image):
  1. I used wrapper paper with a blue design on the front and plain blue on the back. I have started with the plain blue at the top.
  2. Fold in half length-wise.
  3. Unfold.
  4. Fold the right edge to the central crease from Step 2.
  5. Repeat with the left edge.
  6. Refold along the central crease from Step 2.
  7. Fold in half, from top to bottom. This is the completed unit. Repeat for the remaining units.
Making the Bracelet Chain

  1. All the units beautifully folded before making the bracelet! :)
  2. Hold one unit vertically and fold another unit around it horizontally, leaving enough space for inserting another unit. In the picture, the white is wrapped around the black.
  3. Fold the leg of the vertical piece as shown. The leg will now aligned with the horizontal unit.
  4. Fold the triangular leg back so that it lies on the horizontal unit. The clip is not necessary. I just needed something to hold the fold in place while photographing it!
  5. Flip over so that the edge AB becomes BA. The leg is now at the top.
  6. Repeat Step 3 again, as in the picture.
  7. Fold over the triangular leg as in Step 4.
  8. Add the next unit, this time horizontally.
  9. Repeat the steps, folding the traingular bit and folding back over the previous unit.
  10. Flip over, so AB becomes BA. And repeat the steps. Continue till you have the required length of bracelet.
Completing the Bracelet: 

  1. Once you have completed the required length of bracelet, you will need to complete your bracelet. For this, take the last legs of the unit and insert into the space you left in the first unit of the bracelet.
  2. You will need to put in a little effort, along with efforts from a tweezer in all probability, to ensure that all the bits and pieces are pushed into the little space.
  3. You will need to repeat the same steps, to form the triangle and fold back.
  4. You will need to repeat the same steps, to form the triangle and fold back.
  5. The bit that is standing out has to be pushed behind the unit below that. Repeat the same with the other leg. This will go on the inside. A little more effort than the front leg, but not too difficult.
  6. Annnnnd... Tada!! Your bracelet is complete :)