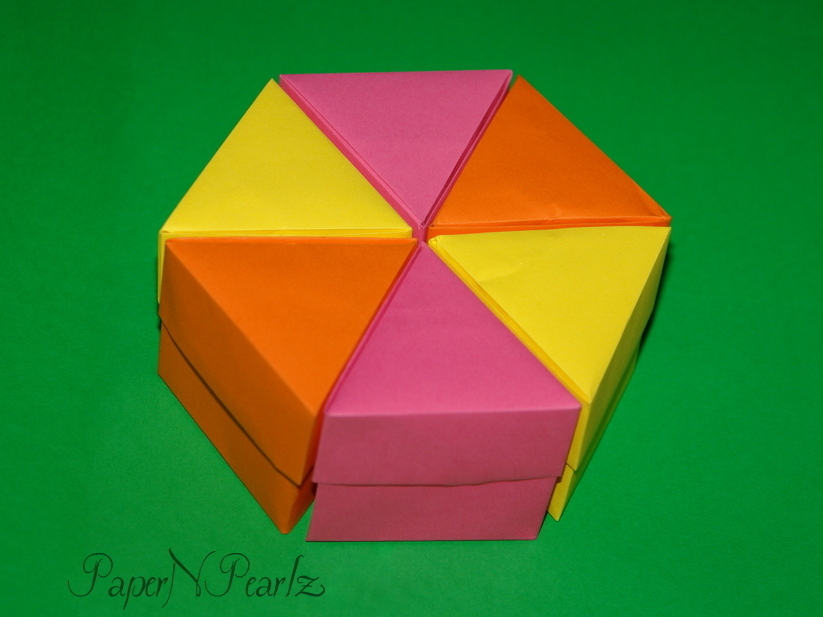
The Multi Points Star, by Ilan Garibi, is a great addition to my origami collection this Christmas. The stars are modular, easy to make and can be used to make stars with as many points as required, starting with 6 points.

I realised that paper that is thicker than usual origami paper works great for this model. So I ended up using printer paper, wrapper paper etc.

I tried with various sizes of squares as well, starting with 2 inch squares and finished with 4 inch squares. All looked great!


Model Details:

Model: Multi Point Star 

Creator: Ilan  Garibi

Difficulty Level: Low Intermediate

Paper Ratio: Square

Paper Size: 1.5 inches upto 4 inches squares

Modules: 6 modules and above

Tutorial: Youtube 
After a whole lot of Christmas crafts and tutorials, here is another beautiful modular star, created by Christine Blasek. There are about 3 variations to this star and all of them look great!

The model has 8 units in all and I wanted to bring out that change in colour in the centre of the star, so I had used some of my precious duo coloured origami paper. And I think the star justifies the paper :)

I did find a youtube video for making the original kalami star. Since the variation is an extension of the original star, I think the video should be helpful if you are stuck while folding it.

Model Details:

Model: Kalami Star 

Creator: Christine Blasek

Website: Kalami
 

Difficulty Level: High Intermediate

Paper Ratio: Square

Paper Size: 3 inches

Modules: 8

Instructions: Kalami

Tutorial (for the original Kalami Star): Youtube


While origami kusudamas and other modular oriami pieces are great decorations for Christmas, one must admit that they are not the simplest of decorations to work on. They are usually time consuming and, in my case, unless I start preparing for Christmas at least a month in advance, I find that I have very few pieces to decorate my house with.

That is where paper crafts help me out a lot! Paper craft decorations usually include glue and cutting and snipping but they are simple to make and I can get my daughter, Little Miss, to help me out as well!

One such is this modular star that I had done last year. I had also meant to post a tutorial but never got around to it. With Christmas around the corner, now is a great time for this tutorial! I hope you enjoy making this star :) Here are the instructions (Click on the picture for a larger one)


What is needed: 
  • 5 or 6 squares of paper – about 4 – 5 inches is ideal. Thick paper is the best for making these stars, preferably card stock. 5 squares will give a 5-armed star and 6 would result in a 6-armed star. 
  • Glue
  • String
  • Glitter, colours, paints, anything else that can add beauty to the star
Steps: 
  1. For each of the squares of paper for the star, 
  2. Fold in half, left to right, and unfold.
  3. Fold in half, bottom to top, and unfold. 
  4. Turn over
  5. Fold one diagonal and unfold. Turn the paper over again
  6. If you press the center of the square, the paper will start to fold down by itself, along the diagonal and the folds of steps 2 and 3.
  7. Flatten down the folds to form a square. This is a square base in origami.
  8. Repeat for the other 5 or 6 squares
  9. Place one square base on top of the other and clip them together
  10. Continue clipping the squares for the remaining pieces. Add the string in between 2 square bases. 
  11. Once you are satisfied with the arrangement, apply glue to each of the clipped surfaces – ensure that glue is applied to the whole surface, else there will be a big gap in the middle of the star. Apply some extra glue to the string to hold it securely in place. Clip the glued star till the glue dried completely.
  12. Decorate the star to your heart’s content and hang on your Christmas tree!

The Ari Jigoku or Ant Lion’s Nest is a modular origami, designed by Silvana Betti Mamino. The units are made from rectangles in the ratio 1:2. A total of 30 units are required. The curls should be completed before the assembly. The completed kusudam is very sturdy and does not require any glue.

The origami looks best in solid duo coloured paper. I also tried one with wrapper paper but unfortunately, the curls do not show up very well, so it wasn’t much of a success.


Model Details:

Model: Ari Jigoku

Creator: Silvana Betti Mamino

Book: Unit Origami Fantasy

Author: Tomoko Fuse

Difficulty Level: High Intermediate

Paper Ratio: Rectangular in ratio 1:2

Paper Size: 3 inches * 1.5 inches

Number of Modules: 30

Tutorial: Stranamasterov.ru

Roman Diaz's book "Origami Essence" is a very cool book with a number of origami animals and birds. The first of them is this panda, an easy, geometrical version.

The diagram is easy to follow. The suggested paper size is 15-20 cms and I used 15 cms square. A smaller square, I thought, would have resulted in a smaller and more appealing panda!

Model Details:

Model: Panda 

Creator: Roman Diaz 

Book: Origami Essence

Author: Roman Diaz

Difficulty Level: Low Intermediate

Paper Ratio: Square

Paper Size: 6 inches

Model Size: ~3 inches in height

Tutorial: Youtube Part 1 and Part 2

Recently I tried the origami barracuda from John Montroll and Robert Lang's book 'Origami Under the Sea'.

The model is designed by John Montroll and is a complex one to fold. I started with a large square of paper, 14 inches side. I didn't want to get stuck in the middle because the paper was too small! But I think a 12-inch square would have worked well too.

This is the first time I am folding a complex origami animal. I hadn't realised that they would turn out to be quite that thick! I am not too happy with the way the fins turned out. I think they are  a bit displaced. And the eyes aren't too prominent but other than that, I am quite happy with my first effort 😀

The paper I have used is a very crisp and thin banana paper. This is the first time I am using such a paper and it worked out really well for a complex origami.

Model Details:

Model: Barracuda 

Creator: John Montroll

Book: Origami Under the Sea
 

Author: John Montroll & Robert Lang
 

Difficulty Level: Complex

Paper Ratio: Square

Paper Size: 14 inch squares

The Origami 4-star box is one of the very few models that I was able to fold from the Origami Tanteidan Vol 17. I was actually quite delighted to find that I could actually fold one of the models, given the complexity of the origami!

The box is a modular pattern, 4 modules for the lid and 4 for the base. The lid and base are folded in the same way except (1) the walls of the base are higher than the lid and (2) the spiral of the base is folded into the model so that it isn't visible at the base.

I found the model interesting to fold in that, usual modular boxes are folded as 2D and in the final step they are converted into 3D. But in this one, the model no longer lies flat from the second step after the precreasing. And of course, the folding the spiral into the base wall was also something new.

Model Details:

Model: Four Star Box

Creator: Toshikazu Kawasaki

Book: Origami Tanteidan, Volume 17

Difficulty Level: High Intermediate

Paper Ratio: Square

Paper Size: 5 inches squares

Modules: 4 for base and 4 for lid


I found Roman Diaz's house a unique design to fold and enjoyed folding it! The design is such that the height and width of the house can be changed, so I guess it is possible to make houses in an ascending order of size! Instructions can be found in Volume 17 of the Origami Tanteidan.

The lock that holds the roof in place is quite interesting.

Single sided paper might not give you a very good result, since part of the house would end up in white, with the rest of the house in colour. Solid colours on both sides or print and single colour, like what I have used, would be good.

Altogether, a very good origami to fold :)

Model Details:

Model: House 

Creator: Roman Diaz

Website: Dosis Diaria de Origami
 

Difficulty Level: High Intermediate

Paper Ratio: Square

Paper Size: 6 inches

After trying Yuri Shumakov's vase yesterday, I decided to try out the next vase - or rather, box - by Katrin Shumakov.

The Bonsai Box is a popular origami box, designed by Katrin Shumakov. As boxes go, this is a complex origami, one that I have always been scared of trying, thinking that it will be too complex for me.

Now that I finally tried it out, I realised that it wasn't as complex as I feared! The best part of the box is that, unlike the other boxes/vases from Oriland, this has a good, wide mouth, that makes it a very convenient box to hold little things that are always scattered around my house.

Model Details:

Model: Bonsai Box 

Creator: Katrin Shumakov

Difficulty Level: High Intermediate

Paper Ratio: Square

Paper Size: 8 inches

Tutorial: Youtube


Yuri Shumakov's origami vase is folded from a single sheet of paper and has a very realistic look to it. A good amount of pre-creasing is required before the vase is folded into shape. Though it is challenging, it a good origami to do.

I used a 80 gsm A4 sheet cut into a square. So the size was roughly 8.2 inches square. The model works best with thick paper - but not too thick though, since there is a lot of creasing to do. 80 gsm is ideal I thought. Regular 60 gsm origami paper might not be sturdy enough, once completed.

Model Details:

Model: Vase

Creator: Yuri Shumakov

Difficulty Level: High Intermediate

Paper Ratio: Square

Paper Size: 8.2 inches

Model Size: 3.75 inches in height and 2.25 inches diameter

Instructions: Oriland

This modular wreath is a great project for beginner origamist who are just starting off with modular origami. It is a traditional design and quite simple.

I love how eye-catching the end result is! I had placed this at my desk in office and everyone who passed by, had a couple of remarks to make on the star :)

Model Details:

Model: Spiky Wreath 

Origin: Traditional

Difficulty Level: Simple

Paper Ratio: Square

Paper Size: 2 inch squares

No of Modules: 16

Tutorial: Youtube

Instructions: Tavin's Origami

The TUVWXYZ star is a complex modular planar model, designed by the amazing Meenakshi Mukerji.

The model consists of 7 intersecting stars, each star made of 6 arms. All the stars meet at the centre of the model. A total of 42 modules are required for the star, 7 colours and 6 modules in each colour. Folding the modules is quite simple, though time consuming.

Assembling the star is a good puzzle! I had trouble in understanding when to start adding the 7th colour, since you actually start with 6 colours. I eventually did figure it out :) The 7th star is the first one to get completed. In the picture, this was the orange coloured one.

Model Details:

Model: TUVWXYZ Star

Creator: Meenakshi Mukerji

Book: Ornamental Origami

Author: Meenakshi Mukerji

Difficulty Level: Complex

Paper Ratio: Square

Paper Size: 4 inches

Instructions: http://britishorigami.info/academic/davidpetty/origamiemporium/images/mm_tuvwxyz.gif

Number of Modules: 42

Robin Glynn's 6-sided star box turned out to be quite interesting! I rather liked the way the 2D module is turned into a 3D piece. The modules link well together. The lock for the base is slightly difficult to do, but it ensures that no glue is required.

The box should be done using stiff paper. Else it doesn't hold the shape well. Solid colours, in alternate colours, would be better for the box I think. But I can never forgo a chance to use wrapper paper, so that is what I used :)

Model Details:

Model: Star Box 

Creator: Robin Glynn

Difficulty Level: Low Intermediate

Paper Ratio: Square

Paper Size: 5 inch squares

Modules: 12

Tutorial: Youtube (Base and Lid)

Diagram: Origami Diagram


I have previously made triangular boxes from 3 modules and wanted to try out one from a single sheet of paper. And found out Thoki Yenn's triangular box, where both the box and the lid are made from a single sheet of A4 size paper.

I love how economical the box and lid is! The box is made from half the A4 paper and the lid from half a square from the same sheet. The instructions sound quite complex, but making these boxes is actually quite simple.

Model Details:

Model: Triangular Boxes

Creator: Thoki Yenn

Difficulty Level: Low Intermediate

Paper Ratio: A4

Instructions: Erik Demaine

I like making boxes from single sheets of paper. For one thing, they are quite economical and for another, you can just grab a piece of paper and start working on the box!

This pentagonal box is designed by Rikki Donachie and is made from a single A4 sheet of paper. It is quite easy to fold. I folded the base such that the height was a little more than the lid. Otherwise, both base and lid were the same.

Model Details:

Model: Pentagonal Boxes

Creator: Rikki Donachie

Difficulty Level: Low Intermediate

Paper Ratio: A4

Paper Size: 7 inches

Tutorial: Youtube

Butterfly earrings are not very easy to make, but the earrings that result from them are quite beautiful. Well, what else would you expect from a butterfly? :)

I liked the green earrings that I made. I had included green butterfly beads as well and loved how the whole thing turned out! Another of my earrings that I ended up keeping with me, since I couldn't bear to part with them!


I hadn't come across any 5-sided modular boxes until recently. Modular pentagonal boxes are not very common and one of the first pentagonal box I came across was Dennis Walker's Cherry Blossom Box.

A very pretty box to fold, it ends up with a star shape in the top and 5 petals on top of the star. It folds best with 80 gsm paper. I had this beautiful gift wrapper paper which worked out very well.

Model Details:

Model: Cherry Blossom Box

Creator: Dennis Walker

Difficulty Level: High Intermediate

Paper Ratio: Square

Paper Size: 4 inches

Instructions: Lid, Base

Number of Modules: 10 (5 for lid and 5 for base)

This spider from Eric Keneeway's book 'Complete Origami' is a fairly easy origami to do. But a little bit of kirigami also comes into play, so origami purists would not be keen on folding this little guy, I suppose.

The origami starts with a a frog base and builds up on that. I folded this from 8-inch square 60 gsm paper. It should be mentioned that there are plenty of layers of folds that go into the model. So thin paper is an absolute must.

Model Details:

Model: Spider 

Creator: Bob Allen

Book: Complete Origami
 
 
Difficulty Level: Low Intermediate

Paper Ratio: Square

Paper Size: 6 inches

Model Size: ~3 inches in length

The Knob Box lid, designed by Jorge E Jaramillo, is one that I had tried some time back and hadn’t quite succeeded. I gave it another go and this time I did complete it :) The most difficult part of the lid was twisting it into the knob, after creasing the folds of the knob. I found the model quite challenging and so have been making a few of them, just to get the hang of it.

The model requires a fairly large square of paper to get a reasonably sized box. I initially used a 12 inch square and then a 9 inch square. The 12 inch one turned out to be nice and big and the 9 inch one was smaller but more to my liking.

The base is simpler to make and is designed by Anna Kastlunger. She has also made a series of tutorial videos on making the lid and the base. Considering that there is only a CP available to fold the lid, I wouldn’t have even attempted the model if not for her tutorial! There are a series of 5 videos (4 for folding the lid and 1 for the base) and are detailed and very well presented.


Model Details:

Model: Knob Box

Creator (Lid): Jorge E Jaramillo

Creator (Base): Anna Kastlunger

Difficulty Level: High Intermediate

Paper Ratio: Square

Paper Size: 9 - 12 inches

Crease Pattern (Base): Flickr!

Crease Pattern (Lid): Flickr!

Tutorial (Lid): Part 1, Part 2, Part 3, Part 4

Tutorial (Base): Youtube

Tomoko Fuse's boxes are really simple to make and I love making them! So here goes another of her boxes from her book 'Quick and Easy Origami Boxes'.

I rather like the little knob on the lid. Adds a little something and gives us a handle to use to open the box :)


Model Details:

Model: Triangular Boxes

Creator: Tomoko Fuse

Book: Quick and Easy Origami Boxes

Author: Tomoko Fuse

Difficulty Level: Low Intermediate

Paper Ratio: Square

Paper Size: 4 inches

Tutorial: Youtube

Number of Modules: 6 (3 for box and 3 for lid)


A heptagon or septagon is a 7-sided polygon and this box contains 7 sides. The design is again, by Tomoko Fuse, from her book ‘Joyful Origami Boxes‘.

The folding is somewhat similar to the hexagon box I had folded earlier. The main difference is in the way the angle is decided for a heptagon.

Since the box has an odd number of modules, I think it looks better if made from a single solid colour or from a single patterned paper. Using alternate colours means there were will be 2 modules in the same colour which stands out like a sore thumb!


Model Details:

Model: Heptagon Starry Pinwheel Boxes

Creator: Tomoko Fuse

Book: Joyful Origami Boxes

Author: Tomoko Fuse

Difficulty Level: High Intermediate

Paper Ratio: Square

Paper Size: 5 inches

Number of Modules: 14

The hexagon pinwheel box is a design by Tomoko Fuse, from her book 'Joyful Origami Boxes'. It is made from 6 squares of paper and joined without glue.

The lid looks best when folded with duo coloured paper. But I think it looks great when folded from any dark-shaded wrapper paper too.

And as in most cases, I did use wrapper paper to fold this box :) I love the variety offered by the paper and always prefer using it to any solid coloured paper, especially for boxes.


Model Details:

Model: Hexagon Pinwheel Box

Creator: Tomoko Fuse

Book: Joyful Origami Boxes

Author: Tomoko Fuse

Difficulty Level: High Intermediate

Paper Ratio: Square

Paper Size: 5 inches

Tutorial: Lid, Base

Number of Modules: 12

The Pandora's box, so named because it causes some misery attempting to open the box, is designed by Yami Yamauchi. Though it looks like there is an opening in the middle of the box (see the straight line going around the middle), this isn't the opening.

To figure out the opening, you will have to make the box! So give it a go. I assure you, it is quite simple.

Model Details:

Model: Pandora's Box

Creator: Yami Yamauchi

Difficulty Level: Low Intermediate

Paper Ratio: Square

Paper Size: 6 inches

Instructions: Mari's Origami Home

Tutorial: Youtube
Trialling out a bunch of paper earrings, made from Japanese washi paper. I still have ways to go, but I think I have made a good start. 


I used predominantly green paper for this set. The biggest problem with making paper jewellery is dealing with the size of the modules. But while the going in difficult, the end result is very good.


Most of the designs are from Ayako Brodek's book on Origami Jewellery, a real keeper if you are inclined towards making such jewellery. The most useful part was the size details provided for each design.


I also tried out some traditional, simple designs such as the star and the wreath. The only problem with these designs was that I had to experiment quite a bit to arrive at the optimum size of paper.


All the earrings are made sturdy by glazing. And this also makes them water resistant.


Paper hearts are really great to make! They are simple and however badly you end up making them, they still turn out great :) So ended up making these heart earrings.

I love how the colours pop in the gold and orange earrings. Absolutely my favourite. These next ones in blue are a more subtle version, complete with a couple of heart beads to liven them up.


I like most of the origami designed by Carmen Sprung and here is another of her designs. This one is called √3 Schachtel (Google gives the translation as box or case). √3 because of the paper ratio which is x:√3x. I think this must be the only time that I use such a ratio!!

In case you are wondering what the value of √3 is, it approximates to 1.732. So if one side of the paper is 3 inches, then the other side would approximately come to 3 * 1.732 = 5.2 inches. If you wish to have one side as 6 inches, then the paper size would be 6 inches by 10.4 inches. For more approximations, check out the instructions where Carmen Sprung has already provided some of the values.

As for the folding, it is not very complicated. The last step might require some effort if you are a beginner origamist. I rather like the shape of the box and the fact that it is folded from a √3 paper ratio adds uniqueness to the piece.

Model Details:

Model: √3 Schachtel

Creator: Carmen Sprung

Difficulty Level: Low Intermediate

Paper Ratio: x:√3x

Paper Size: 6 inches by 10.4 inches and 3 inches by 5.2 inches

Instructions: Origamiseiten

Valentine rings are quite popular during this season and here is one that is pretty easy to make.

The ring is designed by Hiroshi Kumasaka. It is made from a square. In order to make a ring that fits you well, add 2 cms to the circumference of your finger. So if the circumference is 6.5 cms, add 2 to make it 8.5 cms. I converted this approximately to 3.5 inches and that is the size of paper I had used.

Model Details:

Model: Valentine Day's Ring 

Creator: Hiroshi Kumasaka

Difficulty Level: Low Intermediate

Paper Ratio: Square

Paper Size: 3.5 inches

Instructions: Cecilia's Origami Website


With Valentine's Day just round the corner, I found this interesting table card, complete with a little heart at the top. The table card is made from 2 pieces - a base and the heart. It was a little challenging to fold, but I love the result, especially the red card with white heart.

Model Details:

Model: Heart Card 

Creator: Hans Birkeland

Difficulty Level: High Intermediate

Paper Ratio: Square

Paper Size: 7 inch square

Model Size: ~2 inches across

Diagram: Origami Resource Center 
Most origami boxes are modular pieces and to get a box this size, you would need really small modular units, which could turn out to be tedious to make. But this box is just perfect in size!

One thing that I would suggest is that, if you are giving this to someone, it would be better to glue the little pocket that is on the inside of the box. I also glued the join at the top of the box to prevent it from opening up!

Model Details:

Model: Heart Box 

Creator: Robin Glynn

Difficulty Level: High Intermediate

Paper Ratio: A4 (297 mm * 210 mm)

Model Size: ~4 inches

Diagram: Origami Diagram

Tutorial: Youtube (Part 1 and Part 2)

The Four Leaves Tato is designed by Christiane Bettens, better known in the origami world as Mélisande.

The paper should be at least a 7 inch square to give a usable tato. The first I had done was using regular copy paper. The tato that I completed was immediately picked up by my daughter to store her jewelry :)

The leaf is made of accordian pleats, the more pleats there are, the better the leaf looks. So take your time and make as many pleats as possible :)


Model Details:

Model: 4 Leaves Tato

Creator: Christiane Bettens / Mélisande

Difficulty Level: High Intermediate

Paper Ratio: Square

Paper Size: 8 inches

Instructions: La chronique de Mélisande

A Tato is a Japanese flat container and Tatogami is one of the oldest form of paper folding. Tatos can hold small flat objects like needles and buttons and postage stamps.

Traditional tatos are easy to make, so instead of making a traditional one, I tried out this butterfly tato, designed by Marcela Brina. Origami paper, coloured differently on both sides, works well to bring out the butterfly shape in the middle.

The instructions are clear, though for a beginner it might present a bit of a challenge initially.

Model Details:

Model: Butterfly Tato 

Creator: Marcela Brina

Difficulty Level: High Intermediate

Paper Ratio: Square

Paper Size: 6 inch squares

Diagram: Artis Bellus 

The Decoration Box is from the book 'Modular Origami Polyhedra' and is designed by Lewis Simon. The cube is made from 12 modules. Variations made from half a square and from dollar bills are also found in the book.

Of all the cubes that I have tried in the recent days, this is, by far, my favourite. The alternate dark and light strips add so much beauty to the cube. If the folds are well-creased and accurately done, the final cube is quite firm.

Model Details:

Model: Decoration Box 

Creator: Lewis Simon

Book: Modular Origami Polyhedra
 

Author: Lewis Simon, Bennett Arnstein, Rona Gurkewitz
 

Difficulty Level: Low Intermediate

Paper Ratio: Square

Paper Size: 4 inch squares

Model Size: ~3.5 inches side

Modules: 12

Tutorial: Youtube 

The Origami Pinwheel Cube is designed by Tomoko Fuse and is found in her book 'Multidimentional Transformations Unit Origami'. The cube is formed from just 6 units, so as compared to the other cubes that I have done in recent days, I found it pretty quick to complete. 

The name of course, comes from the pinwheel shape that is seen on each of the faces. Origami paper that has different colours on both sides will work best. 

Model Details:

Model: Pinwheel Cube 

Creator: Tomoko Fuse

Book: Multidimensional Transformations Unit Origami
 

Author: Tomoko Fuse
 

Difficulty Level: Simple

Paper Ratio: Square

Paper Size: 4 inch squares

Modules: 6

Tutorial: Youtube (Folding and Assembly)