Showing posts with label 12 modules. Show all posts

 The third of the models that I tried was the Origami Striped Sonobe, assembled into an Octahedron, from 12 modules. The assembly is, of course, different from the Large Cube assembly from my last post. 

The Octahedron is formed from pyramids, in rings of 4 pyramids. I love this assembly - it is easy but at the same time, looks quite complex. And the striped sonobe modules give it a nice touch. 

The colour combination is the same as my previous models - deep blue, light blue and yellow. The size remains the same - 3-inch squares. The resulting octahedron is about 3.5 cms (~1.4 inches). It fits nicely into the palm of my hand! A super-cute model :)

Model Details:

Model: Striped Sonobe - Octahedron

Creator: Meenakshi Mukerji

Book: Marvelous Modular Origami

Author: Meenakshi Mukerji

Difficulty Level: Low Intermediate

Paper Ratio: Square

Paper Size: 3 inches

Model Size: ~1.4 inches side

Modules: 12

 Continuing my theme from my last post, I folded the Snow-Capped Sonobe this time. The assembly is in a large cube, made from 12 units. This is the first Snow-capped sonobe. There is a second one too, but that required folding thirds at one point, so I gave that a miss!!

I have previously folded this model, but had assembled it into an octahedron. But this time, since I am trying to go as sequentially as possible, I assembled the large cube. By the way, this is the third model in the book, the second one being the Striped Sonobe.

This is also folded from 3-inch squares. While the large cube is larger than the cube, it really isn't that much bigger! Each side measures ~1.1 inch - not much different from 0.8 inch, is it?? 


Model Details:

Model: Snow-capped Sonobe - Large Cube

Creator: Meenakshi Mukerji

Book: Marvelous Modular Origami

Author: Meenakshi Mukerji

Difficulty Level: Low Intermediate

Paper Ratio: Square

Paper Size: 3 inches

Model Size: ~1.1 inches side

Modules: 12


As I had said in my previous post, while making the origami spiral cube, I wanted to retry this model using A5 paper instead of A4. A4 paper resulted in a fairly large cube which wasn't very appealing to me.

The coronavirus lockdown has given me ample time, so I decided to redo the model, using some lovely kami paper that I had. The paper turned out perfect for this model, since it was light enough that I could fold the spirals and assemble it easily.

Usually smaller origami models are more difficult to do than bigger ones, but in this model, I found the smaller one easier to assemble! Mainly because it was small enough to hold in hand while folding. I would definitely recommend the A5 size to the A4!


Model Details:

Model: Spiral Cube

Creator: Tomoko Fuse

Book: Let's Fold Spirals

Author: Tomoko Fuse

Difficulty Level: High Intermediate

Paper Ratio: Rectangle

Paper Size: 8.3 inches * 1.45 inches

Model Size: ~2.5 inches across

Number of Modules: 12

Tutorial: kusuda.ru

Tomoko Fuse's spirals has always fascinated me. And since my last Tomoko Fuse origami was this pyramid box in May, I figured I would try out another of her spirals origami.

This origami spiral cube has been on my to-do list for quite a few years now! And finally I managed to do it! The cube is made from strips cut out of A4 paper. Each A4 sheet is cut into 4 strips. A total of 12 such strips are needed, which means 3 A4 sheets will be required.

As with most of Tomoko Fuse's models, the individual modules are fairly easy to fold. Assembly is a lot more challenging. I assembled the first three faces, on a flat surface. And I admit, I glued the tips of the spiral so that it didn't unravel easily. Once the three faces was done, the fourth face was decidedly more difficult but manageable. Then the top and bottom of the cube. Assembling one of the 2 ends was easy, because I could insert my hand inside the cube to hold the arms of the spiral and then continue with the assembly. The true challenge was, as always, in finishing the final face. I didn't have proper support, which meant I was forming the spiral in air! But finally, with a good deal of patience, I succeeded!

While I am happy with the cube, I find it too big for my taste. Hope to make another one from A5 paper. The principle remains the same. 4 strips from each A5, 12 strips in all.

Model Details:

Model: Spiral Cube

Creator: Tomoko Fuse

Book: Let's Fold Spirals

Author: Tomoko Fuse

Difficulty Level: High Intermediate

Paper Ratio: Rectangle

Paper Size: 11.7 inches * 2 inches

Model Size: ~3.5 inches across

Number of Modules: 12

Tutorial: kusuda.ru

A very happy New Year 2019! Hope this year bring joy and peace to every one of you 🎉🎉

This recent pair of origami that I made - Daniel Reutskiy's kusudama - is very special for me. For one, it was decided and planned completely by Little Miss. She decided on the model, the colour combination, which I absolutely love, btw, and the number of modules. I usually make 30-module kusudamas. But for a change, I have made both the 12-module and the 30-module ones.

I have used 3 colours - chocolate, butterscotch and raspberry (as Little Miss calls it). Each square is 3 inches side. 30 modules or 12 modules as the case may be. Final sizes are 3 inches diameter for the 12-module kusudama and 4 inches diameter for the 30-unit one.

Model Details:

Model: Modular Kusudama 

Creator: Daniel Reutskiy

Difficulty Level: Low Intermediate

Paper Ratio: Square

Paper Size: 3 inch squares

Model Size: ~4 inches in diameter (30 modules) and ~3 inches in diameter (12 modules)

Modules: 30 and 12

Tutorial: Youtube 

The Edge Unit A is the first of the modular origami designs from Tomoko Fuse's 'Unit Origami Wonderland'. The edges form a 90 degree angle on either side.

I have folded the cube, made from 12 such modules. The model is quite firm and assembly was not too much of a challenge either. Overall, a pleasing modular to work on.

Model Details:

Model: Cube from Edge Unit A 

Creator: Tomoko Fuse

Book: Unit Origami Wonderland
 

Author: Tomoko Fuse

Language: Japanese
 
Difficulty Level: Low Intermediate

Paper Ratio: Square

Paper Size: 3 inches

Model Size: ~3 inches side

Modules: 12

We had recently been on a short trip to the sea, for the summer. And while doing some shopping, I came across an amazing shop which had some fabulous wrapper paper in some awesome colours and patterns. So I ended up picking up a whole lot of paper and now I have enough to last me a lifetime!!

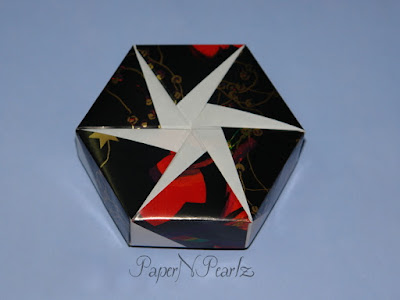
The cream and chocolate brown papers in this hexagon box were a couple of sheets I picked up there. The moment I saw the paper, I fell in love with it and have been trying to decide on the model. Finally I decided to make one of Tomoko Fuse’s beautiful boxes from her book on spirals.

The paper was thicker than regular origami paper, so the box turned out to be quite sturdy, though it required more effort in folding and assembling. The spirals were difficult because of handling 6 arms simultaneously but the end result was so satisfying that I just sat and admired the box for about half an hour after I had completed it!


Model Details:

Model: Hexagon Box 

Creator: Tomoko Fuse

Book: Let’s Fold Spirals
 

Author: Tomoko Fuse
 

Difficulty Level: High Intermediate

Paper Ratio: Square

Paper Size: 6 inches

Modules: 12 (6 + 6)

After completing my last 2 Tomoko Fuse designs made from 120 units each, I decided to try one of her simpler models - this simple open frame cube, made from 12 square units.

I have used 3 colours and 4 units of each colour. The squares had a side of 4 inches and the end result was a frame of about 3 inches.

Model Details:

Model: Open Frame - Cube

Creator: Tomoko Fuse

Book: Unit Origami

Difficulty Level: Low Intermediate

Paper Ratio: Square

Paper Size: 4 inches

Model Size: ~3 inches in diameter

Modules: 12

Tutorial: Youtube

My daughter, Little Miss, has recently become very keen on recycling and reusing whatever she can. So when I was recently asked to make a few origami lotuses, she came up with the idea of making literary lotuses! And we are both delighted with the way the lotuses turned out. We initially tried a complete literary lotus - that is, the flower and the leaves were an old book paper. But our second attempt - book paper lotus with green copy paper leaves were more to our liking.

One thing I did find was that, the book paper is much thinner than the copy paper - which meant pulling out the petals had to be done with more care, else we risk tearing the paper. And since the paper was thinner, the literary lotus turned out a little smaller than the one made entirely from copy paper.


Model Details:

Model: Lotus

Origin: Traditional

Difficulty Level: Low Intermediate

Paper Ratio: Rectangle

Paper Size: 3 inches * 5.2 inches

Model Size: ~4 inches

Modules: 12

Tutorial: Youtube 

I recently ordered a lot of origami paper from Kim's Crane and am now thrilled with my supply of beautiful origami paper :) And since I had so much of variety, I decided to start off making Christmas decorations from them. And, I think the most common origami decoration for Christmas must be the Sonobe!

So here are a whole lot of origami sonobes made in a variety of colours and patterns, all set for Christmas. I am yet to add satin ribbons for hanging them from and I will be all set. I also ended up making a few Christmas stars, which you can see scattered around.

I worked on both 30-unit and 12-unit models. All using 3-inch squares, so all of them ended up pretty much the same size.


Model Details:

Model: Sonobe

Creator: Mitsunobu Sonobe

Difficulty Level: Low Intermediate

Paper Ratio: Square

Paper Size: 3 inch squares

Model Size: 3-inch in diameter

Modules: 12 or 30

Tutorial: Youtube 

The origami lotus is yet another traditional, modular model and one that I had tried out recently. The assembly for the lotus is different from what I had done till date.

After folding the individual modules (there are a total of 8 modules for the flower and 4 for the leaves), we assemble the modules in sets of 3 (2 flower modules and 1 leaf module) and tie them together. Once everything is held tight in place, then we start forming the petals and leaves.

The beauty of the flower lies in the way the petals are shaped. The inner petals can be closed into the centre to give the appearance of a flower just starting to bloom. I think mine has the look of a fully opened flower.

Altogether, an interesting and ingenious model to fold.

Model Details:

Model: Lotus

Origin: Traditional

Difficulty Level: Low Intermediate

Paper Ratio: Rectangle

Paper Size: 5.5 inches * 3.5 inches

Model Size: ~4 inches

Modules: 12

Tutorial: Youtube 

Here is the final cube from the book 'Modular Origami Polyhedra'. The Ninja Star Cube is also made from 12 modules. The one I tried is the second cube. This one is a bit more ornate than the original ninja star cube. It has got a couple more folds which gives a little variety to the folds.

Each face of the cube has the shape of the star in the middle. The star is clearer in the next picture.


Model Details:

Model: Ninja Star Cube 

Creator: Lewis Simon

Book: Modular Origami Polyhedra
 

Author: Lewis Simon, Bennett Arnstein, Rona Gurkewitz
 

Difficulty Level: Low Intermediate

Paper Ratio: Square

Paper Size: 3 inches

Model Size: Square cube with approximate side of 2.25 inches

Modules: 12

Before trying the Ninja Star Modular Cube, I tried out one last cube. This is again from the book 'Modular Origami Polyhedra'. As before, this is from the chapter on Decoration Box System. Almost all the cubes have the same heading, namely, 'Modular Cube', so I am also using the same name :) To be more specific, this is the 8th cube in this chapter. The design is by Lewis Simon.

When I looked at this model, I liked the shape which is different from the usual cube shape. This looks a little like the last modular cube I did, but with more pronounced truncated corners. Assembling the model is different from usual for me. An interesting model to fold :)


Model Details:

Model: Modular Cube 

Creator: Lewis Simon

Book: Modular Origami Polyhedra
 

Author: Lewis Simon, Bennett Arnstein, Rona Gurkewitz
 

Difficulty Level: Low Intermediate

Paper Ratio: Square

Paper Size: 3 inches

Model Size: Square cube with approximate side of 2.25 inches

Modules: 12

Since making my last cube, I have made a few more cubes from 12 sheets of paper. All are from the book 'Modular Origami Polyhedra' . This one is a Sonobe Cube formed from Decoration Box modules. We start off folding as for the decoration box module and then add a few more folds to get the final module.

I first tried this model from 2-inch squares. Quite a tough job!! Folding these thin creases are quite painful, but not as painful as creasing paper that has already been folded 4-5 times!! My thumb took quite a beating! I would strongly advice a bone-folder for this model. Unfortunately, I don't have one, so had to make do with my poor thumb :(

Model Details:

Model: Sonobe Cube from Decoration Box Modules 

Creator: Lewis Simon

Book: Modular Origami Polyhedra
 

Author: Lewis Simon, Bennett Arnstein, Rona Gurkewitz
 

Difficulty Level: High Intermediate

Paper Ratio: Square

Paper Size: 2 inches

Model Size: Square cube with approximate side of 1.25 inches

Modules: 12

As I had mentioned in my previous post, I tried out the modular cube variation, this one in orange. The assembly is the same as the modular cube. The only change, in fact, is the way the initial fold is done, so that the reverse of the paper becomes visible. So it is a good idea to use paper coloured on both sides, in contrasting colours. I preferred using single-sided orange coloured paper. I think it has turned out quite well :)

But in reality, folding the modules turned out to be an unexpected challenge! I had used the same paper size as in my previous cube (1.25 by 3.5 inches). Unfortunately, this model had a couple of additional folds, resulting in really thin strips. And folding those thin strips in such a small paper turned out to be painful!! I used a ruler to ensure that I got the folds right. Thankfully the paper was quite strong, I am sure I would have ended up tearing quite a few modules otherwise!

Model Details:

Model: Modular Box Variation 

Creator: Bennett Arnstein

Book: Modular Origami Polyhedra
 

Author: Lewis Simon, Bennett Arnstein, Rona Gurkewitz
 

Difficulty Level: Low Intermediate

Paper Ratio: Rectangle in ratio 1:2

Paper Size: 1.25 by 3.5 inches

Model Size: Square cube with approximate side of 1.25 inches

Modules: 12

Robin Glynn's 6-sided star box turned out to be quite interesting! I rather liked the way the 2D module is turned into a 3D piece. The modules link well together. The lock for the base is slightly difficult to do, but it ensures that no glue is required.

The box should be done using stiff paper. Else it doesn't hold the shape well. Solid colours, in alternate colours, would be better for the box I think. But I can never forgo a chance to use wrapper paper, so that is what I used :)

Model Details:

Model: Star Box 

Creator: Robin Glynn

Difficulty Level: Low Intermediate

Paper Ratio: Square

Paper Size: 5 inch squares

Modules: 12

Tutorial: Youtube (Base and Lid)

Diagram: Origami Diagram

The hexagon pinwheel box is a design by Tomoko Fuse, from her book 'Joyful Origami Boxes'. It is made from 6 squares of paper and joined without glue.

The lid looks best when folded with duo coloured paper. But I think it looks great when folded from any dark-shaded wrapper paper too.

And as in most cases, I did use wrapper paper to fold this box :) I love the variety offered by the paper and always prefer using it to any solid coloured paper, especially for boxes.


Model Details:

Model: Hexagon Pinwheel Box

Creator: Tomoko Fuse

Book: Joyful Origami Boxes

Author: Tomoko Fuse

Difficulty Level: High Intermediate

Paper Ratio: Square

Paper Size: 5 inches

Tutorial: Lid, Base

Number of Modules: 12

The Decoration Box is from the book 'Modular Origami Polyhedra' and is designed by Lewis Simon. The cube is made from 12 modules. Variations made from half a square and from dollar bills are also found in the book.

Of all the cubes that I have tried in the recent days, this is, by far, my favourite. The alternate dark and light strips add so much beauty to the cube. If the folds are well-creased and accurately done, the final cube is quite firm.

Model Details:

Model: Decoration Box 

Creator: Lewis Simon

Book: Modular Origami Polyhedra
 

Author: Lewis Simon, Bennett Arnstein, Rona Gurkewitz
 

Difficulty Level: Low Intermediate

Paper Ratio: Square

Paper Size: 4 inch squares

Model Size: ~3.5 inches side

Modules: 12

Tutorial: Youtube 

The Snow-capped Sonobe is another variation on the Sonobe created by Mitsunobu Sonobe. This variation is created by Meenakshi Mukerji and is from her book 'Marvelous Origami'. 

Two-sided paper, coloured on one side works best for this model, though that is not what I have used!

Model Details:

Model: Snow-capped Sonobe 

Creator: Meenakshi Mukerji

Book: Marvelous Origami
 

Author: Meenakshi Mukerji
 

Difficulty Level: High Intermediate

Paper Ratio: Square

Paper Size: 3 inch squares

Modules: 12

The WXYZ, created by Tung Ken Lam, had set in motion the creation a series of planar models by various origamists including Francis Ow, David Petty, Satoshi Kamiya and Meenakshi Mukerji. The WXYZ is among the simplest of the planar models and is made up of 4 intersecting triangles.

It is quite simple to fold though the assembly will take up some time. I am glad I finally managed to do a planar model though the colour combination isn't the greatest! The red and orange together don't stand out quite that well.

These models have a unique naming convention, which is based on geometric principles. The number of letters used is the same as the number of planes in the model. Thus WXYZ would mean it has 4 planes.

Model Details:

Model: WXYZ Planar Model 

Creator: Tung Ken Lam

Book: Origami A-B-C

Author: David Petty

Difficulty Level: Low Intermediate

Paper Ratio: Square

Paper Size: 4 inch squares

Model Size: ~5 inches from tip to tip

Modules: 12

Diagram: British Origami