Showing posts with label Christmas. Show all posts


Merry Christmas, dear readers! Hope this season brings you much joy and peace, despite the problems that still persist with the virus! 

Here are my latest favourite projects - Leaf trays made from newspaper tubes, using red and green tubes to add a little Christmas vibe to it! 


And check out these pretty Christmas baubles - yet another eco-friendly project. Though not by me! This is done by a group called PeopleKraft. Do check out their Insta page for more of their work. These baubles are made from scrap fabric, left over from various other projects. I thought it was an innovative way of reusing such material and so, ordered a couple of these baubles for my Christmas tree! 

Once again, a Merry Christmas!

Its that time of the year! A time of joy and cheer! And on my blog, this is the time to create some Christmas themed newspaper weaving crafts! So this year, I decided to go ahead and redo the leaf tray from my previous post! Using Christmas colours of red and green - naturally! 


 And let me say, I am absolutely delighted with the way this tray has turned out! I used random red/green tubes, and I love the effect produced by this random mix. The handle was also attached differently. I like this method better. 

Overall, a nice bit of work to end this year! 

Model Details:

Model: Leaf Tray

Difficulty Level: Complex

Tutorial (making newspaper tubes): Youtube

 
A little experiment for making a small, leaf-shaped tray, in time for Christmas! This little tray has been on my to-do list for quite some time now, especially since I have already made a couple of leaf trays using the coiling technique of weaving.  

Since I had already coloured some tubes green and red, in anticipation of some Christmas themed newspaper weaving projects, I decided to use a few of them to try out this little leaf tray. Well, it turned out not to so little after all - measuring around 10-inches at the maximum length!


While I quite liked the leaf stalk that I added, I think I need to figure out a better way, or rather,  a more aesthetically pleasing way of adding it! 

Other than that, I am in love with this tray and I think I will do one more using Christmas colours! What say??

Model Details:

Model: Leaf Tray

Difficulty Level: Complex

Tutorial (making newspaper tubes): Youtube


Paolo Bascetta's stellated dodecahedron, also known as the Bascetta Star is, I think, the most well-known of Bascetta's creations. I also love this Compass Rose folded quite some time back. 

During these coronavirus times, I tried out yet another of his modulars - a modular 2D star, called the New Year's Day Star. While folding it, I was wondering if it was possible to restart this year, minus the pandemic! 

Coming back to the modular, it is folded from 18 modules and is similar to the Mette Ring. In the mette ring, the final step is folding the module into 2. This step is not included in the New Year's star. Instead, the unfolded modules are slipped into the little pockets to form the star. Though I assembled it with glue, it can be done without glue. I used 2 inch squares and 2 colours, in the classic black and white combination. And I quite like the way it has turned out. 


Model Details:

Model: New Year's Day Star

Creator: Paolo Bascetta

Difficulty Level: Low Intermediate

Paper Ratio: Square

Paper Size: 2 inches

Model Size: ~ 4 inches across

Number of Modules: 18

Tutorial: Youtube

Diagram: Free Download


Merry Christmas 2019, dear blog readers! 

It feels like the year had just begun and we are already at the end and looking forward to a new decade! Time does fly, doesn't it? 

Anyway, in the Christmas tradition, I decided to do something in the traditional colours of green and red. I had rolled a number of newspaper tubes some time back and had been wondering on the project to work on. So I decided to go ahead with the new style of weaving that I have been trying out these days. In case you, dear reader, haven't had an opportunity to see what I have been up to, do check out this blue leaf tray that I had done a few months back. Also check out the previous box and lid, done using the same red/green tubes. 

This style of newspaper weaving, called coiling or root-weaving, is tedious but results in really cool newspaper products that are absolutely eye-catching! The weave is without any form, so it is with some trial and error that I manage to do this style of free-form weaving. 


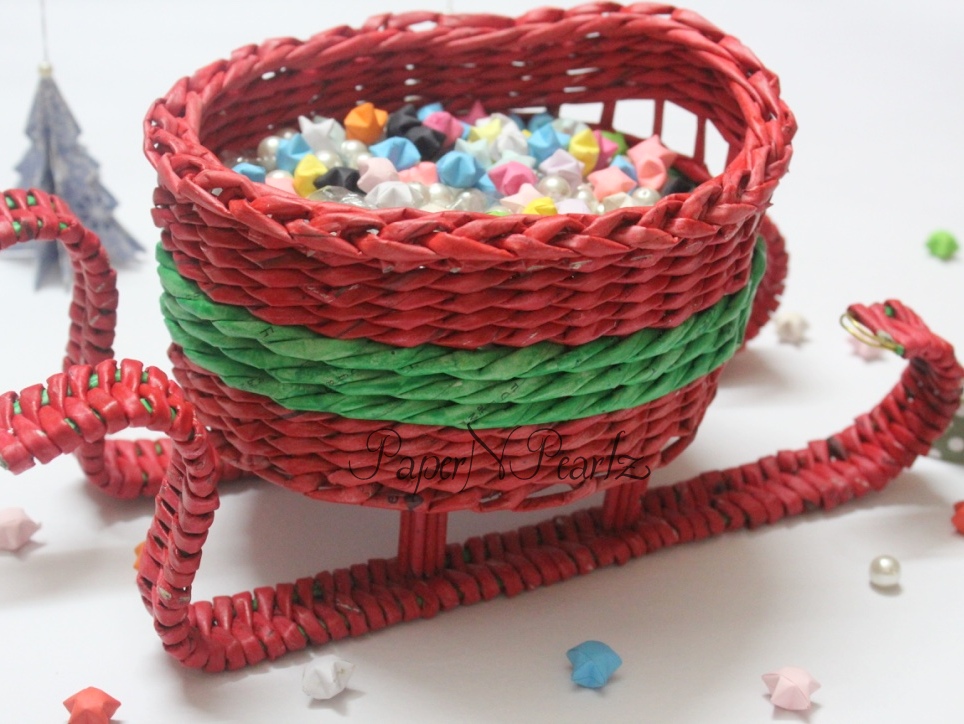
This bowl or rather, tray is about 7.5 inches in diameter and made entirely from newspaper tubes, coloured red and green. As with my previous blue tray attempt, here too, I attempted to paint both plain tubes and tubes with print still visible. Since the colours were both dark ones, I was able to obliterate most of the print after painting the tubes twice. With a single coat of paint, the colour is not very rich and the print is clearly visible. But with a second coat, the colour also becomes richer and most of the font are pretty much invisible! And what little is visible, is hardly seen in this style of weaving anyway! So that was a good discovery for me.

In total, to make this bowl, I have used a total of 50 plain green tubes, 25 green tubes with print visible, 100 plain red tubes and 30 red tubes with print visible. And as expected, with this style of dense weaving, the end product is very robust and strong. A coat of polyurethene and I have an absolutely amazing product!

So what do you think?


Model Details:

Model: Coiled Christmas Bowl

Difficulty Level: Complex

Tutorial (making newspaper tubes): Youtube

Tutorial (coiling or root-weaving technique): Youtube

With Christmas in the air, I decided to make a little Christmas wreath for my Christmas tree. This wreath is designed by Francesco Guarnieri and is made from 8 modules. It is pretty easy  and quick to do and makes a great addition for the Christmas Tree.

My first attempt was using white washi paper with red flowers, contrasted with plain red paper. Quite liked the contrast in this. But for a more traditional Christmas look, I guess the usual red-green combination works best. The model works best with double-sided paper. 3.5 inches squares were ideal for my requirements, and resulted in a great about 6 inches in diameter.


Model Details:

Model: Stella Ghirlanda / Star Garland

Creator: Francesco Guarnieri 

Difficulty Level: Low Intermediate

Paper Ratio: Square

Paper Size: 3.5 inches square

Model Size: ~6 inches in diameter

Modules: 8

Instructions: Origami poesie di carta

Tutorial: Youtube

Here's a wreath that I made for Christmas. The problem is that I had made use of a tutorial that I had saved a long time back, but unfortunately I know neither the name nor the creator of the wreath. Hmm.. Big problem!

But I can say one thing - it is an easy wreath to make and looks excellent with double sided paper!!

Merry Christmas 🎄🎄

Model Details:

Model: Wreath 

Difficulty Level: Simple

Paper Ratio: Rectangle, 1:2 ratio

Paper Size: 3 inch by 1.5 inches

Model Size: ~3 inches in diameter

Modules: 8
Merry Christmas!

After viewing many, many, MANY images of newspaper woven, Christmas themed articles on Pinterest, I decided to try out Santa's sleigh - seemed easy enough - oval shaped basket, a couple of runners and we are pretty much done. Or at least that is what I thought!

The basket was easy enough to make. I used an oval container as a form, cut out a cardboard base, covered with Christmas themed paper, weaved the basket with red and green newspaper tubes.

The challenge turned out to be the runners! Threading my tubes with wire so that it will hold the shape was itself quite a challenge! The wire needed to be thin enough to go through the tubes but thick enough so that it did not bend too easily. Once I threaded the tubes, using red tubes, I made 2 long lengths, similar to the cup handle. Here, it appears I did not wet the tubes, because quite a few of them cracked repeatedly :( Finally, I needed to figure out a way to hold up the sled above the runners. I am still not happy with the way this turned out and I am yet to figure out an effective way to do this.

Finally, this was the result:

Not what I had hoped for, but I know that my next effort will be better :) 


May the peace and blessings of Christmas be yours. And may the coming year be filled with happiness.

Merry Christmas!
More newspaper weaving! This attempt was more successful I think. I decided to go with Christmas colours, since anyway, these decorations were for Christmas. 

For these bells, I rolled newspaper tubes (about 150 in total), split them into 2, used acrylic colours mixed with glue and water to paint the 2 sets and allowed the tubes to dry completely. 

Once the tubes were dry, as with my last attempt, I used a bell form and wove these ornaments. The woven bells were themselves quite robust, but to add a little shine and sturdiness, I coated them with polyurethene. Allowed to dry and lo and behold, 2 beautiful ornaments ready for Christmas! 

Model Details:

Model: Woven Christmas Bell

Origin: Traditional

Difficulty Level: Low Intermediate

Model Size: ~5 inches tall 

Tutorial (making newspaper tubes): Youtube

Newspaper Weaving is one art that fascinates me, though till date, I have not been very good at it. But for this year's Christmas, I decided to try some ornaments using weaving. And this Christmas bell is one of my first attempts. 

For this bell, I first rolled newspaper tubes, colored them using acrylic paints, wove the bell using a form and finally coated with polyurethane.
Lots of work, but I am loving it! 


Model Details:

Model: Woven Christmas Bell

Origin: Traditional

Difficulty Level: Low Intermediate

Model Size: ~5 inches tall

Thanks be unto God for His unspeakable gift. 2 Corinthians 9:15

May this Christmas be a time of reconciliation and peace, may the love of Christ be with us and His peace surround us. May our Christmas be a time of healing, giving and sharing.

Merry Christmas!

And here are a couple of really adorable Christmas earrings that I had recently folded. I absolutely love how well they have turned out!

The first pair is made with red beads and oxidised bead caps. And of course, red and white washi paper. The second pair is made from kami paper with wooden beads to add some green relief.


 This Christmas has been a very busy time for me. I had participated in a couple of Christmas sales and have been busy making paper jewelry! And paper jewelry is time-consuming work! So I didn't get a lot of time to make anything special for Christmas 2014.

One thing that I did try was this modular star. The star is actually made from Bascetta Star modules. The star requires a total of 24 modules. The modules are folded as usual. For assembly, instead of using 3 modules for the pyramids, here we use 4. From then on, it is pretty straight forward. Keep adding modules in a circle. I found it easier to assemble the circle first and then worry about fixing the centre. I used glue to hold the joints well, since I had planned on adding it to my Christmas tree.

The first star that I did was in rainbow colours. I think a better choice of paper would have been paper coloured on both sides, like copy paper. So I did another star with Christmas colours. Very happy with the result this time :)

So that is my Christmas decoration for this year. Hope you have fun with this model :)

A very merry and joyous Christmas to my readers. Have a wonderful day :)


Model Details:

Model: Modular Star

Creator: Paolo Bascetta

Difficulty Level: Low Intermediate

Paper Ratio: Square

Paper Size: 3 inches

Model Size: ~ 6 inches diameter

Number of Modules: 24

Tutorial Link (for making the modules): Youtube
Christmas is another 2 months away, but Christmas exhibitions and craft bazaars are sooner and well, I hope to participate in at least 2 Christmas events! So I have been busy making origami jewelry. 

These origami angel earrings, are something new that I have trying out this year. And going from the response on my Facebook page, I am sure this will sell well :)

This chain with a modular wreath as a pendant, is a favourite of mine. And I am in love with this colour combination too! I added the pendant to an 18 inch red organza ribbon necklace, using a very cute bail that I have been wanting to use for a long time now and finally got a chance to.

I went for the vintage look with this bracelet. Each star is made from paper that I cut from a discarded book, strung together with black beads and crystals. I almost always finish my bracelets with toggles - they are so much easier to close than lobster clasps I think. I used heart toggles for this bracelet. We do want to spread love this Christmas, don't we??

I regularly post my origami jewelry on my Facebook page. So if you haven't liked my page, do head over and take a look :)

With Christmas just round the corner, there is no better time to fold Santas, is there? I tried this Santa because of how natural he looks. I think all that this Santa is missing, is his big sack of toys!

The model has been adapted by Steve and Megumi Biddle, from the original one created by Steve Casey, and can be found in the book 'Essential Origami'. This book is a good place to start for beginners and the Santa is one of the more advanced models.

This Santa cannot stand by himself, so I added wire loop to his cap, and now he occupies his own special place on our Christmas tree!

Model Details:

Model: Santa Claus

Creators: Steve and Megumi Biddle

Book: Essential Origami

Authors: Steve and Megumi Biddle

Difficulty Level: Low Intermediate

Paper Ratio: Square

Paper Size: 6 inches

Model Size: ~3.5 inches

Yet another design by Martin Sejer Andersen that I recently folded :) This was initially named 'The Unnamed Ring'! and has recently been christened the Braided Ring.

The ring is made from 14 modules. The modules start off with folding into fifths. So a template comes in handy. I quite like the little bits of colour (white in my case) that can be seen at the edges and at the centre of the ring. Btw, the ring is a 3D ring, but can easily be converted into a flat 2D version. But I did find the 3D version more stable than the 2D one!


Model Details:

Model: Braided Ring 

Creator: Martin Sejer Andersen

Difficulty Level: Low Intermediate

Paper Ratio: Square

Paper Size: 3 inches

Model Size: ~ 4 inch diameter

Tutorial: Youtube

Modules: 14

I recently ordered a lot of origami paper from Kim's Crane and am now thrilled with my supply of beautiful origami paper :) And since I had so much of variety, I decided to start off making Christmas decorations from them. And, I think the most common origami decoration for Christmas must be the Sonobe!

So here are a whole lot of origami sonobes made in a variety of colours and patterns, all set for Christmas. I am yet to add satin ribbons for hanging them from and I will be all set. I also ended up making a few Christmas stars, which you can see scattered around.

I worked on both 30-unit and 12-unit models. All using 3-inch squares, so all of them ended up pretty much the same size.


Model Details:

Model: Sonobe

Creator: Mitsunobu Sonobe

Difficulty Level: Low Intermediate

Paper Ratio: Square

Paper Size: 3 inch squares

Model Size: 3-inch in diameter

Modules: 12 or 30

Tutorial: Youtube 

The Multi Points Star, by Ilan Garibi, is a great addition to my origami collection this Christmas. The stars are modular, easy to make and can be used to make stars with as many points as required, starting with 6 points.

I realised that paper that is thicker than usual origami paper works great for this model. So I ended up using printer paper, wrapper paper etc.

I tried with various sizes of squares as well, starting with 2 inch squares and finished with 4 inch squares. All looked great!


Model Details:

Model: Multi Point Star 

Creator: Ilan  Garibi

Difficulty Level: Low Intermediate

Paper Ratio: Square

Paper Size: 1.5 inches upto 4 inches squares

Modules: 6 modules and above

Tutorial: Youtube 

This is actually a very simple modular star, made from simple square bases. I had actually done this as a wealth-from-waste project, using some left over wedding invitations that my brother had given me. His invites were a gorgeous combination of red and white and I also loved the texture of the card. So I reused the card to make a simple star ornament. Just a bit of glitter and I was done.

And I will also post a tutorial on making the star. It is quite simple and would make lovely Christmas decorations..

Model Details:

Model: Simple Modular Star

Difficulty Level: Simple

Paper Ratio: Square

Paper Size: 5 inches

Number of Modules: 5

Instructions: PaperNPearlz
The Stellated Dodecahedron, commonly called the Bascetta Star is a very popular modular origami and was designed by Paolo Bascetta. This spiky star becomes especially famous during the Christmas season. Though there is still some time for Christmas, I decided to give this a go.

It is a very simple design to work on and will be a good one for beginner origamist who wish to do some modular origami. As with most modular origami, folding the individual modules is an easy job and creating the star from the modules is slightly more complicated.

The design works best with dual coloured paper.

Model Details:

Model: Stellated Dodecahedron (Bascetta Star)

Creator: Paolo Bascetta

Difficulty Level: Low Intermediate

Paper Ratio: Square

Paper Size: 4 inches

Number of Modules: 30 Units

Tutorial Link: Youtube