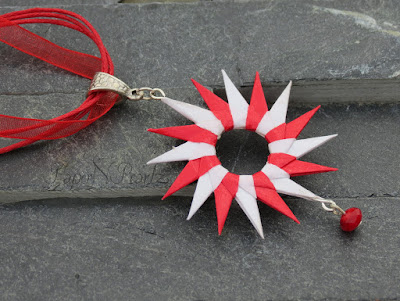
This Christmas has been a very busy time for me. I had participated in a couple of Christmas sales and have been busy making paper jewelry! And paper jewelry is time-consuming work! So I didn't get a lot of time to make anything special for Christmas 2014.

One thing that I did try was this modular star. The star is actually made from Bascetta Star modules. The star requires a total of 24 modules. The modules are folded as usual. For assembly, instead of using 3 modules for the pyramids, here we use 4. From then on, it is pretty straight forward. Keep adding modules in a circle. I found it easier to assemble the circle first and then worry about fixing the centre. I used glue to hold the joints well, since I had planned on adding it to my Christmas tree.

The first star that I did was in rainbow colours. I think a better choice of paper would have been paper coloured on both sides, like copy paper. So I did another star with Christmas colours. Very happy with the result this time :)

So that is my Christmas decoration for this year. Hope you have fun with this model :)

A very merry and joyous Christmas to my readers. Have a wonderful day :)


Model Details:

Model: Modular Star

Creator: Paolo Bascetta

Difficulty Level: Low Intermediate

Paper Ratio: Square

Paper Size: 3 inches

Model Size: ~ 6 inches diameter

Number of Modules: 24

Tutorial Link (for making the modules): Youtube
Fumiaki Kawahata's most well-known origami is probably the Origami Yoda. But, I doubt I will ever make it - for one, I am not very clear on who exactly Yoda is (Star Wars and I are galaxies apart!!) and two, I am not really good at folding people/animals/birds from paper. Somehow my models don't come out with a smooth finish and end up looking very unrealistic!

The modular ball, on the other hand, is one of only 3 modular origami designed by Fumiaki Kawahata. I have always been put off by how complex it looks, until I finally gave it a try today. Surprisingly, it is pretty easy to make. There are 6 modules that are basically pleated. Each corner is folded perpendicularly to the initial pleat, to form 2 perpendicular arms.

Now the way the model is put together is something I have not seen before! There is none of the usual tabs and pockets to assemble the model. Instead, 2 modules are placed facing each other, so that their perpendicular arms meet in the centre. Now, these 2 arms hold in place a third module. It is a little tricky initially, but pretty simple once you get the hang of it. Only thing to remember is that, if one module is taken out, the whole model will come undone.

Model Details:

Model: Modular Ball

Creator: Fumiaki Kawahata

Difficulty Level: Low Intermediate

Paper Ratio: Square

Paper Size: 3.5 inches

Model Size: ~ 3 inches

Tutorial - Modules: Youtube

Tutorial - Assembly: Youtube
Christmas is another 2 months away, but Christmas exhibitions and craft bazaars are sooner and well, I hope to participate in at least 2 Christmas events! So I have been busy making origami jewelry. 

These origami angel earrings, are something new that I have trying out this year. And going from the response on my Facebook page, I am sure this will sell well :)

This chain with a modular wreath as a pendant, is a favourite of mine. And I am in love with this colour combination too! I added the pendant to an 18 inch red organza ribbon necklace, using a very cute bail that I have been wanting to use for a long time now and finally got a chance to.

I went for the vintage look with this bracelet. Each star is made from paper that I cut from a discarded book, strung together with black beads and crystals. I almost always finish my bracelets with toggles - they are so much easier to close than lobster clasps I think. I used heart toggles for this bracelet. We do want to spread love this Christmas, don't we??

I regularly post my origami jewelry on my Facebook page. So if you haven't liked my page, do head over and take a look :)
With Tomoko Fuse's lecture and workshop coming up this weekend, I decided to try out another of her popular designs - the Petals Kusudama (Type II). The kusudama is made from 30 units. Each unit has a base and an inset, which is folded into the base. The units are assembled like a sonobe. The kusudama holds well even without any glue, though, since I wanted to make it into a hanging ornament, I ended up gluing the joins.

A 3-colour combination works well for the kusudama. And for that, it is best to ensure that the paper used for the insets is single-sided - coloured on one side and white on the other. If it is double sided, then it works best if the paper has a different colour on both sides.

I used copy paper for the base and 60 gsm origami paper for the insets. So the model turned out pretty strong and sturdy. I also ended up making a tassel (this is pretty tedious work!) and string it along with a few beads and the kusudama to get myself a very pretty ornament :)

Model Details:

Model: Petals – Type II – Kusudama

Creator: Tomoko Fuse

Book: Floral Origami Globes

Author: Tomoko Fuse

Difficulty Level: Low Intermediate

Paper Ratio: Rectangle in ratio 1:2

Paper Size: 3.5 inches by 1.7 inches

Model Size: ~ 4 inches

Number of Modules: 15 rectangles of 1 colour and 15 rectangles of a second colour

Tutorial: Youtube
We have a very exciting day coming up here in India! On 21st September, the origami master, Tomoko Fuse, is all set to conduct a lecture followed by a workshop, here in Bangalore, India :)

Tomoko Fuse's visit to India is a part of the World Assembly of Women in Tokyo, a symposium that takes place between 12th to 14th September. The period before and after the symposium, 8th – 19th September, has been positioned as the Shine Weeks and a series of women-related events will be held in Japan and overseas. The Japan Foundation, New Delhi is organizing these events in India.

Tomoko Fuse's first workshop will be held in Delhi on 18th September. This will be followed by her lecture and workshop in Bangalore on 21st September. The best part of the workshop is that the entry is free! Yay! So I am all set and raring to go :)

After attempting Fumiaki Kawahata's Diplodocus in my previous post, I decided to try the origami dinosaur earrings for my Little Miss.

I tried out different sizes and finally this was the pair that I liked the best. I used red kami paper with print on it.

How do you like it? As for my daughter, she is very pleased! So yay for mummy!! 😀

Model Details:

Model: Dinosaur Earrings 

Creator: Fumiaki Kawahata

Book: Origami Dinosaurs 2

Author: Fumiaki Kawahata

Difficulty Level: High Intermediate

Paper Ratio: Square

I know zilch about dinosaurs! But Little Miss happened to see some origami dinosaur earrings on Etsy and wanted one for herself.

So I set about experimenting, since single-sheet origami isn't my cup of tea. Fumiaki Kawahata's book on Origami Dinosaurs has this folding for the Diplodocus, which was an interesting origami to fold. For the uninitiated, a diplodocus is a large, long-necked dinosaur, with a long tail. The animal is said to grow to a length of 24 metres (79 feet!!)

Since I wanted to make a small earring, I started of with a fairly large square first, just to see if I was able to fold it. The big grape coloured one is folded from a 7-inch square. And then, using progressively smaller squares, I refolded the origami. My smallest is folded from a 2-inch square. It is still too big to be an earring, but I will get there!


Model Details:

Model: Diplodocus (Dinosaur)

Creator: Fumiaki Kawahata

Book: Origami Dinosaurs 2

Author: Fumiaki Kawahata

Difficulty Level: High Intermediate

Paper Ratio: Square
The origami spiral is yet another beautiful modular origami by Tomoko Fuse. Because of how colourful it looks, I had tried this out a long time back - about 3 years back, when I was pretty much a newbie to origami. While folding the modules was pretty easy, I just couldn't figure out how to connect one unit with the next. And finally gave up.

Now, since I have gained a little more experience, I gave it another try. It still required some figuring out, but I was able to get the principle at last :)

I wanted to make a spiral with at least 10 rings in it. Since each ring has 8 modules, I needed at least 80 modules. I added a few more, till I had 100 modules in all and finally set about assembling the modules. So now, based on the number of modules used in a model, the spirals is my biggest project!


The basis for the spiral is the ring which is made from 8 modules. The ring itself will make a good Christmas decoration I think. It would be better to use 80 gsm paper, though this might make it a little difficult to assemble the modules. If making the spiral, I would suggest 60 gsm origami paper. Colourful paper is best for the spirals, resulting in some very colourful and attractive origami.

Be sure to glue the joints, especially for the spirals - rest assured, everyone who sees it will want to handle it and you will end up with many modules that have come undone, unless it is glued in place.

I had used 3-inch squares for making the modules and ended up with a spiral that measured about 6 inches in diameter - a little too big to be used as a slinky! But in spite of that, everyone who has seen it has attempted using it as a slinky!


Model Details:

Model: Rings and Spirals

Creator: Tomoko Fuse

Book: Floral Origami Globes

Author: Tomoko Fuse

Difficulty Level: High Intermediate

Paper Ratio: Square

Paper Size: 3

Model Size: ~ 6 inches in diameter

Diagram: OrigamiModular


The Origami Star Dodecahedron is one of the many models that can be folded using the SIP (Six Intersection Pentagrams) Unit. The SIP model was co-discovered independently by Francesco Mancini, Jared Needle and Leong Cheng Chit. The same unit can be used to fold the Star Icosidodecahedron (60 units), the Star Dodecahedron (30 units) and the Star Prism (15 units). And since I tend to fold a lot of 30-unit models, I tried out the star dodecahedron :)

The units are fairly easy to fold and assemble. I had used handmade marble paper and am quite pleased with the way it turned out. And I absolutely love the ethnic feel that the background adds to the picture! 😍

Model Details:

Model: Star Dodecahedron

Creator: Francesco Mancini

Difficulty Level: High Intermediate

Paper Ratio: Rectangle in ratio 1:2

Paper Size: 4 inches * 2 inches

Model Size: 7 inches in diameter

Modules: 30

Diagram: Creating Origami (The pdf provides the instructions for the Six Integrating Pentagram model, but the first page of the pdf has the diagrams for folding the unit)

Tutorial: Youtube 

The strawberry wreath is a simple variation of the origami traditional 16-pointed star. While the original star is single-coloured, this variation is double coloured and looks good with double-sided paper. The moment Little Miss saw the strawberry colours I had used for this star, she decided that it should be named the Strawberry Wreath :)

I have been meaning to make a tutorial on one of the traditional origami designs and have now revised the plan and decided to make one on this variation. So hopefully soon, I should have my next tutorial ready :)

Model Details:

Model: Strawberry Wreath

Origin: Traditional

Difficulty Level: Simple

Paper Ratio: Square

Paper Size: 3.5 inches

Model Size: ~6.5 inches in diameter

Modules: 16

Tutorial: Youtube 

The Poinsettia Floral Ball is a beautiful kusudama from Meenakshi Mukerji's book 'Marvelous Modular Origami'. I have been wanting to make this model for quite some time, but never got around to it! So when I got some pretty pink wrapping paper, I finally gave it a go. Well, red paper would have been the obvious choice for a poinsettia flower, I do realize, but I kinda liked this paper for the model.

The modules are pretty easy to fold. Assembly is also fairly simple. The lock is quite strong, but I did end up adding a little glue to a few corners. All these ball-like modulars tend to get thrown about a bit, so always makes sense to add some glue at the joints. The floral ball is fairly large - mine was about 5.5 inches in diameter (I had used rectangle that were 4 inches by 2 inches).

The book provides quite a few variations in the floral balls and hopefully, I will soon get around to folding those as well :)

Model Details:

Model: Poinsettia Floral Ball

Creator: Meenakshi Mukerji

Book: Marvelous Modular Origami

Author: Meenakshi Mukerji

Difficulty Level: Low Intermediate

Paper Ratio: Rectangle in ratio 1:2

Paper Size: 4 inches * 2 inches

Model Size: ~5.5 inches in diameter

Modules: 30

Yet another simple modular origami made from a waterbomb base. This one is even named 'Quick and Easy Modular" :) The model looks complex but it is fairly simple to make. Reminds me of the origami spinner.

The modular is made from 6 units which are pretty easy to fold. The modules lock well and require no glue.

Yet another project for beginners to modular origami!

Model Details:

Model: Quick and Easy Modular

Creator: Heather Shida

Difficulty Level: Simple

Paper Ratio: Square

Paper Size: 5 inches

Model Size: ~6 inches

Modules: 6

Tutorial: Youtube 

I am always on the lookout for some easy origami to teach Little Miss, my daughter. And when I find modular origami that she can do, I am doubly delighted. So yesterday, I happened upon this beautifully easy modular action origami, the origami magic circle and of course, had to immediately fold it. It is so simple that it took me all of 15 minutes to fold and assemble the 8 modules!

Each module starts from a waterbomb base. When assembling, absolutely no glue is required since each module locks well into the adjacent module. When assembled, the model resembles a flower (second pic). When the pointy ends are turned inwards, they end up meeting in the middle and the model becomes a circle.

A few tips:

* Use double-sided paper. Copy/printer paper is perfect for this model. This will ensure that the uncoloured side of the paper is not visible at the open end.

* If kids are attempting the model, use paper that is at least 4-5 inches in size. Little Miss, who is 6, found it difficult assembling the model when I gave her 3-inch square papers (slotting the two tabs simultaneously into the two pockets turned out to be frustrating for her).


Model Details:

Model: Magic Circle

Origin: Traditional

Difficulty Level: Simple

Paper Ratio: Square

Paper Size: 5 inches

Model Size (circle): ~5.5 inches

Model Size (flower): ~8 inches

Modules: 8

Tutorial: Youtube


I have not been the most active blogger these days, mainly because I am experimenting with paper jewelry and well, that is pretty time-consuming. Though I enjoy making paper jewelry, there is nothing like folding a good solid modular origami to get one back in the blogging game! This modular icosahedron is a fairly easy model to complete and is folded from half a square. So 15 squares, cut into half gives the 30 rectangles required for the icosahedron. The base unit is Lewis Simon's Triangle Edge Module.

Some points to note:

* I worked with coloured copy paper (80 gsm), which resulted in a good, sturdy model.

* If you are working with single sided paper, be sure to start with the coloured paper facing down (as given in the diagram).

* If your model is going to be tossed around (and believe me, this icosahedron very quickly becomes a football!), then be sure to add a dab of glue at the joints.

Model Details:

Model: Icosahedron from Triangle Edge Modules

Creator: Lewis Simon

Book: 3D Geometric Origami

Authors: Lewis Simon, Bennett Arnstein and Rona Gurkewitz

Difficulty Level: Low Intermediate

Paper Ratio: Rectangle

Paper Size: 3.5 inches * 1.75 inches

Model Size: ~3 inches

Modules: 30

Tutorial: Youtube 

My daughter, Little Miss, has recently become very keen on recycling and reusing whatever she can. So when I was recently asked to make a few origami lotuses, she came up with the idea of making literary lotuses! And we are both delighted with the way the lotuses turned out. We initially tried a complete literary lotus - that is, the flower and the leaves were an old book paper. But our second attempt - book paper lotus with green copy paper leaves were more to our liking.

One thing I did find was that, the book paper is much thinner than the copy paper - which meant pulling out the petals had to be done with more care, else we risk tearing the paper. And since the paper was thinner, the literary lotus turned out a little smaller than the one made entirely from copy paper.


Model Details:

Model: Lotus

Origin: Traditional

Difficulty Level: Low Intermediate

Paper Ratio: Rectangle

Paper Size: 3 inches * 5.2 inches

Model Size: ~4 inches

Modules: 12

Tutorial: Youtube 

This month's theme at the Origami Society of Madras is a little different from usual. This month, we are working on a theme author instead of a theme object. And the author we have voted for is the grand-master of origami - Akira Yoshizawa.

The beauty of Akira Yoshizawa's models lie in the simple, elegant lines of his fold. His genius is evident in the way he captures an animal or an insect with the fewest folds possible! Ofcourse, there are a number of complex models to his name but his simple ones are the ones that capture the attention of even a beginner origamist.

His most popular model is the butterfly. I love this butterfly. When I first started teaching my Little Miss some basic origami, this was among the first models I taught her. And she became quite famous in her class, because she could fold a butterfly while most of her classmates folded only boats :) And inspite of the butterfly being an easy model to fold, it still looks amazingly like a butterfly! No wonder Akira Yoshizawa is credited as an origami grand master!

So today, what I folded was the origami shrimp from his book "Origami Museum Animals". Though the model is called a lobster, I think it resembles the shrimp more than it resembles the lobster. Again, with the fewest of folds, the grand-master has beautifully helped me fold a couple of cute little shrimps! Each shrimp is folded from a triangle formed by cutting along the diagonal of a square. In the notes, he has said that if the paper is thin enough, we can fold the square along its diagonal and then proceed with the shrimp, but I preferred folding it from a triangle. It helps that we can fold 2 shrimps from a single square which is what I did.

Model Details:

Model: Shrimp / Lobster

Creator: Akira Yoshizawa

Book: Origami Museum Animals
 

Author: Akira Yoshizawa
 

Difficulty Level: Low Intermediate

Paper Ratio: Triangle

Paper Size: 9.5 inch square cut along the diagonal

Model Size: The body measures ~ 3.5 inches and the antennae measure ~ 3.25 inches

The kusudama spiral, which looks to me to be less of a kusudama and more of a modular design, is created by Irina Krivyakina. The design is very similar to Tomoko Fuse's spiral origami.

In this design, the 6 sides of the cube are first assembled individually and then put together using connecting units. Each side of the cube is made up of 4 units which are folded together to form the spiral. A total of 24 units are required for the cube faces. The connecting unit is basically a bird base. 12 such units are required for assembling the cube.

3 inch squares are the perfect size for making the cube. I would not suggest a single-sided paper for the units used for assembling the cube. When using single-sided paper, while forming the spiral, I discovered to my dismay, that however I folded it, a little bit of the white was visible at the corners of the spirals. And it was very obviously seen in the completed cube :(

Model Details:

Model: Kusudama Spiral

Creator: Irina Krivyakina

Difficulty Level: High Intermediate

Paper Ratio: Square

Paper Size: 3 inches

Model Size: ~4 inches

Modules: 36

Photo Tutorial: Stranamasterov

Tutorial: Youtube


I am not sure of the creator of these origami pleated boxes. My guess would of course, be Tomoko Fuse. But I am not able to find any reference to the box in any of her books. Unfortunately I do not remember where I learnt to fold this either. And I do not remember the name of the box either. Since it has got a whole bunch of pleats, I just call it the pleated box. So, not knowing any of these details, I have had little success in finding out the creator. But for now, I am tagging it as Tomoko Fuse.

The box can be made from a variety of paper. I have tried mine with wrapper paper, hand made paper, origami paper, printer paper and it turned out well in all of them. The one made from origami paper (the variations-in-blue one) is my favourite. I tried it out in a variety of sizes too. From 5 inch squares to 2 inch squares. All look fantastic I think :)

Model Details:

Model: Pleated Box 

Creator: Tomoko Fuse

Difficulty Level: Low Intermediate

Paper Ratio: Square

Modules: 4 for the base and 4 for the lid
The truncated icosahedron is another of Tomoko Fuse's modular creations. This is from her book Unit Polyhedron Origami. The model is fairly easy to do. It rather reminds me the origami football I had folded nearly a year back!

The model is made of a combination of hexagonal flat units and connecting units that connect the hexagonal units. Usually modular units have a pocket and a tab - each tab fits into its adjacent unit. But in these models, the hexagonal shapes have 3 pockets and no tabs. So the connecting units fit into the pockets of adjacent hexagons and hold the model together.

I like the little windows in the model as well :) Also, though the backs of the hexagons can be seen through the windows, the reverse side of the paper is not seen in the completed unit. So single-sided paper works perfectly well. I had used 80 gsm paper which turned out to be great for this model. The completed truncated icosahedron is sturdy - so sturdy, in fact, that my brother suggested we use it as a football! 😮


Model Details:

Model: Truncated Icosahedron

Creator: Tomoko Fuse

Book: Unit Polyhedron Origami
 

Author: Tomoko Fuse
 

Difficulty Level: Low Intermediate

Paper Ratio: Square

Paper Size: 3.5 inches for the hexagons; 1.75 inches for the connectors

Model Size: ~5 inches in diameter

Modules: 50

The rabbit by Stephen O'Hanlon is another easy rabbit to do. And I found it a lot more realistic than the traditional rabbit. Love the super-long ears of these rabbits!

It takes very little time to complete - about 10 minutes or so. So I think it will also make a great kids project.

Model Details:

Model: Rabbit 

Creator: Stephen O'Hanlon

Difficulty Level: Low Intermediate

Paper Ratio: Square

Paper Size: 6 inches

Model Size: 3.25 inches in height and 2.5 inches across

Diagram: Fishgoth.com

Tutorial: Youtube 

The traditional origami rabbit is pretty easy to make and there are plenty of tutorials out there to help out. I have been trying out other rabbits as well, and am amazed at the number of origami rabbits there are - everything from the super simple to the super complex! I think I can make these every day for a month and still have pending designs!

Model Details:

Model: Rabbit 

Origin: Traditional

Difficulty Level: Simple

Paper Ratio: Square

Paper Size: 3 inches

Model Size: ~2 inches in height and 1.5 inches across

Tutorial: Youtube 

If you are familiar with folding the traditional origami crane and the origami Kawasaki rose, then why not try out the Origami Tsuri Rose - a modified crane with a rose in the centre.

The tsuru rose has been on my to-do list for quite some time. And finally I was able to try it out - mostly because the monthly theme at the Origami Society of Madras is a crane and I didn't want to end up folding the traditional crane :)

The crane is not easy to fold - I would rate it as a high intermediate. And the reason for is, once the pre-creasing is over, immediately on starting the folds, the model becomes 3D. So almost from the beginning (Step 10 in the diagram), we end up folding in the air. And as the folding progresses, there are quite a few layers of paper to fold, which makes it harder to fold or get crisp creases. And getting a good, well-creased crane without crushing the rose in the centre was pretty challenging for me. That said, after I had tried it a couple of times, I was quite happy with the outcome :)


Model Details:

Model: Tsuru Rose

Creator: Satoshi Kamiya

Difficulty Level: High Intermediate

Paper Ratio: Square

Paper Size: 6 inches

Model Size: ~ 5 inches wingspan and 4 inch from head to tail

Instructions: Coisas de papel

I love reading and, consequently, love collecting bookmarks. But since it was Valentine's Day a couple of days back, I wanted to make heart shaped bookmarks. So off I went, making a whole bunch of these heart bookmarks for everyone I know! Wonderful V-Day gift for a book lover, huh?

The bookmarks are pretty easy to make, thanks to the tutorial by Jo Nakashima, who is also the creator of this model. They are made from a rectangle in the ratio 1:2 but from the tutorial, I understand any rectangle will work just fine.

Model Details:

Model: Heart Bookmarks 

Creator: Jo Nakashima

Difficulty Level: Low Intermediate

Paper Ratio: Rectangle

Paper Size: 6 * 3 inches

Model Size: ~4.5 inches long by 1 inch heart

Tutorial: Youtube


Valentine's Day - a very nice time to make origami hearts! So I found these easy hearts, which take about 5 minutes to complete :)

I had intended to make these hearts as covers for a couple of boxes that I had, so I made them from big, 6-inch paper. I love polka dots, so I had this lovely red, polka dot wrapper paper which I was able to use now. This paper is a little thicker than the 80 gsm printer paper, which made it very good for this heart.

Now, all I need to do is fix them on top of 2 boxes that I am making for my husband and my daughter. And I am all set for Valentine's Day!


Model Details:

Model: Hearts 

Creator: Haui Boglárka

Difficulty Level: Simple

Paper Ratio: Square

Paper Size: 6 inches

Model Size: 5 inches across and 4.5 inches in length

Instructions: Zsuzsiorigami  (no longer available)

Tutorial: Youtube

After folding the octagonal box from 4 units, I tried the 8-unit box. While folding, I realized that the 4-unit version is actually an extension of the 8-unit box. So folding the individual modules was pretty easy.

The assembly was not as easy as the 4-unit box. Mainly because there are 8 arms that have to be folded together to form the spiral at the top. And obviously, dealing with 4 spiral arms was way easier :)

I had used 3 inch squares to make the modules. So the result was a fairly small, octagonal box which is the perfect size for gifting jewelry in.

Model Details:

Model: Octogon Box 

Creator: Tomoko Fuse

Book: Let's Fold Spirals
 

Author: Tomoko Fuse
 

Difficulty Level: High Intermediate

Paper Ratio: Square

Paper Size: 3 inches

Model Size: ~ 2.5 inches across and 1.25 inches tall (including spiral)

Modules: 16 (8 for base and 8 for lid)

Of late, I have been making paper reeds in the fond hopes of making a bowl. I had previously made a paper woven bowl and basket and after coating it with a mixture of fevicol and water, I have found it to be quite robust!

Since rolling the paper reeds was the most time consuming part of making the bowl, I have been making these reeds as and when time permitted. So finally, when I had about 100 of these reeds, I figured it was time to make my next bowl.

This bowl is larger and more sturdy than my previous one. I have still not learnt how to end the bowl! I had no clue what to do at the end, so finished it rather abruptly!

A lot more practice is required, if I wish to end up with a smoother, more refined finish. Starting the bowl requires more precision. It is difficult to hold all the strands at the beginning and as a result, the beginning isn't very smooth. The sides were pretty easy to do, except for the end of course :) Over all, am neither happy nor unhappy with my effort.

If you would like to give these paper weaves a try, this video should be of help. The language is not English, but the video is still very useful 😊
SaveSave

This month's theme at the Origami Society of Madras is Boxes! Yay! Love it :)

So I got cracking with this octagonal box by the ever-prolific Tomoko Fuse. I have this absolute fascination for boxes with spirals. I am always astounded by how beautifully elegant they look! So I worked on this spiral box from Tomoko Fuse's 'Let's Fold Spirals'.

A couple of years back, I had completed yet another spiral box - a hexagon and I love that box. I still have it and it is still as sturdy as ever. The octagon box, though, isn't as sturdy as the hexagon box because of the way it is constructed. This box is made from 4 modules for the lid and 4 for the base. And each module forms 2 sides of the octagon.

I had used 80 gsm paper (love the rather Christmassy look that the red/green combination brings in!) which gave stability to the box. Thicker paper should work much better though.

Model Details:

Model: Octagonal Box with Spirals 

Creator: Tomoko Fuse

Book: Let's Fold Spirals
 

Author: Tomoko Fuse
 

Difficulty Level: High Intermediate

Paper Ratio: Square

Paper Size: 5 inches

Model Size: ~4 inches across and 2 inches tall (including spiral)

Modules: 8 (4 + 4)

The Origami Society of Madras has started a recent project - to fold as many models as possible, based on a particular theme and post it on the group's Facebook page. The theme is selected via voting and this month's theme has been Dragons.

If you go through my posts, you will quickly realize that I have a general aversion towards folding life forms - I have about 50 posts on lifeforms as opposed to 120 posts on modular origami! But I did want to take part in this initiative, so finally, on the very last day of this month's theme, I tried out Robert Neale's origami dragon.

The dragon is fairly easy to fold, easier to fold when using thin paper (60 gsm or lesser). I had used 80 gsm paper, so the feet of my little guy don't look too good, in spite of putting my bone-folder to good use!

I started with a 4.5 inch square and the final dragon measured about 1.5 inches tall and 2.25 inches across.

Model Details:

Model: Dragon 

Creator: Robert Neale

Book: Origami Monsters and Mythical Beings
 

Author: Jay Ansill
 

Difficulty Level: Low Intermediate

Paper Ratio: Square

Paper Size: 4.5 inches

Model Size: ~1.5 inches tall and 2.25 inches across

Tutorial: Youtube 

In preparation of Valentine's Day next month, I thought I would try out something new. The Kawasaki rose has always been challenging for me, so I decided to make it even more challenging by making a rose ring using the same rose.

I have tried out the rose ring before, but I wasn't too happy with the way it turned out then. But after some practise and some fails, here is one I absolutely love. Goes to a good friend of mine too. Hope she likes it 😀

The paper I have used is pearlized washi paper in a soft peach colour with tinges of gold woven into the paper. The final ring was glazed to strengthen it.


The yellow rose is another one I made using similar paper. I used a bronze ring, which I thought went better with the rose. This was even more challenging, since the paper was smaller than the peach ring. But well, I am happy with the final outcome!! 😃

Model Details:

Model: Rose Ring 

Creator: Toshikazu Kawasaki

Book: Origami Dream World - Flowers and Animals
 

Author: Toshikazu Kawasaki
 

Difficulty Level: High Intermediate

Paper Ratio: Square

Tutorial: Youtube

Tomoko Fuse's book 'Unit Origami Fantasy' is in Japanese, so I am not able to find the name of this model! Hence the generic title for the post :) Do leave a comment if you are aware of the name of the model. Though the book is in Japanese, the detailed step-by-step instructions are more than enough to complete the models.

As far as the model goes, this is a simple model, made from a windmill base. I used printer paper (80 gsm) for the units, which turned out pretty good for this model. I think if I had used regular 60 gsm origami paper, the model might not have been as sturdy. For a sturdier model, thicker paper such as scrapbooking paper should work well, given the simplicity of the folds and the assembly.

In general, for modular origami, I tend to go for the icosahedron assembly (30 unit assembly). But for a change, I tried the cube assembly (12 unit assembly). Each face is made from 4 modules and there are a total of 6 faces to the cube.


Model Details:

Model: Cube Modular 

Creator: Tomoko Fuse

Book: Unit Origami Fantasy
 

Author: Tomoko Fuse

Language: Japanese
 
Difficulty Level: Low Intermediate

Paper Ratio: Square

Paper Size: 3 inches

Model Size: ~3 inches

Modules: 6

I am quite fascinated with Tomoko Fuse's book 'Floral Origami Globes' and after completing the Butterfly Kusudama, I didn't waste much time, working on the next kusudama.

This kusudama is the Chrysanthemum Globe Kusudama, assembled from 60 rectangles. Each unit is assembled from 2 rectangles - a base and the chrysanthemum, inserted into the base.

The kusudama assembly is the basic sonobe assembly for 30-unit icosahedrons, but with a small difference. While the sonobe assembly is in a clock-wise direction (the pockets open to the right and the tabs go into these pockets), the chrysanthemum assembly is anti-clockwise - that is, the tabs are inserted into pockets that open to the left.

The chrysanthemum unit has multiple layers of paper in the central petal, so thin paper works better. I have used regular copy paper and had to be extra careful when folding it so that it did not tear in the middle.

Model Details:

Model: Chrysanthemum Globe Kusudama 

Creator: Tomoko Fuse

Book: Floral Origami Globes
 

Author: Tomoko Fuse
 

Difficulty Level: Low Intermediate

Paper Ratio: Rectangle in ratio 1:2

Paper Size: 4 inches by 2 inches

Model Size: ~5 inches in diameter

Modules: 30

Tutorial: Youtube 

Recently I had purchases some earring bases shaped like little bird cages, complete with birds too! So decided to use them to make some pretty origami earrings, with little stars in them.

Tried out a couple of colours and options and I must admit my favourite are the literary stars, made from the pages of an old book. Love the idea of recycling as well and these were so cute that they got sold out pretty fast!


The next option was using momigami paper. The crinkly texture of this paper adds an interesting dimension to the stars I thought. The royal blue earrings are made from this paper.


Finally I tried regular origami paper to make the brown stars. These stars blended well with the earring base. And once glazed, they had a nice shine to them too!

What do you think? Which are your favourites?