Showing posts with label complex. Show all posts


Merry Christmas, dear readers! Hope this season brings you much joy and peace, despite the problems that still persist with the virus! 

Here are my latest favourite projects - Leaf trays made from newspaper tubes, using red and green tubes to add a little Christmas vibe to it! 


And check out these pretty Christmas baubles - yet another eco-friendly project. Though not by me! This is done by a group called PeopleKraft. Do check out their Insta page for more of their work. These baubles are made from scrap fabric, left over from various other projects. I thought it was an innovative way of reusing such material and so, ordered a couple of these baubles for my Christmas tree! 

Once again, a Merry Christmas!


Stay Home Stay Safe! Who would have thought that a microscopic virus could bring the world virtually to a halt?? While this pandemic has had a terrible impact around the globe, it is during the lockdown that I have been able to connect with friends from long back, get back into my blogging, work on some incomplete projects.

One of the projects is this newspaper weaving project - Making coasters from newspaper tubes, using the root weaving or coiling technique. I was kinda bored of circular shapes, so attempted something a little different. Not sure how well it turned out, but I can say for certain that the coasters are rock solid.


The holder was a last minute idea, since I had plenty of rolls left over. Turned out pretty useful too, since I didn't end up losing a coaster or two, just because they were left lying around! The edges of the holder leaves a lot to be desired and even now, I am not too sure how to go about making this, but hopefully in the future, it will get better.

On the whole, I am happy with the outcome.


Model Details:

Model: Coiled Coasters with Holder

Difficulty Level: Complex

Tutorial (making newspaper tubes): Youtube

Tutorial (coiling or root-weaving technique): Youtube


Given the intense newspaper weaving session from the last post, I decided to do something a little simpler. So here is my pair of pot holders, made in aqua and white - the colours of my parents' living room. For quite some time now, they have been asking me to weave them something that goes with their room colours. And for a looong time now, I have been putting it off - mainly because I wasn't too sure that I would do justice to their aesthetically pleasing room! 

 So finally, after much deliberation, I decided to try out a couple of pot holders, to be kept over their piano, along with a candle stand in the same colour combination. Since I needed a pair, I used the exact opposite colours, in the same pattern. 

I am quite pleased with the way it has turned out. The centre portion, made from a single tube that is twisted around the base tube, was something new. While this is not always even, I quite like the effect produced. I believe I will use the same pattern in a few more weaves in the future!


A few months back, I had made a leaf-shaped tray using the technique of coiling with newspaper tubes. I decided to revisit the tray, this time using wood-stained tubes, the same ones I had used for this box with lid. This tray is bigger than my previous attempt, measuring about 15 inches at the longest length.


I had sprayed the tubes with water mixed with a little fabric softener, about half an hour before I started weaving. This resulted in very flexible tubes that did not break or crack while weaving. I will try out other methods of coating the tubes as I make other objects using the same technique.

Very happy with how even the weaving turned out. The closeup of the tray brings that out very well.


Finally tried out a new finish. I came across this style of finishing the edges, during my usual perusals on Pinterest and was quite fascinated by this. I feel this style is much better than the usual edging. This gives a very professional look to the product and has a very leathery appearance. I messed up the ending, but I have learnt from that and should do better next time.

Model Details:

Model: Tray

Difficulty Level: Complex

Tutorial (making newspaper tubes): Youtube

Tutorial (coiling or root-weaving technique): Youtube 

Tutorial for the edge: Youtube


More newspaper weaving, this time using magazine rolls. I had rolled up these tubes in the fond hope of making a pen holder. But for one reason or the other, I never got around to making them. So finally, thanks to new year resolutions, I decided to use them to make another attempt at coiling or root weaving.

This time, I decided to try out a rectangular shape, so that I could make it into a tray instead of a pencil holder. I had no particular idea of how big or how long the tray should be. I just coiled till I was happy with the size and till the tubes lasted!

The shape is a little wonky. As you can see, one side is a little larger than the other. But other than that, I think it a fairly good attempt.

The plus point of using magazine tubes is that the end result is very colourful and more cheerful than newspaper tubes that are painted a single colour! The end result is to be sent to a dear friend of mine, who had been asking me to sell one of my newspaper projects. I think this colourful tray will be a good addition to my friend's desk 💖


Model Details:

Model: Tray 


Difficulty Level: Complex

Tutorial (making newspaper tubes): Youtube

Tutorial (coiling or root-weaving technique): Youtube
So, after the last post on all the popular origami from last year, I realised that newspaper weaving was lagging behind. So I decided to try and complete at least 12 projects of newspaper weaving this year.

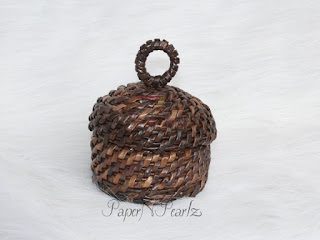
With that goal in mind, this is my first attempt - a newspaper woven little jewellery box with a lid. This is the first time I am attempting a proper lid, which will fit the box. My last attempt was rather rudimentary and I was not at all happy with that. While this is a definite improvement, I have ways to go before I can be really happy with this.

As is evident, this was also woven using the coiling technique. I guess I will attempt a few more projects using the same method. These tubes were coloured dark brown, using wood stain.


 Model Details:

Model: Coiled Box with lid

Difficulty Level: Complex

Tutorial (making newspaper tubes): Youtube

Tutorial (coiling or root-weaving technique): Youtube


Merry Christmas 2019, dear blog readers! 

It feels like the year had just begun and we are already at the end and looking forward to a new decade! Time does fly, doesn't it? 

Anyway, in the Christmas tradition, I decided to do something in the traditional colours of green and red. I had rolled a number of newspaper tubes some time back and had been wondering on the project to work on. So I decided to go ahead with the new style of weaving that I have been trying out these days. In case you, dear reader, haven't had an opportunity to see what I have been up to, do check out this blue leaf tray that I had done a few months back. Also check out the previous box and lid, done using the same red/green tubes. 

This style of newspaper weaving, called coiling or root-weaving, is tedious but results in really cool newspaper products that are absolutely eye-catching! The weave is without any form, so it is with some trial and error that I manage to do this style of free-form weaving. 


This bowl or rather, tray is about 7.5 inches in diameter and made entirely from newspaper tubes, coloured red and green. As with my previous blue tray attempt, here too, I attempted to paint both plain tubes and tubes with print still visible. Since the colours were both dark ones, I was able to obliterate most of the print after painting the tubes twice. With a single coat of paint, the colour is not very rich and the print is clearly visible. But with a second coat, the colour also becomes richer and most of the font are pretty much invisible! And what little is visible, is hardly seen in this style of weaving anyway! So that was a good discovery for me.

In total, to make this bowl, I have used a total of 50 plain green tubes, 25 green tubes with print visible, 100 plain red tubes and 30 red tubes with print visible. And as expected, with this style of dense weaving, the end product is very robust and strong. A coat of polyurethene and I have an absolutely amazing product!

So what do you think?


Model Details:

Model: Coiled Christmas Bowl

Difficulty Level: Complex

Tutorial (making newspaper tubes): Youtube

Tutorial (coiling or root-weaving technique): Youtube

I have rolled up tubes for a Christmas project but before that, decided to try out a little box with lid using the red/green combination. I have tried this method before, when I made a blue tray, but since it's been a long time since I did that, this box and lid is kind of a refresher course for me 😀
I liked the way this box came out. I added a little ring to the lid so that it is easy to open the box. The overall size is about 4 inches in diameter and about 3 inches in height.

The problem I faced was making a little indent for the lid so that it doesn't slide off easily. I am still to  figure out how to weave the lid. For this box, all I did was stick a couple of tubes to form the indent.

For this box, instead of using white tubes, I used tubes with print, painted red and green. In the close up shot, a little bit of the print is still visible, but of course, this cannot be avoided. I think the only colour which will completely obliterate the print is black.


Model Details:

Model: Coiled Box with lid

Difficulty Level: Complex

Tutorial (making newspaper tubes): Youtube

Tutorial (coiling or root-weaving technique): Youtube


One of the traditional methods of basket-weaving involves a technique called coiling. This technique combines a process of coiling materials such as grass and binding them together using flexible fibres.

The same process can be applied to tubes made from newspaper or magazines. Here the tubes are used in both the processes - they are wound and held together by other tubes. I first came across this technique of weaving in Pinterest and have since been fascinated by the method.

When I got an opportunity to try it out, I first attempted it using newspaper tubes. Needless to say, it wasn't much of a success! My coiling was loose and the tubes that held the coils together were not placed close enough to give a tight weave. And once you fail, even in something like craft work, it takes a lot of courage to get back on the proverbial horse, doesn't it?

So, after many months and with a lot of hesitation, I tried out this blue tray, in the shape of a leaf. The tubes are made from newspaper strips, around 10 mm in width and 260 mm in length, rolled around a 2mm skewer. I painted it prussian blue, since that was the colour I had in abundance! This time, since I knew what to expect, I was able to coil much better. Overall, it gave me much better results than my first attempt. The shaping is still a problem and that takes more practise I guess. On the whole, I am quite pleased with this attempt.

While this technique is more challenging than regular weaving, the result if much more pleasing. But I would not attempt this type of weaving unless I had a lot of time, because without doubt, it is much more time-consuming that the regular weaving that I do. This tray took me a good 3 days to complete! And that is just the coiling part. Time taken for rolling the tubes, painting and glazing the final product also needs to be considered.


Model Details:

Model: Coiled Blue Leaf Tray

Difficulty Level: Complex

Tutorial (making newspaper tubes): Youtube

Tutorial (coiling or root-weaving technique): Youtube
Yet another of Tomoko Fuse's models - this one from her book 'Floral Origami Globes', called Parallelogram Floral Globe.

The thing I love about this book is that each module is made of 2 parts - a basic unit (which looks like a sonobe module) called the 'Base',  and an insert, called the 'Face'. Each unit is assembled by joining the base and the face. So this basically means that I can use the single-sided paper, that I have plenty of, and still manage to get some colours in my model.

The other point about this book is that, in each section, there are only subtle differences in folding one model and the next. But these difference still result in new, really cool variations. And of course, the fact that you use only half a square for the base unit and a quarter for a face unit means the whole model is very economical!!

Model Details:

Model: Parallelogram Floral Globe 

Creator: Tomoko Fuse

Book: Floral Origami Globes
 

Author: Tomoko Fuse
 

Difficulty Level: Complex

Paper Ratio: Rectangles in ratio 1:2 for base and Squares cut into 4 quarters for face

Paper Size: 4 inch squares

Model Size: ~4 inches in diameter

Modules: 30 rectangles + 30 quarters

In recent days, I have been experimenting with newspaper weaving. So what exactly is newspaper weaving? In this art, we roll up newspaper strips into tubes, paint the tubes using acrylic colours and then weave the tubes into various shapes.

Easy to write, very difficult to do - at least for me! I have been trying out various methods of rolling, painting and weaving the tubes. Have been fairly successful, but if I browse the net for what others have done, I can see exactly how amateurish my attempts look!

But in recent attempts, the output has been pretty good, if I do say so myself! My latest attempt at weaving is this cup and saucer combination, made from lavender and brown tubes. Tutorials abound on the net, both written and video tutes and I have used them as much as possible to finally complete this product. And I must confess, I am quite proud of how it has turned out :)

The saucer measures about 7 inches in diameter, the cup (which is attached to the saucer) has a 5-inch base and measures about 6 inches in height. The toughest part was making the handle, I just couldn't figure out how people got such close loops!! Finally, practise paid off and I managed to shape the handle well.

At the end, I coated the entire thing in a mix of fevicol and water and allowed it to dry overnight. And now I have a good, very sturdy (you would be surprised to see how sturdy newspaper tubes turn out to be!) and pretty cup and saucer set, made entirely from newspaper!

An excellent way to recycle, I think :) 
Since in recent days, I have been trying out many modular origami. I wanted to try out the inverse of the previous model I had folded - the 120-unit rhombic icosahedron using Tomoko Fuse's double-sided convex hexagonal rings. This time, I had used concave modules. As before, this one is also made of 120 modules.

This model turned out to be one of my most challenging. Mainly because this was like assembling the model upside down! And initially quite a few times, I started assembling the pieces as I would a regular icosahedron, with the cones pointing out. Then I had to undo and reassemble correctly. A lot of painful rework! Also, as the assembly progressed, I found that there were a few instances when I just couldn't get that little tab (the one that inserts into the adjourning section?) in place. Finally, I just gave up, but the model is so tight that there is no way the pieces will slip out. I can even use it as a football I think :)

Model Details:

Model: Double-sided Concave Hexagonal Ring 120 unit Rhombic Icosahedron 

Creator: Tomoko Fuse

Book: Unit Polyhedron Origami
 

Author: Tomoko Fuse
 

Difficulty Level: Complex

Paper Ratio: Rectangle in ratio 1:2

Paper Size: 3.4 inches by 1.7 inches

Model Size: ~4 inches in diameter

Modules: 120

The Rhombic Icosahedron from Tomoko Fuse's book 'Unit Polyhedron Origami' is folded from 120 rectangular units. The assembly of this model is a serious test of patience! Folding the units took me a couple of days - it is no joke folding 60 yellow and 60 blue units! Assembly took me nearly half a day, a whole lot of patience and the aid of a couple of toothpicks. I was so tempted to tear the whole thing when I was assembling the last few pieces. Only the thought of folding another 120 pieces kept from doing it :)

The model is very sturdy. Well, I had used 80 gsm paper, so that was a very good decision in my view. Before assembling the model, I completed the 12 5-unit yellow centers first. Then I proceeded to add the blue units in the 3 and 4-unit assembly. In fact, I think if I had assembled the 3-unit blue sets as well, that would have made it even easier.

Altogether, a good, challenging model for me. There is another 120-unit model made from concave units, which would be the inverse of this model. I hope to do it. Some time, hopefully in the near future!

Model Details:

Model: Double-sided Convex Hexagonal Ring 120 unit Rhombic Icosahedron 

Creator: Tomoko Fuse

Book: Unit Polyhedron Origami
 

Author: Tomoko Fuse
 

Difficulty Level: Complex

Paper Ratio: Rectangle in ratio 1:2

Paper Size: 3.4 inches by 1.7 inches

Model Size: ~6 inches in diameter

Modules: 120

Tutorial: Youtube

In the past couple of years, I have made and sold quite a few of my origami earrings online. This has been a fairly easy job for me, since I could make the earrings I wanted and put them up for sale when I wanted to. There was no pressure and it helped me make more and more complex earrings.

This year, for the first time, I got a couple of opportunities to be a part of local market places that sold hand crafted goods. Since I have never been a part of such craft bazaars before, these experiences have been real eye openers!


Let me start off with the many lessons that I learnt during these forays: One - I could not gradually make earrings at my own pace! I needed enough earrings to at least cover the 2 tables that each stall would be provided with. And let me tell you, paper jewelry does NOT occupy space! So in the first event, even though I had about 200 pairs of earrings (Whew! Making them was an immense challenge! It felt like I was spending whole weeks at my work table..), my table looked half full! By the way, my earrings included leaf earrings, star earrings, umbrellas, pine cones, butterflies and hearts.


Two - So since my first stall looked hardly full, I decided that I need to diversify my jewelry. It was not sufficient that I made earrings, I needed to make things that take up space. So I started making bracelets and chains/necklaces. And that is what went into my second stall. I had a bigger variety of earrings - I included rose stud earrings, bird stud earrings, woven earrings, modular and wreath earrings. My bracelets included butterfly bracelets, star bracelets and bird bracelets. But still, I found that my tables did not look filled in!


Three - For my third event, I diversified even more! I included handmade bags, pillow boxes and little Christmas ornaments. And finally I was happy with the way my stall looked :)

Four - For a marketplace, it is not sufficient that you have just your products. In addition, a lot of accessories are needed. A major item was the packaging stuff. I needed boxes/zip lock packs to keep the jewelry in. Then I needed bags to put the boxes in. These bags also had to be handmade bags, to go with the handmade theme. I also found that having a stand listing the price of all the items was very useful. And a sign board was an absolute essential.


Now, these are things that I need not worry about in a online shop and they were all additional expenses! So now I absolutely need to participate in more events just to recuperate all that money that I have invested! :)

Five - A few of the buyers were not able to appreciate handmade works. To them, all I was using was paper. So they believed that I should be selling it for a 10th of the price I quoted. But thankfully, this was a minority. For the most part, people understood the effort that goes into handmade.


Among the positives, the biggest positive was the opportunity to meet a lot of handcraft enthusiasts who had put up stalls in the events. I was amazed at the creativity that I saw. Jewelry, clothes, greeting cards, paper bags, paintings, clay art, terra cotta jewelry, crocheted works - an absolutely mind-boggling array of talents were on display!

Two - I found a lot of people fascinated by paper jewelry! For a lot of them, this was the first time they were seeing something like that. In fact, a lot of them were not aware that my jewelry was made from paper. The moment I said that it was paper jewelry, they did a double take and immediately fingered the jewelry to check that it was in fact paper!


Then they had the usual questions on durability, water resistance etc.

Three - Children were fascinated  with the birds and stars. Young adults loved the butterflies. And those in their 30s were very appreciative of my rose studs. All of them were very appreciative of the effort. Quite a few of them were aware of origami and a few even knew that tiny roses were very difficult to fold. So they were all the more fascinated by the jewelry.


So these events have been learning, yet delightful experiences. I have made new crafter friends, I have got a list of people who want to learn origami, I have new clients who want specific jewelry in specific colours.

While I will continue with my online sale (it is hassle-free as compared to a bazaar!), I would love to participate in yet another event and exhibit more of my jewelry. Though, not any time soon!

The Origami Society of Madras, of which I am a part, is a Facebook group, made up of origami enthusiasts in Chennai (Madras of yore). So a few days back, there was an origami folding challenge on the theme, 'Aqua' ie., any origami that is related to water can be folded - shells, fish, frogs etc. The event will be coming to an end on 17th March. Well, I only recently came to know of this challenge but life has become quite hectic recently, so I wasn't sure I would be able to participate. But I did find some free time this weekend, so set about figuring out what to fold, what paper to use and how to fold.

John Montroll's book 'Origami Under the Sea' came in quite useful and I finally decided to fold the Angelfish from the book. It turned out to be quite challenging for me, especially the final few steps which included the final shaping of the fish, the pleating. I had used banana paper, a thin but strong and crisp handmade paper, but in spite of that, the final fish was quite thick. I ended up wetting those thick folds to shape the thin fins and pleat the other 2 fins.

So, here is my angelfish :) I am quite happy with the result and might even screw up enough courage to try out the complex models from the book! Soon.. Hopefully in the near future!
Model Details:

Model: Angelfish 

Creator: John Montroll

Book: Origami Under the Sea
 

Author: John Montroll and Robert Lang
 

Difficulty Level: Complex

Paper Ratio: Square

Paper Size: 6 inch squares

Model Size: 2.5 inches across and 3.25 inches fin-to-fin

Recently I tried the origami barracuda from John Montroll and Robert Lang's book 'Origami Under the Sea'.

The model is designed by John Montroll and is a complex one to fold. I started with a large square of paper, 14 inches side. I didn't want to get stuck in the middle because the paper was too small! But I think a 12-inch square would have worked well too.

This is the first time I am folding a complex origami animal. I hadn't realised that they would turn out to be quite that thick! I am not too happy with the way the fins turned out. I think they are  a bit displaced. And the eyes aren't too prominent but other than that, I am quite happy with my first effort 😀

The paper I have used is a very crisp and thin banana paper. This is the first time I am using such a paper and it worked out really well for a complex origami.

Model Details:

Model: Barracuda 

Creator: John Montroll

Book: Origami Under the Sea
 

Author: John Montroll & Robert Lang
 

Difficulty Level: Complex

Paper Ratio: Square

Paper Size: 14 inch squares

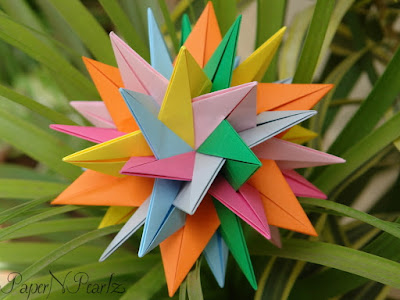
The TUVWXYZ star is a complex modular planar model, designed by the amazing Meenakshi Mukerji.

The model consists of 7 intersecting stars, each star made of 6 arms. All the stars meet at the centre of the model. A total of 42 modules are required for the star, 7 colours and 6 modules in each colour. Folding the modules is quite simple, though time consuming.

Assembling the star is a good puzzle! I had trouble in understanding when to start adding the 7th colour, since you actually start with 6 colours. I eventually did figure it out :) The 7th star is the first one to get completed. In the picture, this was the orange coloured one.

Model Details:

Model: TUVWXYZ Star

Creator: Meenakshi Mukerji

Book: Ornamental Origami

Author: Meenakshi Mukerji

Difficulty Level: Complex

Paper Ratio: Square

Paper Size: 4 inches

Instructions: http://britishorigami.info/academic/davidpetty/origamiemporium/images/mm_tuvwxyz.gif

Number of Modules: 42