We had recently been on a short trip to the sea, for the summer. And while doing some shopping, I came across an amazing shop which had some fabulous wrapper paper in some awesome colours and patterns. So I ended up picking up a whole lot of paper and now I have enough to last me a lifetime!!

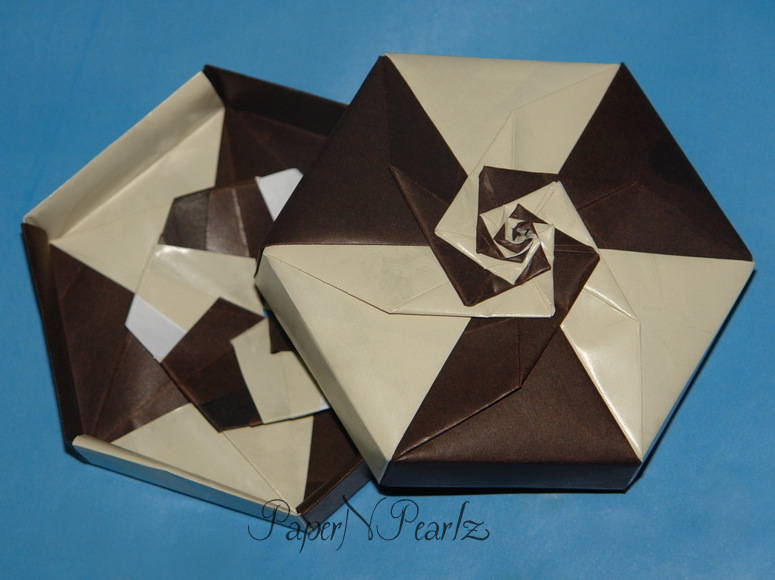
The cream and chocolate brown papers in this hexagon box were a couple of sheets I picked up there. The moment I saw the paper, I fell in love with it and have been trying to decide on the model. Finally I decided to make one of Tomoko Fuse’s beautiful boxes from her book on spirals.

The paper was thicker than regular origami paper, so the box turned out to be quite sturdy, though it required more effort in folding and assembling. The spirals were difficult because of handling 6 arms simultaneously but the end result was so satisfying that I just sat and admired the box for about half an hour after I had completed it!


Model Details:

Model: Hexagon Box 

Creator: Tomoko Fuse

Book: Let’s Fold Spirals
 

Author: Tomoko Fuse
 

Difficulty Level: High Intermediate

Paper Ratio: Square

Paper Size: 6 inches

Modules: 12 (6 + 6)

Well, well, well, it appears that I have completed 2 newspaper weaving projects in a month! This was yet another order that I had received. And I must say I was initially tempted to say no! I mean, I have never worked on a tissue holder, my magazine racks to-date were not really a success, so I was not sure I would be able to pull it off. But finally, after much research on Youtube and Pinterest and quite a few trials, I am done with it 😊


Of the three, the magazine rack was definitely the toughest. I started off with a plywood base with holes drilled every 2 cms. Walnut wood stained newspaper tubes formed the vertical racks. After that, it was just a matter of mixing the green and lavender tubes to form the pattern.


The pen holder was quite easy - circular base, raised the side tubes and used green and lavender to complete the sides. The tissue holder was a challenge because I have never done one before. I think I can improve on this in my next attempt. I added a little handle to hold the 2 sides and to keep the tissues in place.


Couldn't resist posting yet another picture of the magazine rack. I covered the plywood base with brown wallpaper to give it a more professional look. A closer look will give a better view of the base. 

How about that? An order for a serving tray and 4 coasters completed! Very happy with the way the project has shaped up 😊 The tray is 12 inches in diameter and the coasters are 5 inches across. I had made the tray with a couple of handles on either side, making it easier to carry it. I ended up using a total of about 250 rolls for the tray and 200 rolls for the coasters - 50 per coaster.

Also, notice the origami stars scattered on the tray? Courtesy of Little Miss, who decided that the tray will look even more beautiful with the stars scattered randomly. Well, can't argue with her, so there you go...


The best part of the project for me? The edging of the tray. Can you make out those long loops that form a thick edge? This was something I have been practising for some time now, but failing more often than not! So when it turned out perfect for this tray, I was over the moon! 😎

Finally, once all the gluing and drying was complete, I varnished the tray and the coasters and allowed them to dry over night and now, all I need to do is pack and send them to their new owners 😊 An exciting end to the day! Yay! 

Well, Little Miss's interest in origami continues. But now it is more managerial - which means she decides what I should fold and what colours I should use and then she waits for me to complete folding it before she proceeds to 'teach' me how to photograph them 😄 

So this is her next pick - a heart bracelet. This is designed by Henry Pham. While most of his origami is complex, this heart bracelet is pretty easy to do. 

Little Miss picked out the colours. We decided we wanted small hearts, so used 2 inch squares and ended up with each module measuring about 1.5 inches in length. Connecting the modules is just a matter of sliding one into the next. We glued the connecting points so they do not slide out. We used a total of 6 hearts (7 would have been more comfortable for Little Miss) to form the bracelet. 

Little Miss is as thrilled with the bracelet as she was with the backpacks. And I await more instructions from Her Highness 😀 

Model Details:

Model: Heart Bracelet

Creator: Henry Pham

Difficulty Level: Low Intermediate

Paper Ratio: Square

Paper Size: 2 inch squares

Model Size: ~6 inches in length

Modules: 6

Tutorial: Youtube 

My daughter, Little Miss, wanted to try out some origami with me, so we went searching on YouTube for something she could try out. Finally decided on this rather cute Japanese school bag, designed by Fumiaki Shingu. Like most of his origami, this one is also fairly easy to do. It is made from 3 squares - one forms the back, one the front and the third one forms the front flap and the back straps. 

Little Miss decided to go for a multi-coloured bag, so it is easy to make out where each of the squares fit in. We used 6 inches squares and the final bag ended up around 2 inches tall. 


The front flap opens up, so it is possible to fill the little bag with tiny, little things to carry along! Talk about impractical!! But Little Miss simply adores the bags :) 

Model Details:

Model: Backpack

Creator: Fumiaki Shingu

Difficulty Level: Low Intermediate

Paper Ratio: Square

Paper Size: 6 inches

Model Size: 2 inches

Modules: 3

Diagram: Origami-club

Tutorial: Youtube 

Sonobes are beautiful, decorative origami created by Mitsunobu Sonobe. In addition to the original sonobe, thanks to its versatility and ease of folding, there are many, many variations created by Tomoko Fuse, Meenakshi Mukerji and quite a few other origamists.  

Narong Krined's variations caught my eye, while I was searching for my next model to fold. The one I have folded is the first of his variations that I was able to find. 

I used 7.5 cms squares, 30 in all for this model. As for the eye-popping colours, well, I wanted something attractive and multi-coloured. Since I am not very good with colour selections, Internet gave me this suggestion - Dark Purple, Mustard Yellow and Dark Coral. How does it look? Attractive or too candy-coloured? 

Model Details:

Model: Narong Krined's Sonobe Variation 1 

Creator: Narong Krined

Difficulty Level: Low Intermediate

Paper Ratio: Square

Paper Size: 3 inch squares

Model Size: ~3 inches in diameter

Modules: 30

Tutorial: Origamee.net 

I have started the year 2018 with a bang! I completed my first paper weaving project (a magazine holder) and here is my first origami of this year. This model is one of Tomoko Fuse's kusudamas, named Fuufuki Asagao Kusudama. It is taken from her book Unit Origami Fantasy. 

The kusudama is made from 30 smaller squares, folded and assembled together (I did the assembly with glue). I used fairly thick paper, by origami standards - 80 gsm regular printer paper, cut into 3*3 inch squares. I am not sure 60 gsm paper would have worked quite so well. 

What I loved about this kusudama was its angular, sharp appearance, something you don't usually see in kusudamas. Kusudamas, I think, are usually more flowery, soft and flowing. But here, I love the sharp dips that reveal the stars and the triangular peaks that remind me of Fuse's Little Turtle kusudama

Model Details:

Model: Fuufuki Asagao Kusudama 

Creator: Tomoko Fuse

Book: Unit Origami Fantasy
 

Author: Tomoko Fuse
 

Difficulty Level: High Intermediate

Paper Ratio: Square

Paper Size: 3 inch squares

Model Size: ~5 inches in diameter

Modules: 30

Tutorial: Youtube