Given the intense newspaper weaving session from the last post, I decided to do something a little simpler. So here is my pair of pot holders, made in aqua and white - the colours of my parents' living room. For quite some time now, they have been asking me to weave them something that goes with their room colours. And for a looong time now, I have been putting it off - mainly because I wasn't too sure that I would do justice to their aesthetically pleasing room! 

 So finally, after much deliberation, I decided to try out a couple of pot holders, to be kept over their piano, along with a candle stand in the same colour combination. Since I needed a pair, I used the exact opposite colours, in the same pattern. 

I am quite pleased with the way it has turned out. The centre portion, made from a single tube that is twisted around the base tube, was something new. While this is not always even, I quite like the effect produced. I believe I will use the same pattern in a few more weaves in the future!


A few months back, I had made a leaf-shaped tray using the technique of coiling with newspaper tubes. I decided to revisit the tray, this time using wood-stained tubes, the same ones I had used for this box with lid. This tray is bigger than my previous attempt, measuring about 15 inches at the longest length.


I had sprayed the tubes with water mixed with a little fabric softener, about half an hour before I started weaving. This resulted in very flexible tubes that did not break or crack while weaving. I will try out other methods of coating the tubes as I make other objects using the same technique.

Very happy with how even the weaving turned out. The closeup of the tray brings that out very well.


Finally tried out a new finish. I came across this style of finishing the edges, during my usual perusals on Pinterest and was quite fascinated by this. I feel this style is much better than the usual edging. This gives a very professional look to the product and has a very leathery appearance. I messed up the ending, but I have learnt from that and should do better next time.

Model Details:

Model: Tray

Difficulty Level: Complex

Tutorial (making newspaper tubes): Youtube

Tutorial (coiling or root-weaving technique): Youtube 

Tutorial for the edge: Youtube


More newspaper weaving, this time using magazine rolls. I had rolled up these tubes in the fond hope of making a pen holder. But for one reason or the other, I never got around to making them. So finally, thanks to new year resolutions, I decided to use them to make another attempt at coiling or root weaving.

This time, I decided to try out a rectangular shape, so that I could make it into a tray instead of a pencil holder. I had no particular idea of how big or how long the tray should be. I just coiled till I was happy with the size and till the tubes lasted!

The shape is a little wonky. As you can see, one side is a little larger than the other. But other than that, I think it a fairly good attempt.

The plus point of using magazine tubes is that the end result is very colourful and more cheerful than newspaper tubes that are painted a single colour! The end result is to be sent to a dear friend of mine, who had been asking me to sell one of my newspaper projects. I think this colourful tray will be a good addition to my friend's desk 💖


Model Details:

Model: Tray 


Difficulty Level: Complex

Tutorial (making newspaper tubes): Youtube

Tutorial (coiling or root-weaving technique): Youtube


The Sweet Spring Kusudama is a very simple but very elegant looking origami kusudama, designed by Natalia Romanenko. Each unit is a combination of 2 or 3 smaller modules. Why do I say 2 or 3? Because, while the instructions I found online require 3 modules, you can make do with just 2 of them. 

The basic module is an origami pig base. This is formed from a square. To this module, we add 2 modules folded from a rectangle. This forms the star and a wavy loop on the star. Well, I didn't want the wavy bit, so I stopped with just the star. Hence had ended up with 2 instead of 3 modules. 

So once these units are assembled, the kusudama is formed by inserted 1 unit into the next. The assembly is very simple and the model holds well together. 

I have been meaning to use indigo coloured paper for a long time now, so I clubbed it with orange paper to give me a very bright sweet spring kusudama! 

Have you tried out this kusudama? Do give it a go, if you haven't. 


Model Details:

Model: Sweet Spring Kusudama

Creator: Natalia Romanenko

Difficulty Level: Low Intermediate

Paper Ratio: Square + Rectangle in ratio 1:2

Paper Size: 3 inches square / 3 inches by 1.5 inches rectangle

Model Size: ~4 inches in diameter

Modules: 60

Instructions: Paper Finger Cuts

Tutorial: Youtube


How about that?? I ended up making a very cute little duckling which also served a purpose! This is a little container that I made for my daughter Little Missy. She uses this to store little trinkets and is delighted with how tiny and "kawai" it is! 

I actually had a few sticks left over, after completing a recent project, so wanted to use those remaining sticks. And well, this was the size I could make without having to roll and paint new ones! So a duckling instead of a duck! I should addceyes, I guess, but I thought it looked good even now, no? 

Another first for me is that I have woven this as a free form, that is, I usually have a base form over which I weave. But I wanted to see how it went without a form and I think it has come out fairly well.

Model Details:


Model: Duckling shaped container


Difficulty Level: Complex

Tutorial (making newspaper tubes): Youtube
Roman Diaz's origami owl was a delight to fold, so this year, I wanted to try more of the origami from the book "Origami Essence". The origami Wren (Ratonera) is the third origami from the book and a little more complex than either the panda or the owl.

The suggested paper size is 5-6 inches but since I had some foil-backed origami paper of 4.5 inches size, I decided to go ahead with that. A colour change is seen near the neck of the wren and at the legs.

I enjoyed folding this little bird and am delighted that I started the year with this origami, even though origami life-forms are not generally my cup of tea. I loved the colour change, the shaping of the beak and the tail. A very lovely model to fold.

I hope I get the chance to fold more models from the book.. Hopefully the cardinal, provided I get red/black kami paper!


Model Details:

Model: Wren (Ratonera) 

Creator: Roman Diaz 

Book: Origami Essence

Author: Roman Diaz

Difficulty Level: Low Intermediate

Paper Ratio: Square

Paper Size: 4.5 inches

Model Size: ~3 inches in height
So, after the last post on all the popular origami from last year, I realised that newspaper weaving was lagging behind. So I decided to try and complete at least 12 projects of newspaper weaving this year.

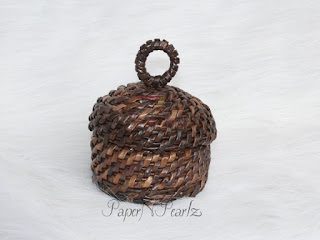
With that goal in mind, this is my first attempt - a newspaper woven little jewellery box with a lid. This is the first time I am attempting a proper lid, which will fit the box. My last attempt was rather rudimentary and I was not at all happy with that. While this is a definite improvement, I have ways to go before I can be really happy with this.

As is evident, this was also woven using the coiling technique. I guess I will attempt a few more projects using the same method. These tubes were coloured dark brown, using wood stain.


 Model Details:

Model: Coiled Box with lid

Difficulty Level: Complex

Tutorial (making newspaper tubes): Youtube

Tutorial (coiling or root-weaving technique): Youtube