A Happy Mother's Day to all the wonderful moms out there! This Mother's Day, I had made a couple of newspaper woven heart containers (photographed only one though) to 2 special ladies in my life - my mom and my mom-in-law.

These two women have always been supportive of everything I do and have encouraged me to go after my dreams. They are both strong women and have been instrumental in helping me become stronger, both mentally and spiritually. And to these wonderful women, I wish a very happy Women's Day :)


To create these heart containers, I decided to use some lovely card stock paper with pink and blue hearts. Little Miss helped me pick out matching grosgrain ribbon for the bows. I went with an odd number of base tubes so that the dark blue/light blue combination would show up better.


I must say that forming the dip at the top of the heart was quite challenging. I still have to perfect it. Since the shape was something different, I ended up having to make a base form. This ensured that my piece did not go out of shape. I have finally got the hang of managing the height of the containers. So in the heart box, the height was pretty much consistent. 


So that's about it. I already have a couple of orders for making these heart boxes. So I'll get cracking and will be sure to post pics of the completed items. And once again, a happy Mother's Day 😃

A round storage box measuring 6 inches tall and 9.5 inches across is my latest foray into the art of newspaper weaving. For this container, I did not paint the tubes, but rather used the regular newspaper tubes with print, to weave the box. Once everything, including the lid, was completed, I painted everything with white acrylic paint. While I was able to get a good, white container, I must say it is much less tedious to paint the tubes before weaving! Painting the nooks and crannies of the completed object is really really tiresome.

Finally, to add some colour, I included some decoupage using decoupage napkins and I must say I love the effect.

The lid has a little bow on top, though it turned out a little too small. But it works as an effective handle.

As soon as the work was done and everything dried up and hardened, Little Miss came right along and picked up the container and declared that it was hers as she had absolutely nothing to store her things! 😄 So that was that. Apparently if I needed one for myself, I better make another one, this one was not available..


My second attempt at making an oval container has been quite a success, if I do say so myself! My first attempt was the blue box which was not that great, frankly speaking. Naturally, I wanted to retry it, but this time I decided to go with a decoupaged cardboard base. And I wanted a closed box, so decided to try the lid as well.

The decoupage tissue was in orange and grey, with a coffee theme, so I went for the same colour combination for my paper tubes as well. The orange came out very well. The grey was a hit and a miss - it looks a little grey and a little brown!


The style of weaving remains the same as before - a Layer-wise Rope Style Pattern. I used 3 grey tubes followed by an orange tube for a total of 32 tubes. The lid was a basic lid with a little loop to help open it. Finally, I double-glazed the entire thing to make it real hard. In addition to making it hard, it made it a little glossy as well, which I am not too happy about. I prefer a matt finish to a gloss one.


While I love folding origami kusudamas, over the past few years, I find it more pleasing to fold geometric modular shapes. And for those who are interested in polyhedral origami, Tomoko Fuse's book 'Unit Origami Essence' is an absolute treasure trove! As is the case with most of her other books, this book too is entirely in Japanese. But that is no hindrance, since the pictorial steps are very clear and fairly easy to follow. And in the few places that one might get stuck, Google Translate comes to the rescue.

One of the drawbacks of using a Japanese books is that I was not able to figure out the names of each of the models. The book is divided into 4 chapters. The first chapter is on cubes. The second chapter deals with solids made from triangular bases, the third - solids made from pentagonal bases and finally, the fourth deals with solids from star-shaped bases.

My first attempt from the book was from the Cubes section. I tried out pretty much all the cube models. The individual modules are pretty easy to fold. The second of the models (in brown and yellow in the pic) was very unique - made from boat-shaped units, 4 units in all. Most of the other cubes were from 6 modules. A couple of the cubes were pretty nice variations.

All the models have a recommended size listed. For all the cubes I had tried, it was given as 15 cms * 15 cms (6 inches * 6 inches). But I had used 9 cms * 9 cms (3.5 inches * 3.5 inches) squares and didn't have much difficulty folding or assembling the pieces.

Model Details:

Model: Various Cubes

Creator: Tomoko Fuse

Book: Unit Origami Essence

Author: Tomoko Fuse

Language: Japanese

Difficulty Level: Low Intermediate

Paper Ratio: Square

Paper Size: 3.5 inches

Model Size: ~1.4 inches side

Number of Modules: 3 to 6
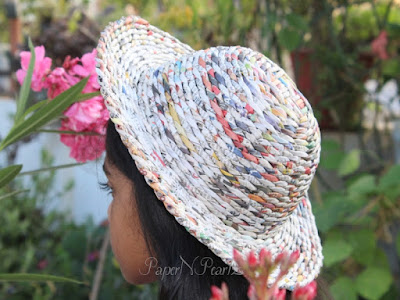
With summer just around the corner, Little Miss decided that she wanted me to weave her a hat.. So naturally, I got cracking and used my trial tubes to make a trial hat.

Whenever I roll tubes, I segregate them into 3-4 categories - the no-print tubes, tubes with only black print and the rest of the coloured tubes. The coloured tubes are used for all my trials. I don't paint them, so they are not very strong. Anyway, I always have a couple of bunches of these trial tubes.

The procedure was pretty elementary - round box for form, started with 16 tubes in the centre and wove around the form till I was happy with the size, then I flattened out the tubes and wove the rim of the hat.


Here's Little Miss, modelling the hat. Unfortunately, a round hat doesn't really fit our heads! I did not realise this till she tried it out. Apparently, according to a few hat-related videos that I subsequently watched, the top of the hat needs to be more oval than rounded. So though I am happy with the initial output, there is much work to do before I can start making hats in various colours for Little Miss. She has already given me the colour combinations that I need to start working on 😄


This origami star, designed by Enrica Dray, is a modular star made from 8 modules. It is really simple to fold and beautiful and elegant when completed. The star has a slight 3-D effect, since the top layer does not lie flat against the lower layer. The back of the star (Second pic), I thought, was as beautiful as the front!

2 contrasting colours work best for this model. Since I have a very bad eye for colour selection, I used the net to find out 2-colour combinations and liked the black-beige yellow the best. Origami 60 gsm paper, 3 inch squares, 4 of black and 4 of beige yellow, resulted in a star about 4 inches across.

Previously, I have folded the Mina Kusudama, also designed by Enrica Dray. Like the star, the mina kusudama was also easy to fold and assemble. It is of course, made from 30 modules, so it is more time-consuming than the star, but equally satisfying to work on.


Model Details:

Model: Star 

Creator: Enrica Dray

Difficulty Level: Low Intermediate

Paper Ratio: Square

Paper Size: 3 inch squares

Model Size: ~4 inches across

Modules: 8

Tutorial: Youtube 
Since my last couple of woven projects have been fairly successful, I decided to try out another shape - an oval container. I used a used oval ice-cream box as the base and started working on the box. My primary reason for trying out this shape was to figure out how to weave the base. Since the base is not circular, there are some calculations involved to figure out the initial weave.

Suffice it to say, for me, the base was a disaster (hence the absence of photos of the base!! 😀). But once the walls were formed, the task was much simpler. Since I had two shades of blue, I wanted to use both and so decided on using the Layer-wise Rope Style pattern. A detailed MK (MasterKlass, for the uninitiated) on Youtube (link below) by the talented Elena Tishchenko provided all the help I needed.

Overall, not too bad for a first attempt. One area that I really need to work on is uniformity of height! As is obvious from the picture, in some places, it is too short and in others, too tall! I also need to figure out how to hide the cut ends near the top edge. Well, practise makes perfect and I really need to practise! 😊

Model Details:

Model: Woven Oval Container

Difficulty Level: High Intermediate

Tutorial (Layer-wise Rope Style Pattern): Youtube (Part 1, Part 2)