This Christmas has been a very busy time for me. I had participated in a couple of Christmas sales and have been busy making paper jewelry! And paper jewelry is time-consuming work! So I didn't get a lot of time to make anything special for Christmas 2014.

One thing that I did try was this modular star. The star is actually made from Bascetta Star modules. The star requires a total of 24 modules. The modules are folded as usual. For assembly, instead of using 3 modules for the pyramids, here we use 4. From then on, it is pretty straight forward. Keep adding modules in a circle. I found it easier to assemble the circle first and then worry about fixing the centre. I used glue to hold the joints well, since I had planned on adding it to my Christmas tree.

The first star that I did was in rainbow colours. I think a better choice of paper would have been paper coloured on both sides, like copy paper. So I did another star with Christmas colours. Very happy with the result this time :)

So that is my Christmas decoration for this year. Hope you have fun with this model :)

A very merry and joyous Christmas to my readers. Have a wonderful day :)


Model Details:

Model: Modular Star

Creator: Paolo Bascetta

Difficulty Level: Low Intermediate

Paper Ratio: Square

Paper Size: 3 inches

Model Size: ~ 6 inches diameter

Number of Modules: 24

Tutorial Link (for making the modules): Youtube
Fumiaki Kawahata's most well-known origami is probably the Origami Yoda. But, I doubt I will ever make it - for one, I am not very clear on who exactly Yoda is (Star Wars and I are galaxies apart!!) and two, I am not really good at folding people/animals/birds from paper. Somehow my models don't come out with a smooth finish and end up looking very unrealistic!

The modular ball, on the other hand, is one of only 3 modular origami designed by Fumiaki Kawahata. I have always been put off by how complex it looks, until I finally gave it a try today. Surprisingly, it is pretty easy to make. There are 6 modules that are basically pleated. Each corner is folded perpendicularly to the initial pleat, to form 2 perpendicular arms.

Now the way the model is put together is something I have not seen before! There is none of the usual tabs and pockets to assemble the model. Instead, 2 modules are placed facing each other, so that their perpendicular arms meet in the centre. Now, these 2 arms hold in place a third module. It is a little tricky initially, but pretty simple once you get the hang of it. Only thing to remember is that, if one module is taken out, the whole model will come undone.

Model Details:

Model: Modular Ball

Creator: Fumiaki Kawahata

Difficulty Level: Low Intermediate

Paper Ratio: Square

Paper Size: 3.5 inches

Model Size: ~ 3 inches

Tutorial - Modules: Youtube

Tutorial - Assembly: Youtube
Christmas is another 2 months away, but Christmas exhibitions and craft bazaars are sooner and well, I hope to participate in at least 2 Christmas events! So I have been busy making origami jewelry. 

These origami angel earrings, are something new that I have trying out this year. And going from the response on my Facebook page, I am sure this will sell well :)

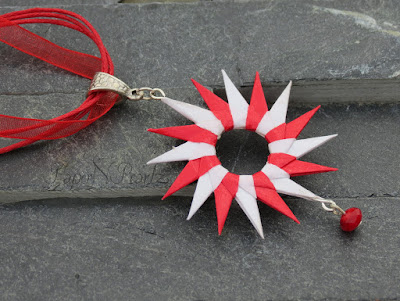
This chain with a modular wreath as a pendant, is a favourite of mine. And I am in love with this colour combination too! I added the pendant to an 18 inch red organza ribbon necklace, using a very cute bail that I have been wanting to use for a long time now and finally got a chance to.

I went for the vintage look with this bracelet. Each star is made from paper that I cut from a discarded book, strung together with black beads and crystals. I almost always finish my bracelets with toggles - they are so much easier to close than lobster clasps I think. I used heart toggles for this bracelet. We do want to spread love this Christmas, don't we??

I regularly post my origami jewelry on my Facebook page. So if you haven't liked my page, do head over and take a look :)
With Tomoko Fuse's lecture and workshop coming up this weekend, I decided to try out another of her popular designs - the Petals Kusudama (Type II). The kusudama is made from 30 units. Each unit has a base and an inset, which is folded into the base. The units are assembled like a sonobe. The kusudama holds well even without any glue, though, since I wanted to make it into a hanging ornament, I ended up gluing the joins.

A 3-colour combination works well for the kusudama. And for that, it is best to ensure that the paper used for the insets is single-sided - coloured on one side and white on the other. If it is double sided, then it works best if the paper has a different colour on both sides.

I used copy paper for the base and 60 gsm origami paper for the insets. So the model turned out pretty strong and sturdy. I also ended up making a tassel (this is pretty tedious work!) and string it along with a few beads and the kusudama to get myself a very pretty ornament :)

Model Details:

Model: Petals – Type II – Kusudama

Creator: Tomoko Fuse

Book: Floral Origami Globes

Author: Tomoko Fuse

Difficulty Level: Low Intermediate

Paper Ratio: Rectangle in ratio 1:2

Paper Size: 3.5 inches by 1.7 inches

Model Size: ~ 4 inches

Number of Modules: 15 rectangles of 1 colour and 15 rectangles of a second colour

Tutorial: Youtube
We have a very exciting day coming up here in India! On 21st September, the origami master, Tomoko Fuse, is all set to conduct a lecture followed by a workshop, here in Bangalore, India :)

Tomoko Fuse's visit to India is a part of the World Assembly of Women in Tokyo, a symposium that takes place between 12th to 14th September. The period before and after the symposium, 8th – 19th September, has been positioned as the Shine Weeks and a series of women-related events will be held in Japan and overseas. The Japan Foundation, New Delhi is organizing these events in India.

Tomoko Fuse's first workshop will be held in Delhi on 18th September. This will be followed by her lecture and workshop in Bangalore on 21st September. The best part of the workshop is that the entry is free! Yay! So I am all set and raring to go :)

After attempting Fumiaki Kawahata's Diplodocus in my previous post, I decided to try the origami dinosaur earrings for my Little Miss.

I tried out different sizes and finally this was the pair that I liked the best. I used red kami paper with print on it.

How do you like it? As for my daughter, she is very pleased! So yay for mummy!! 😀

Model Details:

Model: Dinosaur Earrings 

Creator: Fumiaki Kawahata

Book: Origami Dinosaurs 2

Author: Fumiaki Kawahata

Difficulty Level: High Intermediate

Paper Ratio: Square

I know zilch about dinosaurs! But Little Miss happened to see some origami dinosaur earrings on Etsy and wanted one for herself.

So I set about experimenting, since single-sheet origami isn't my cup of tea. Fumiaki Kawahata's book on Origami Dinosaurs has this folding for the Diplodocus, which was an interesting origami to fold. For the uninitiated, a diplodocus is a large, long-necked dinosaur, with a long tail. The animal is said to grow to a length of 24 metres (79 feet!!)

Since I wanted to make a small earring, I started of with a fairly large square first, just to see if I was able to fold it. The big grape coloured one is folded from a 7-inch square. And then, using progressively smaller squares, I refolded the origami. My smallest is folded from a 2-inch square. It is still too big to be an earring, but I will get there!


Model Details:

Model: Diplodocus (Dinosaur)

Creator: Fumiaki Kawahata

Book: Origami Dinosaurs 2

Author: Fumiaki Kawahata

Difficulty Level: High Intermediate

Paper Ratio: Square