In theory, it is pretty easy to make these dishes but in reality, it is quite a lot of work. And rolling those reeds and making coils from them becomes painful on your fingers too. But I must say, I absolutely love this dish, so I might give it another go and make another dish for myself.

How I did it:

1. Make a whole bunch of paper reeds. I had made about 150 reeds to start off. And in the end, I needed to make some more!! I had used A4 size magazine paper. I cut the paper in half, lengthwise and used it. So 1 sheet gave me 2 reeds.

2. For the base, start off coiling one reed. When you reach the end, glue another reed into the opening. Continue adding reeds till you have the desired size of disk. Keep aside.

3. Now, for the coils, I had made them in 3 sizes. The biggest ones were about 1.5 inches in diameter. For this, I used 2 reeds to get the desired size. The second one was about a inch in diameter, made from a single reed. I coiled it around a pencil, so that I got a circular hole rather than a pinpoint. The last one was about half an inch in diameter. I cut the A4 into 4 rectangles - once vertically and once horizontally. This I used for the final row at the top. Oh, I had used a total of 16 coils in each row, so a total of 43 coils.

4. Once all the coils are done, it is just a matter of gluing them to the circular disc base. Hot glue/quick drying glue is the best for this. I had alternated a large (1.5 inch) coil with the smaller (1 inch) coil.

5. The second row was the same - small coil followed by the bigger one, in between the coils of the first row.

6. For a completed look, I added the final row of coils, the 0.5 inch ones.

7. Finally, once everything is dried, I painted the bowl with a mixture of glue and water. This makes the bowl really stiff and fills all the gaps. So if any of your coils are not tight enough, this coat will ensure it doesn't come undone. Also there is a shine added to the bowl which is very appealing.

Model Details:

Model: Knick-knack Dish

Origin: Traditional

Difficulty Level: Low Intermediate

Model Size: ~6 inches in diameter

After the round wreath made from little paper rosettes, here is another wreath - this one a red, heart wreath. I had used red/brown sheets, cut circles from the paper and rolled these rosettes before gluing them to a heart-shaped wreath base.

I had made one mistake that I will need to rectify in my next wreath. I think I should have painted my wreath base red before adding the flowers. Right now, I can see bits of the white base between the flowers.

But all in all, it was a fun project. Little Miss helped me too, so it turned out to be a time of mom-daughter bonding as well.

Model Details:

Model: Paper Rosette Heart Wreath 

Origin: Traditional

Difficulty Level: Low Intermediate

Paper Ratio: Circle

Paper Size: 3 inches in diameter

Model Size: 13 inches in length and 12 inches across

Tutorial: Youtube

This dual coloured heart is designed by Andrey Lukyanov, an Ukrainian origamist, who has designed a whole bunch of heart/love-based origami! Using Google Translate, I gather from his website (which is in Russian), that this heart represents 2 halves of love which builds a new life.

As far as the model goes, the creator has made a detailed video on how to fold it (link below). After the initial pre-creasings, the model is collapsed on these creases. That point is not very clear in the tutorial. It took me a couple of tries to get this right. Another potential problem area is pleating the leaf. I had used 6-inch paper and the pleats are really tiny!

The obvious choice of paper is a single-sided red paper. I have used pearlized momigami paper and I love the texture it adds to the model.

Model Details:

Model: New Life Heart 

Creator: Andrey Lukyanov

Difficulty Level: High Intermediate

Paper Ratio: Square

Paper Size: 6 inches

Model Size: ~2.5 inches in length and 3 inches across

Tutorial: Youtube (Part 1 and Part 2

This heart dish is a modular dish, made from 4 squares. An apt origami for Valentine's Day I thought. I am not able to find out the creator of this model. The youtube tutorial that I referred to, mentions that it is Tomoko Fuse, but unfortunately I am not able to find this model under her name on the Origami database. And well, whether the creator IS Tomoko Fuse or not, it is still a good one to fold, especially for a day of love.

Origami paper might be a bit too thin for the heart bowl. Printer paper or gift wrapper, about 80 gsm or so should result in a good, not-so-flimsy dish. Fill it with some hearts and it should make a very nice, unique, handmade gift :)

Model Details:

Model: Heart Dish

Creator: Tomoko Fuse

Difficulty Level: Low Intermediate

Paper Ratio: Square

Paper Size: 4 inches

Model Size: ~1.5 inches tall and 4 inches across

Modules: 4

Tutorial: Youtube

Hacky Sack is a football game played by 2 players. The origami hacky sack is an angled modular made from 30 units. The design is by Winson Chan. The modules are not too difficult to fold. The assembly is slightly more complicated and the end result is a very solid sphere that does not require any glue.

The sphere is assembled in modules of 3 and then joined together into pentagons. And joining 30 units results in the dodecahedron, with little triangular corners and a whole lot of open spaces.

I found it an interesting and artistic model to fold. And I must say I love the combination that I have chosen as well. The combination of green-yellow-orange is always a pleasure to look at. Makes one think of bright, sunny days!


Model Details:

Model: Hacky Sack 

Creator: Winson Chan

Difficulty Level: High Intermediate

Paper Ratio: Square

Paper Size: 4 inch squares

Model Size: ~6.5 inches in diameter

Modules: 30

Diagram: Origamidiagram.com 

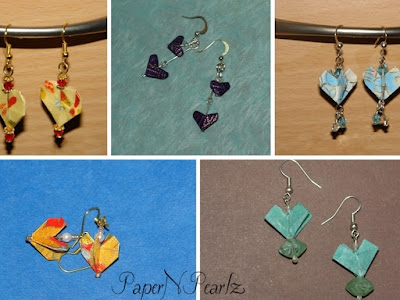
Did you know that the traditional gift for a first anniversary is paper? Well, with Valentine's Day so close, I ended up collecting my favourite paper heart earrings, a unique gift for a unique day.

I remade a few of my heart earrings for my daughter, Little Miss. The purple ones turned out to be her favourite and the right size for her :) 

The Dodecaedro Traforato or Perforated Dodecahedron is a modular origami by Silvana Betti Mamino. Like most modular origami, the modules are pretty easy to fold. They are folded from a A4 sheet. Well, the A4 is actually cut into 4 rectangles horizontally. I felt A4 strips would be too big, so worked with A5 sheet cut into 4 rectangles. Worked perfectly well :) I used printer paper - 5 colours and 6 strips in each colour.

Folding printer paper wasn't that easy - 80 gsm paper requires more effort to fold than 60 gsm, doesn't it? Assembling for me, was the most challenging part. The reason was because of the colours. I wanted to ensure that there was some kind of uniformity in the assembly and after 3 attempts, I finally managed it I think.

The modules hold together without glue once fully assembled. But I didn't find it terribly stable, so if you will be moving it about, then a little glue helps. If you are assembling without glue, ensure you have a whole bunch of paper clips to hold the modules in place.

Model Details:

Model: Dodecaedro Traforato

Creator: Silvana Betti Mamino

Difficulty Level: High Intermediate

Paper Ratio: Rectangles from A5

Paper Size: 2.1 inches by 5.8 inches

Model Size: 4.5 inches diameter

Number of Modules: 30

Instruction: Modulandia.it