Beach chairs are, I am sure, great to use on a summer day and beach chairs are equally great to fold on a very hot summer day! These beach chairs are courtesy of Yoshihide Momotani, from his amazing book 'Doll Houses with Origami'. Every time I open this book, I am tempted to make one of those beautiful doll house rooms! And this time, I was able to complete these chairs, from the garden scene.

The folding is pretty straight forward. The instructions are in Japanese, but the pictures by themselves are pretty clear. There is also a slight variation to this chair, which results in a chair with a tall back.

Model Details:

Model: Beach Chair 

Creator: Yoshihide Momotani

Book: Doll’s House with Origami
 

Author: Yoshihide Momotani
 

Difficulty Level: Low Intermediate

Paper Ratio: Square

Paper Size: 7 inches

Model Size: ~6 inches long and 1.5 inches wide
A catamaran is a boat with two structures that are joined together by a frame. It is a stable boat and quite fast as well, and is a common sight on seas and beaches, especially during summer.

The origami catamaran is a great design to fold on a hot summer day. The design is by Maarten van Gelder. The sail is in a different colour than the rest of the boat, so paper with a solid colour on one side and print on the other is great.

I had some trouble when I folded this initially, at Step 7 of the diagram, where the model is collapsed into shape. I had thought that the creases from Steps 3 to 6 were only for the top layer. I discovered, after fighting with Step 7, that the creases for the layer below as well!

Model Details:

Model: Catamaran 

Creator: Maarten van Gelder

Website: Maarten van Gelder
 

Difficulty Level: High Intermediate

Paper Ratio: Square

Paper Size: 7 inches

Model Size: ~5 inches * ~4 inches

Instructions: Diagrammed Models
Summer is a hot, hot time here, with temperatures touching 100 F (~ 38 C). So I am hardly in a position to go out. The next option for me is of course, to fold something. And what is the most appropriate origami to fold, than the sun?

The first origami sun that popped up was Jo  Nakashima's sun. But before I started working on this one, I chanced upon an Origami Compass Rose (Wind Rose), made from 8 squares of paper, designed by Paolo Bascetta. When I tried it out, I thought it looked more like the sun than a compass rose, with the rays of the sun in alternating colours of yellow and orange. :)

So here is my origami sun/compass rose. I used thick paper, similar to printer paper, essential to hold the sun/rose in shape. It isn't very stable, because the fold that holds the units, is small. That is not to say that you need glue, the shape holds together without glue, but it is wise to use some if you plan on hanging it up.

Model Details:

Model: Compass Rose

Creator: Paolo Bascetta

Difficulty Level: Low Intermediate

Paper Ratio: Square

Paper Size: 2 inches

Model Size: ~4 inches

Modules: 8

Instructions: Origami CZ

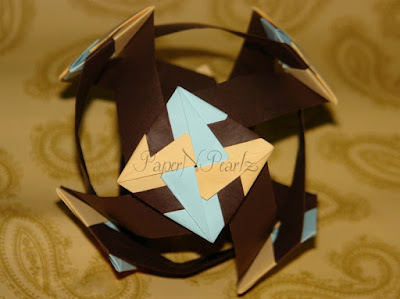
The Santiago Flower Ball is an origami model by Mette Pederson, the well-known creator of the Mette Rings. I must say I love this model! It looks rather like modern art I think. Little Miss insists that it looks like a lantern and has been using it as one! If you hold the model by one of the flowers, it actually does resemble a lantern :)

I had used printer paper, which was perfect for folding it. There aren't a lot of folds, so making the individual units was quite simple. 4 units are assembled together to form the flower (blue and peach in the picture). 6 such flowers are needed. Then the 6 flowers are held together with 12 strips.

The paper size I have used is 3 inch squares for the flowers and 3 * 6 inches strips for the connector units. The resulting model is roughly 6 inches in diameter.

Model Details:

Model: Santiago Flower Ball

Creator: Mette Pederson

Book: Mette Units 7

Author: Mette Pederson

Difficulty Level: Low Intermediate

Paper Ratio: Square / Rectangle in ratio 1:2

Paper Size: 3 inches squares and 3 * 6 inches rectangles

Model Size: ~ 6 inches in diameter

Modules: 36

Update: The design is also found in the Origami Tanteidan 10th convention book.

This origami leaf card is folded from an A4 or A5 paper. The leaf design is formed by pleating the paper.

Paper with print on one side and solid colour on the other works well for design. The only issue was that, I would have loved it if the leaf could have been made from the same print, rather than the solid colour. But if I interchanged the colours, the inside of the paper would have the print, so wouldn't be of much use if there is an intention to write something on the inside.

Another point to note is that, once the card is opened out, refolding it isn't really elementary. So if you are gifting it to someone, ensure that they understand how it should be folded back. Else they might end up quite frustrated, trying to do so :)

I tried the design first with A4 paper. The result was a fairly big card. I found an A5 size much more to my liking.

Model Details:

Model: Leaf Card 

Origin: Traditional

Difficulty Level: Low Intermediate

Paper Ratio: A4 or A5 paper

Tutorial: Youtube

Carmen Sprung must be one of the few origami artists who uses paper in ratios involving square root(√) values! One of the previous Carmen Sprung's designs that I had worked on was the √3 Schachtel, which used paper in the ratio of x:√3x.

The Mennorode Star uses paper in the same ratio ie., x:√3x. In the diagram, she has also explained how to get this size, from a square sheet of paper. The design is a modular star, made from 12 units.

At least 2 colours are required to bring out the pattern in the completed star, and to avoid confusion while assembling it. It is suggested that multiple colours be used when assembling the star for the first time. This is helpful in order to clearly see how the arms fit together.

Though the star is pretty easy to assemble, the instructions are not that simple. And it isn't in English either, so I put google's translate services to good use :) OrigamiNut has posted a video on Youtube with a tutorial for folding and assembling the units. Unfortunately, I discovered this after I had completed the star. The tutorial should make the job fairly easy I think.


Model Details:

Model: Mennorode Star 

Creator: Carmen Sprung

Difficulty Level: Low Intermediate

Paper Ratio: x:√3x

Paper Size: 2.9 inches by 5 inches

No of Modules: 12

Instructions: Origamiseiten

Tutorial: Youtube


After completing the Birdwing Butterfly from a few days back, I gave Michael LaFosse's very famous Alice Gray Butterfly a go. This is a much simpler butterfly to work on, but looks as beautiful as his more complex designs.

And to aid me in my origami, I had recently purchased Margaret van Sicklen's book 'The Joy of Origami'. The reason I had purchased the book was because of the beautiful paper that comes along with the book! The book has instructions for beginner origamists. But the paper is very good. It is glossy and thick magazine kinda paper. The beauty is in the designs and colours of the print. Very lovely! Unfortunately, due to the thickness, I wasn't able to make too many folds, but the Alice Gray butterfly isn't very complex, not too many folds. And the print was perfect for the butterfly. Well, actually, the paper was meant for the butterfly, this was among the first diagrams in the book, so everything was quite perfect :)

And I think the butterfly turned out quite well too. I love the shades of green and blue, very lovely! I think I should make this into my Favicon or something..

Model Details:

Model: Alice Gray Butterfly

Creator: Michael LaFosse

Book: Origami Butterflies
 

Authors: Michael G. LaFosse and Richard L. Alexander
 

Difficulty Level: Low Intermediate

Paper Ratio: Square

Paper Size: 6 inches

Instructions: Origami.cz