Showing posts with label butterfly. Show all posts

Our Church Choir had recently gone on a 2-day trip to a nearby hill station. We usually make it a point to go out together, at least once a year to a resort or a hill station. At the least it gets us away from our busy lives and since a lot of our choristers are students, it gets them away from their studies, which absolutely delights them! About 20 of us had come for the trip and we had a truly lovely time. We had stayed at a Christian retreat centre, a lovely, well-maintained place, full of flowers and trees and absolutely picturesque.


Well, there were about 8 girls (well, not exactly girls, since ours ages ranged from the 20s to the 30s!! But hey, we were all young at heart :)) and about 8 also-young-at-heart guys. The rest were the super-seniors - those in their 50s and 60s, including our choir master and other long-time pillars of our choir. And with such equally distributed ratio of girls and guys, competitions were inevitable. This time, we had a quiz competition - girls vs guys.


There was no specific topic - anything from anywhere would do. One of our long-term choristers had prepared the quiz and he had done an excellent job of it. We loved playing the quiz. We had assembled in one of the rooms we were staying in. All the rooms had bunk-beds, which is very cool to sleep in, by the way! The girls settled down at the top of the bunk-beds and the guys took the lower beds. Once we settled down, the quiz began. It was fast and exciting!


The rules were simple - 30 seconds to answer a question, 10 points for a correct answer, 5 point when a question was passed on. Some of the questions (answers at the end of the post):

  • When was the Book of Revelation written?
  • What is the longest river in the world?
  • What book does Torah, Neviim, Ketuvim represent?
  • What is the heaviest element in the world?
  • Washburn, Dobro resonator, Stratocastor - what are these associated with?

  • What is the largest moon in the Universe?
  • In the Bible, which community worshipped Baal?
  • Which city was the centre of Renaissance art?
  • Which is the company with the most employees?
  • What language was the Old Testament written in?
And finally, we come to the purpose of this post! Well, the girls won the quiz, albeit by a narrow margin! The prize was to be any original gift that the girls liked, which fell within the budget. I was amazed when all of them suggested a handmade paper bracelet from PaperNPearlz!


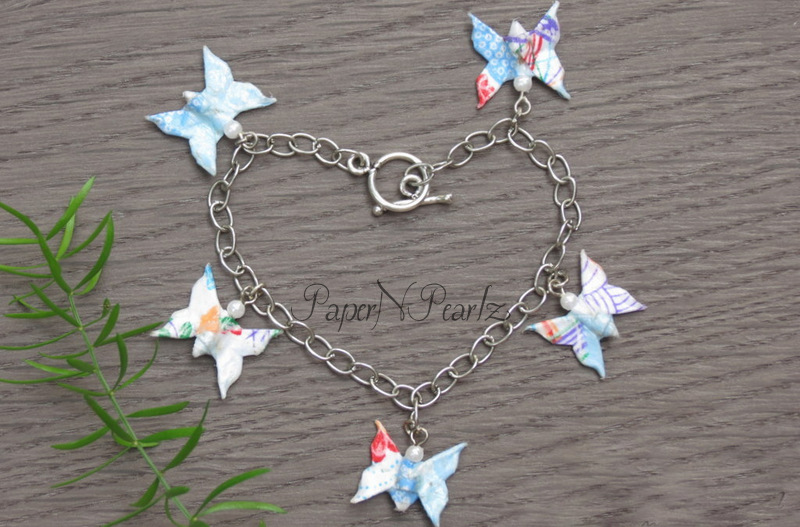
Of course, they wanted it customized. So I gave them an option of butterfly or star bracelets and they got to choose their colours. All of them chose butterflies. As for the colours, as you can see, pinks abounded. The next favourite colour was purple. As much as possible, I added little touches which I thought would be appreciated. One of the bracelets had little jingles in it. Butterfly beads, round and tear drop crystals for a few others. One of the purple bracelets had little lavender pearls and personally this was my favourite.


Of the photos, my favourite turned out to be the pink bracelet, laid out into an off-centre hyperbole. I liked the combination of dark-brown background and pink butterflies, with just a tinge of green from the stem.
Overall, this has been a very exciting, but tiring experience for me. Making about 35 - 40 paper butterflies and turning them into bracelets is no joke - makes me appreciate all those handmade creators around the world! The photography part of this project was also an eye-opener. I had to experiment with so many backgrounds and colours.


I even ended up making a small, inexpensive light box, to provide the right light diffusion and a uniform background. 

And finally, to the answers to the quiz questions:
1. 1 AD
2. Amazon
3. Old Testament
4. Osmium
5. Guitar
6. Ganymede
7. Canaanites
8. Florence
9. Walmart
10. Hebrew

And with that, I come to the end of a rather long post!

In the past couple of years, I have made and sold quite a few of my origami earrings online. This has been a fairly easy job for me, since I could make the earrings I wanted and put them up for sale when I wanted to. There was no pressure and it helped me make more and more complex earrings.

This year, for the first time, I got a couple of opportunities to be a part of local market places that sold hand crafted goods. Since I have never been a part of such craft bazaars before, these experiences have been real eye openers!


Let me start off with the many lessons that I learnt during these forays: One - I could not gradually make earrings at my own pace! I needed enough earrings to at least cover the 2 tables that each stall would be provided with. And let me tell you, paper jewelry does NOT occupy space! So in the first event, even though I had about 200 pairs of earrings (Whew! Making them was an immense challenge! It felt like I was spending whole weeks at my work table..), my table looked half full! By the way, my earrings included leaf earrings, star earrings, umbrellas, pine cones, butterflies and hearts.


Two - So since my first stall looked hardly full, I decided that I need to diversify my jewelry. It was not sufficient that I made earrings, I needed to make things that take up space. So I started making bracelets and chains/necklaces. And that is what went into my second stall. I had a bigger variety of earrings - I included rose stud earrings, bird stud earrings, woven earrings, modular and wreath earrings. My bracelets included butterfly bracelets, star bracelets and bird bracelets. But still, I found that my tables did not look filled in!


Three - For my third event, I diversified even more! I included handmade bags, pillow boxes and little Christmas ornaments. And finally I was happy with the way my stall looked :)

Four - For a marketplace, it is not sufficient that you have just your products. In addition, a lot of accessories are needed. A major item was the packaging stuff. I needed boxes/zip lock packs to keep the jewelry in. Then I needed bags to put the boxes in. These bags also had to be handmade bags, to go with the handmade theme. I also found that having a stand listing the price of all the items was very useful. And a sign board was an absolute essential.


Now, these are things that I need not worry about in a online shop and they were all additional expenses! So now I absolutely need to participate in more events just to recuperate all that money that I have invested! :)

Five - A few of the buyers were not able to appreciate handmade works. To them, all I was using was paper. So they believed that I should be selling it for a 10th of the price I quoted. But thankfully, this was a minority. For the most part, people understood the effort that goes into handmade.


Among the positives, the biggest positive was the opportunity to meet a lot of handcraft enthusiasts who had put up stalls in the events. I was amazed at the creativity that I saw. Jewelry, clothes, greeting cards, paper bags, paintings, clay art, terra cotta jewelry, crocheted works - an absolutely mind-boggling array of talents were on display!

Two - I found a lot of people fascinated by paper jewelry! For a lot of them, this was the first time they were seeing something like that. In fact, a lot of them were not aware that my jewelry was made from paper. The moment I said that it was paper jewelry, they did a double take and immediately fingered the jewelry to check that it was in fact paper!


Then they had the usual questions on durability, water resistance etc.

Three - Children were fascinated  with the birds and stars. Young adults loved the butterflies. And those in their 30s were very appreciative of my rose studs. All of them were very appreciative of the effort. Quite a few of them were aware of origami and a few even knew that tiny roses were very difficult to fold. So they were all the more fascinated by the jewelry.


So these events have been learning, yet delightful experiences. I have made new crafter friends, I have got a list of people who want to learn origami, I have new clients who want specific jewelry in specific colours.

While I will continue with my online sale (it is hassle-free as compared to a bazaar!), I would love to participate in yet another event and exhibit more of my jewelry. Though, not any time soon!

If you are wondering if I have abandoned the blog, well, that isn't happening any time soon! But I haven't been making a lot of origami per se. More of origami jewelry and experimenting with paper - what paper to use for what, size - what size is good for adults/children, design - what design is easy to work on and so on and on.

And the result of those experiments are the earrings and the bracelet. The butterfly earrings, I have found, are liked by children, but are much too large for them. So now I need to figure out a good size for kids. And folding such small sizes isn't a lot of fun either. And requires practise. The wreath earrings are also adult sized and I absolutely love them!  I have made them in a variety of colours and these are my favourites.


Coming to the bracelet, this was a complete experiment. And I am quite pleased with the result :) I have wanted to make these bracelets for a long time, but never did find the toggle clasps, till recently. Unfortunately my length measurements were off target, and the bracelet is a little small for adults but will fit a child perfectly - much to my daughter's delight! More bracelets on the way..


And I also ended  up making a rose ring - a tiny little kawasaki rose, fit on a ring base with a little pearl at the centre. I admit it does require a little tweaking though. Folding a kawasaki rose from such a tiny square requires more practise than I have had.

I put the ring through a stress test by mistake - washed my hands while wearing the ring, but thankfully I had glazed it before. The ring got completely drenched, so I set it aside to dry fully. And wonder of wonders, once dry, absolutely nothing happened to the ring! So if you are worried about buying paper jewelry, do remember that they are pretty water-resistant once glazed and if you do get them wet, just allow them to dry completely before using them again.
A few days back I read a joke that 90% of people using Google.com, use it to check if their internet connection is working and only the remaining 10% use it for searching! Well, it looks like most people I know were busy checking their internet connections today, cos I have got endless messages, pings, calls informing me that today is Akira Yoshizawa's birthday, thanks to the Google doodle today :) I have got suggestions on what I should post and what I should make!


I did take the suggestions to heart and made a little something with Akira Yoshizawa's very famous butterfly. The Yoshizawa Butterfly is, I think, one of the most beautiful yet simple butterflies that I have tried. It starts with a waterbomb base and is very quickly turned into a butterfly!

What I did with the butterfly, was to make a whole bunch of them in rainbow colours (or at least most of the rainbow colours) and place them randomly to a while background to form a collage of sorts.

If you notice closely, you will see that the butterfly wings are not completely flattened and the butterfly itself does not lie flat. This was a small variation I picked up from Nick Robinson's blog, where the wings are folded but not creased and a mountain fold holds the butterfly shape well.


Model Details:

Model: Butterfly 

Creator: Akira Yoshizawa

Difficulty Level: Simple

Paper Ratio: Square

Paper Size: 2 inches

Tutorial: Youtube

Instructions: Sanrio Town

Butterfly earrings are not very easy to make, but the earrings that result from them are quite beautiful. Well, what else would you expect from a butterfly? :)

I liked the green earrings that I made. I had included green butterfly beads as well and loved how the whole thing turned out! Another of my earrings that I ended up keeping with me, since I couldn't bear to part with them!


A Tato is a Japanese flat container and Tatogami is one of the oldest form of paper folding. Tatos can hold small flat objects like needles and buttons and postage stamps.

Traditional tatos are easy to make, so instead of making a traditional one, I tried out this butterfly tato, designed by Marcela Brina. Origami paper, coloured differently on both sides, works well to bring out the butterfly shape in the middle.

The instructions are clear, though for a beginner it might present a bit of a challenge initially.

Model Details:

Model: Butterfly Tato 

Creator: Marcela Brina

Difficulty Level: High Intermediate

Paper Ratio: Square

Paper Size: 6 inch squares

Diagram: Artis Bellus 

The traditional origami butterflies are always great to make. They work with any kind of paper - origami paper, copy paper, gift wrapper and any other that we can lay our hands on.

These butterflies are easy to make and would be good as a little something on the wall I think. Small size is the key. Paper size 3-4 inches is a good size.

Model Details:

Model: Traditional Butterfly 

Origin: Traditional

Difficulty Level: Simple

Paper Ratio: Square

Paper Size: 3 inches

Instructions: David Petty's Origami

The butterfly for today is designed by Rikki Donachie. What I liked most about this butterfly is how beautiful and natural the wings came out. If you stick the body of the butterfly to a wall, the wings make it seem that the butterfly is really flying :) Loved it!

This butterfly looks great when using paper in contrasting colours on both sides. In that case, the butterfly wings would be in one colour and the rest of the butterfly in the contrasting colour.

Model Details:

Model: Rikki Donachie's Butterfly 2

Creator: Rikki Donachie

Book: It's Just a Bit of Paper
 

Author: Rikki Donachie
 

Difficulty Level: Low Intermediate

Paper Ratio: Square

Paper Size: 3 - 4 inches

Instructions: Its Just a Bit of Paper Origamik

Tutorial:Youtube

These simple butterflies were designed by Fatima Granadeiro, a Portuguese origamist.

All kinds of paper works for this model. Smaller sized squares are better. 2-4 inches squares work well. Paper in contrasting colours on both sides would result in a butterfly with one colour for the wings and another for the head.

Model Details:

Model: Fatima Granadeiro Butterfly 

Creator: Fatima Granadeiro

Difficulty Level: Low Intermediate

Paper Ratio: Square

Paper Size: 3 - 4 inches

Instructions: Paper Unlimted's post has the diagram. To go directly to the instructions pdf, click here

The Kawasaki butterfly is yet another easy butterfly, made from half a square - economical and pretty! The creator is the amazing Toshikazu Kawasaki, better known for his origami rose. The butterfly can be found in his book 'Origami Dream World - Flowers and Animals'. 

Model Details:

Model: Butterfly 

Creator: Toshikazu Kawasaki

Book: Origami Dream World - Flowers and Animals
 

Author: Toshikazu Kawasaki
 

Difficulty Level: Simple

Paper Ratio: Rectangle in ratio 1:2

Paper Size: 3 inches by 1.5 inches

Tutorial: Youtube


Akira Yoshizawa's butterfly is one of the prettiest butterflies I have folded. The butterfly starts from a waterbomb base. There are precisely 4 folds following the waterbomb base and voila! You have a beautiful butterfly.

The beauty of this butterfly lies in the simplicity of the folds. This was amongst the initial origami that I folded and I assure you, if you are a beginner origamist, this is a must-fold.

Have a go at it :)

Model Details:

Model: Butterfly 

Creator: Akira Yoshizawa

Difficulty Level: Simple

Paper Ratio: Square

Paper Size: 4 inches

Tutorial: Youtube 

Michael LaFosse is known for his origami butterflies and I think this Alexander Swallowtail Butterfly is by far the most beautiful of his designs. His website features quite a few of his designs. In addition, the tutorial for this butterfly is also available there.

Though I am a beginner origamist, I found the tutorial to be very useful and in spite of the design being of the intermediate level of complexity, I was able to complete it quite easily, thanks to the detailed tutorial.

The butterfly can be done in a large number of sizes, from 2-3 inches square to 6 inches squares. Duo coloured paper works best, as it brings out the change in colour in the body of the butterfly.

If you are fascinated with origami butteflies, then the book, 'Michael LaFosse's Origami Butterflies is a great find. The book describes Michael LaFosse's system for folding an unlimited variety of origami butterflies. It is an absolutely fascinating book that starts by describing the variations for creating your own unique butterfly design and ends with the diagrams for some of LaFosse's beautiful butterflies including the Alexander Swallowtail and Alexander Aztec butterflies.


Model Details:

Model: Alexander Swallowtail Butterfly

Creator: Michael LaFosse

Book: Origami Butterflies
 

Authors: Michael G. LaFosse and Richard L. Alexander
 

Difficulty Level: Low Intermediate

Paper Ratio: Square

Paper Size: 5 inches

Model Size: ~5 inches in diameter

Tutorial: PEM Origami. To reach the tutorial, just go to the link -> Fold more models -> Origami Now! -> Butterflys.