Showing posts with label 6 modules. Show all posts


After working on the Origami Hearty Cube by Meenakshi Mukerji, I decided to delve back into my other origami books by the same author and decided to try out some of her Sonobe Variations. 

I love folding the Sonobe and am quite excited about folding some of the variations in the book "Marvelous Modular Origami". Check out my Poinsettia, one of the models that I had previously folded from this book. 

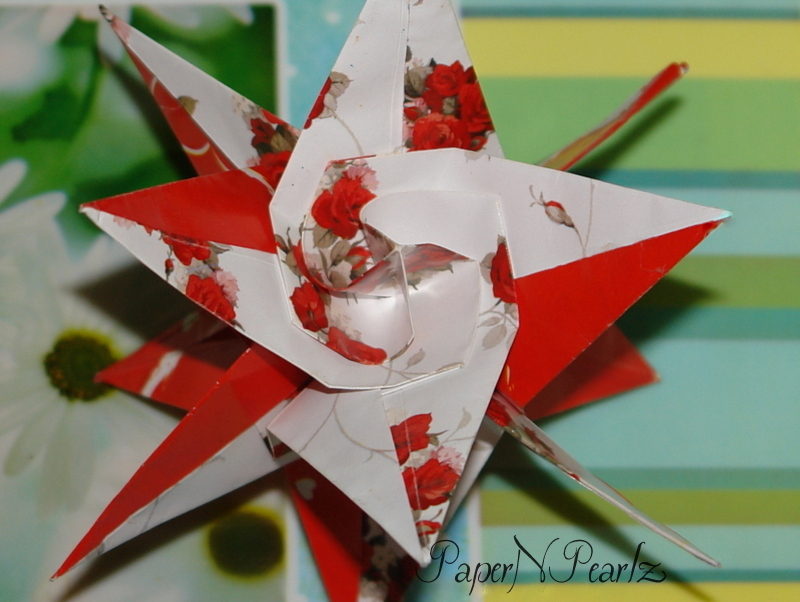
So this time, I started with the very first model in the book, the Daisy Sonobe. This is folded from a square and is not too difficult to fold. Different assemblies are possible - the cube, large cube, octahedron, icosahedron and dodecahedron. While I love folding the octahedron and the icosahedron, I decided to start with the cube. The cube is, of course, folded from 6 units. 

The assembly is pretty straight forward, It is easiest to assemble 4 in a straight line, then connect the end units and finally attach 2 units - 1 at the top and 1 at the bottom. 

I have used 3-inch squares to fold and this resulted in a really small cube - about 2 cms side (~0.8 inches). So if folding a cube, a square of at least 5 inches is advisable. 

I hope to try the other assemblies using the other variations in the book. Hopefully soon!

Model Details:

Model: Daisy Sonobe Cube

Creator: Meenakshi Mukerji

Book: Marvelous Modular Origami

Author: Meenakshi Mukerji

Difficulty Level: Low Intermediate

Paper Ratio: Square

Paper Size: 3 inches

Model Size: ~0.8 inches side

Modules: 6


Well, it's been a month since Valentine's Day and I finally did Meenakshmi Mukerji's Hearty cube!! 😅😅 I have procrastinated quite I know, but unfortunately work has been taking it's toll 😒

The cube, that has a heart on each side, is made from 6 modules. Each module is folded from half a square - a rectangle of ratio 1:2. So the easiest way to do it is to cut 3 squares into 6 modules. 

Origami paper with different colours work best, as that would mean the hearts would stand out. Instead of the traditional red, I decided to go with a light yellow origami paper, with little flowers on one side. Am quite pleased with the way this has turned out 💛

It is a simple modular origami and would be a great model to try out for beginner origamists. 


Model Details:

Model: Hearty Cube

Creator: Meenakshi Mukerji

Book: Exquisite Modular Origami II

Author: Meenakshi Mukerji

Difficulty Level: Low Intermediate

Paper Ratio: Rectangle in ratio 1:2

Paper Size: 6 inches * 3 inches

Model Size: ~ 1.5 inches in height

Tutorial: Instagram

Number of Modules: 6


While I love folding origami kusudamas, over the past few years, I find it more pleasing to fold geometric modular shapes. And for those who are interested in polyhedral origami, Tomoko Fuse's book 'Unit Origami Essence' is an absolute treasure trove! As is the case with most of her other books, this book too is entirely in Japanese. But that is no hindrance, since the pictorial steps are very clear and fairly easy to follow. And in the few places that one might get stuck, Google Translate comes to the rescue.

One of the drawbacks of using a Japanese books is that I was not able to figure out the names of each of the models. The book is divided into 4 chapters. The first chapter is on cubes. The second chapter deals with solids made from triangular bases, the third - solids made from pentagonal bases and finally, the fourth deals with solids from star-shaped bases.

My first attempt from the book was from the Cubes section. I tried out pretty much all the cube models. The individual modules are pretty easy to fold. The second of the models (in brown and yellow in the pic) was very unique - made from boat-shaped units, 4 units in all. Most of the other cubes were from 6 modules. A couple of the cubes were pretty nice variations.

All the models have a recommended size listed. For all the cubes I had tried, it was given as 15 cms * 15 cms (6 inches * 6 inches). But I had used 9 cms * 9 cms (3.5 inches * 3.5 inches) squares and didn't have much difficulty folding or assembling the pieces.

Model Details:

Model: Various Cubes

Creator: Tomoko Fuse

Book: Unit Origami Essence

Author: Tomoko Fuse

Language: Japanese

Difficulty Level: Low Intermediate

Paper Ratio: Square

Paper Size: 3.5 inches

Model Size: ~1.4 inches side

Number of Modules: 3 to 6

Well, Little Miss's interest in origami continues. But now it is more managerial - which means she decides what I should fold and what colours I should use and then she waits for me to complete folding it before she proceeds to 'teach' me how to photograph them 😄 

So this is her next pick - a heart bracelet. This is designed by Henry Pham. While most of his origami is complex, this heart bracelet is pretty easy to do. 

Little Miss picked out the colours. We decided we wanted small hearts, so used 2 inch squares and ended up with each module measuring about 1.5 inches in length. Connecting the modules is just a matter of sliding one into the next. We glued the connecting points so they do not slide out. We used a total of 6 hearts (7 would have been more comfortable for Little Miss) to form the bracelet. 

Little Miss is as thrilled with the bracelet as she was with the backpacks. And I await more instructions from Her Highness 😀 

Model Details:

Model: Heart Bracelet

Creator: Henry Pham

Difficulty Level: Low Intermediate

Paper Ratio: Square

Paper Size: 2 inch squares

Model Size: ~6 inches in length

Modules: 6

Tutorial: Youtube 
Fumiaki Kawahata's most well-known origami is probably the Origami Yoda. But, I doubt I will ever make it - for one, I am not very clear on who exactly Yoda is (Star Wars and I are galaxies apart!!) and two, I am not really good at folding people/animals/birds from paper. Somehow my models don't come out with a smooth finish and end up looking very unrealistic!

The modular ball, on the other hand, is one of only 3 modular origami designed by Fumiaki Kawahata. I have always been put off by how complex it looks, until I finally gave it a try today. Surprisingly, it is pretty easy to make. There are 6 modules that are basically pleated. Each corner is folded perpendicularly to the initial pleat, to form 2 perpendicular arms.

Now the way the model is put together is something I have not seen before! There is none of the usual tabs and pockets to assemble the model. Instead, 2 modules are placed facing each other, so that their perpendicular arms meet in the centre. Now, these 2 arms hold in place a third module. It is a little tricky initially, but pretty simple once you get the hang of it. Only thing to remember is that, if one module is taken out, the whole model will come undone.

Model Details:

Model: Modular Ball

Creator: Fumiaki Kawahata

Difficulty Level: Low Intermediate

Paper Ratio: Square

Paper Size: 3.5 inches

Model Size: ~ 3 inches

Tutorial - Modules: Youtube

Tutorial - Assembly: Youtube

Yet another simple modular origami made from a waterbomb base. This one is even named 'Quick and Easy Modular" :) The model looks complex but it is fairly simple to make. Reminds me of the origami spinner.

The modular is made from 6 units which are pretty easy to fold. The modules lock well and require no glue.

Yet another project for beginners to modular origami!

Model Details:

Model: Quick and Easy Modular

Creator: Heather Shida

Difficulty Level: Simple

Paper Ratio: Square

Paper Size: 5 inches

Model Size: ~6 inches

Modules: 6

Tutorial: Youtube 

Tomoko Fuse's book 'Unit Origami Fantasy' is in Japanese, so I am not able to find the name of this model! Hence the generic title for the post :) Do leave a comment if you are aware of the name of the model. Though the book is in Japanese, the detailed step-by-step instructions are more than enough to complete the models.

As far as the model goes, this is a simple model, made from a windmill base. I used printer paper (80 gsm) for the units, which turned out pretty good for this model. I think if I had used regular 60 gsm origami paper, the model might not have been as sturdy. For a sturdier model, thicker paper such as scrapbooking paper should work well, given the simplicity of the folds and the assembly.

In general, for modular origami, I tend to go for the icosahedron assembly (30 unit assembly). But for a change, I tried the cube assembly (12 unit assembly). Each face is made from 4 modules and there are a total of 6 faces to the cube.


Model Details:

Model: Cube Modular 

Creator: Tomoko Fuse

Book: Unit Origami Fantasy
 

Author: Tomoko Fuse

Language: Japanese
 
Difficulty Level: Low Intermediate

Paper Ratio: Square

Paper Size: 3 inches

Model Size: ~3 inches

Modules: 6

Since of late I have recently been working on easy origami, I thought I would try out something a bit more challenging. This hydrangea cube was a good attempt and I am quite pleased with how it has turned out 😀

How to go about this? Well, we need to initially make 6 of Shuzo Fujimoto's hydrangea tessellations. In origami, tessellations are patterns that are usually folded from a single sheet of paper, that repeat themselves as many times as needed. They usually provide a dimensional appearance.

The hydrangea tessellation is one of the simpler designs. The paper that I have used is regular kami paper. The paper didn't tear while making all those sinks and pops!

Once the 6 hydrangeas are completed, it is just a matter of joining them in a cube. Joins are made by creasing a mountain fold along each of the longer petals, on all 4 sides. The creased corner can be slid into the adjacent hydrangea to hold it in place. Fitting the last of the 6 turned out to be very frustrating and I almost tore up the model! Only the thought that I would have to refold 6 hydrangeas, kept me from doing it!! 😄😄

And if you are the adventurous sort, you can also try the regular snooze assembly, made from 30 units!

Model Details:

Model: Hydrangeau Cube 

Creator: Shuzo Fujimoto

Difficulty Level: High Intermediate

Paper Ratio: Square

Paper Size: 8 inches

Instructions (for making a single hydrangea tessellation): British Origami

Tutorial: YouTube

Modules: 6


With Valentine's day coming up, the origami cube of love would make a great DIY gift 😀 It is a modular cube with a whole bunch of hearts in it! It is made from 6 units, each unit with a heart in one of the corners. The modules are made from half a square, that is, rectangles in the ratio of 1:2. They are quite easy to make. Duo-coloured paper must be used to get the contrast between the heart and the rest of the module.

The cube makes a great decoration and will make a good gift for a loved one..

Model Details:

Model: Cube of Love

Creator: Fumiaki Shingu

Difficulty Level: Low Intermediate

Paper Ratio: Rectangle in ratio 1:2

Paper Size: 5 inches * 2.5 inches

Modules: 6

Diagram: Origami-club

The Multi Points Star, by Ilan Garibi, is a great addition to my origami collection this Christmas. The stars are modular, easy to make and can be used to make stars with as many points as required, starting with 6 points.

I realised that paper that is thicker than usual origami paper works great for this model. So I ended up using printer paper, wrapper paper etc.

I tried with various sizes of squares as well, starting with 2 inch squares and finished with 4 inch squares. All looked great!


Model Details:

Model: Multi Point Star 

Creator: Ilan  Garibi

Difficulty Level: Low Intermediate

Paper Ratio: Square

Paper Size: 1.5 inches upto 4 inches squares

Modules: 6 modules and above

Tutorial: Youtube 

Tomoko Fuse's boxes are really simple to make and I love making them! So here goes another of her boxes from her book 'Quick and Easy Origami Boxes'.

I rather like the little knob on the lid. Adds a little something and gives us a handle to use to open the box :)


Model Details:

Model: Triangular Boxes

Creator: Tomoko Fuse

Book: Quick and Easy Origami Boxes

Author: Tomoko Fuse

Difficulty Level: Low Intermediate

Paper Ratio: Square

Paper Size: 4 inches

Tutorial: Youtube

Number of Modules: 6 (3 for box and 3 for lid)


The Origami Pinwheel Cube is designed by Tomoko Fuse and is found in her book 'Multidimentional Transformations Unit Origami'. The cube is formed from just 6 units, so as compared to the other cubes that I have done in recent days, I found it pretty quick to complete. 

The name of course, comes from the pinwheel shape that is seen on each of the faces. Origami paper that has different colours on both sides will work best. 

Model Details:

Model: Pinwheel Cube 

Creator: Tomoko Fuse

Book: Multidimensional Transformations Unit Origami
 

Author: Tomoko Fuse
 

Difficulty Level: Simple

Paper Ratio: Square

Paper Size: 4 inch squares

Modules: 6

Tutorial: Youtube (Folding and Assembly)

The XYZ Diamonds is another planar origami model, made from 3 intersecting diamonds. The design is by Francis Ow, the well known folder/creator of origami hearts.

Though it looks like there are only 3 planes, joined in the middle as though by magic(!), the planar model is actually made of 6 modules. Accuracy is required in folding the modules, else fitting each unit into the next is almost impossible. The first 4 modules can be fitted in easily. The last 2 are not that easy and this is where accuracy of folds makes a difference.

The model works best with 3 colours and 2 modules of each colour.

Model Details:

Model: XYZ Diamond 

Creator: Francis Ow

Difficulty Level: Low Intermediate

Paper Ratio: Square

Paper Size: 5 inch squares

Modules: 6

Instructions: Dave's Origami Emporium

Tutorial: Youtube


As kusudamas go, this is an easy kusudama, in the sense that, instead of folding 20 to 30 units, this origami needs only 6 units per kusudama. So the time spent on each of these modulars is much lesser.

That said, each module is a little more complex than the usual kusudama modules. The unit starts with a water-bomb base and involves a squash fold at the tip. Finally, after completing the folds, the module is opened up, with extra care, as it is very easy to rip up the squash fold.

Assembly is just a matter of sliding one module under the adjoining one. Not to worry, it holds firm without any glue.

Finally, a word on the paper used. Regular printer paper works best for the model. With regular 60 gsm origami paper, the problem I faced was during assembly. Sliding one module under the other needed a lot of care since 60 gsm paper gets crushed very easily. But with 80 gsm printer paper, this was not much of an issue. Naturally, the printer paper kusudama was more sturdy than the origami paper one.


Model Details:

Model: Quick Kusudama 

Creator: Nina Ostrun

Difficulty Level: Low Intermediate

Paper Ratio: Square

Paper Size: 3.4 inches

Model Size: ~3 inches in diameter

Modules: 6

Diagram: Kusudamas.narod.ru

Tutorial: Youtube 

The spiral star is very elegant, intricate-looking origami which is surprisingly easy to make. Assembling the piece is quite easy if you use a cheat's way out.. some paper clips to hold the sides together :D

The modules start with a bird base. They are then twisted into spirals and then the modules are attached along the arms.

I loved the colour combination of red and white that I had chosen for this piece. And I loved the way the photographs have come out too.

Model Details:

Model: Spiral Star 

Creator: Grzegorz Bubniak

Difficulty Level: Low Intermediate

Paper Ratio: Square

Paper Size: 5 inches

Modules: 6

Crease Pattern: Gregorigami

Tutorial: Youtube