The Braided Paper, designed by J C Nolan, is a very beautiful origami to fold. It does require some practise to fold it and one that I had tried when I was just a beginner in origami and failed.. It was quite some time after that that I tried another of J C Nolan's design, Andrea's Rose. Now I finally had enough confidence to give Braided Paper another try. And I did it! It is such a beautiful design that I am thrilled that I finally managed to do it! :)

I loved the paper that I used for this design, the same banana paper that I had used for Floral Top. The paper is crisp and thin but strong and very good for folding this model.

A square of 8 inches are higher would be ideal when trying this design for the first time. Anything smaller would lead to a lot of frustration when making the reverse and pleat-sink folds for the model.

Model Details:

Model: Braided Paper 

Creator: J C Nolan

Book: Creating Origami
 

Author: J C Nolan
 

Difficulty Level: High Intermediate

Paper Ratio: Square

Paper Size: 9 inches

Tutorial: Origami CZ  

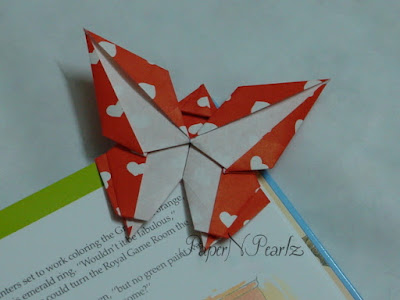
There are quite a number of origami butterflies that have been designed. But there are relatively few origami butterfly bookmarks. And of those few, I think the most beautiful is Grzegorz Bubniak's bookmark.

I have stagnated in my folding these days, haven't really tried new things. So this bookmark made an interesting change. I found the steps to be more complex than what I have attempted so far. But despite that, the instructions were clear enough that I could follow and complete them.

The difficulty level for the bookmark is intermediate, I would say. Moving from step 4 to 5 presented the first challenge for me. Going from Step 9 to 10 was also interesting. I had to closely follow the valley and mountain folds to complete the step. I also needed to figure out how to make a swivel fold.

Model Details:

Model: Butterfly Bookmark 

Creator: Grzegorz Bubniak

Website: GregOrigami
 
 
Difficulty Level: High Intermediate

Paper Ratio: Square

Paper Size: 5 inches

Tutorial: Youtube

Diagram: Dev.Origami

These baby booties, designed by Katsushi Nosho, are easy to make and look very pretty. They would look lovely as decorations or favours for a baby shower.

The booties are held together by a bow, just like real booties! I made these from 8 inch squares and they turned out to the size of a new born baby's foot! But, don't try it out on a baby though ;)

The booties can also be strung together to form a hanging ornament.


Model Details:

Model: Booties 

Creator: Katsushi Nosho

Book: Essential Origami
 

Author: Steve and Megumi Biddle
 

Difficulty Level: Low Intermediate

Paper Ratio: Square

Paper Size: 8 inches

Model Size: ~3 inches side

Instructions: Origamii 

The XYZ Diamonds is another planar origami model, made from 3 intersecting diamonds. The design is by Francis Ow, the well known folder/creator of origami hearts.

Though it looks like there are only 3 planes, joined in the middle as though by magic(!), the planar model is actually made of 6 modules. Accuracy is required in folding the modules, else fitting each unit into the next is almost impossible. The first 4 modules can be fitted in easily. The last 2 are not that easy and this is where accuracy of folds makes a difference.

The model works best with 3 colours and 2 modules of each colour.

Model Details:

Model: XYZ Diamond 

Creator: Francis Ow

Difficulty Level: Low Intermediate

Paper Ratio: Square

Paper Size: 5 inch squares

Modules: 6

Instructions: Dave's Origami Emporium

Tutorial: Youtube


I finally present the very famous Cherry Blossom Kusudama, designed by none other than Tomoko Fuse. Cherry blossoms are usually white or pink in colour but I decided that my kusudama need a bit more colour, so here is a vivid red(orange??)-with-flecks-of-white kusudama :)

The kusudama is made from 30 squares of paper; folding the individual units is the easy part, though it is more complex that most other kusudama units. The fun starts when you assemble the units. Assembly is in groups of 3. Inserting the third unit was a challenge at the beginning. Imagine doing that for all the groups! Phew! The 3-unit groups are put together in 5s and as soon as you assemble your first five, you can see the cherry blossoms emerging. You just need to round off the petals so that it looks more like a petal and less like a diamond..

And.. Tada!! Your very own cherry blossom kusudama! Ok, it does take time and effort and patience and the will to complete it, but it is soon done..It is recommended to use squares that are 5 inches or more, else it gets even more difficult to assemble it. I have used 4.5 inches square here.

The design first appeared in the Origami Tanteidan Magazine (Vol 12, Issue 72). It also includes a section on making little petals that can be folded and inserted into the flower, but I felt that the cherry blossom ball looks better without that. So I left that out.

Model Details:

Model: Cherry Blossom Kusudama 

Creator: Tomoko Fuse

Book: Origami Tanteidan (Vol 12, Issue 72)
 
 
Difficulty Level: High Intermediate

Paper Ratio: Square

Paper Size: 4.5 inches

Model Size: ~5 inches in diameter

Modules: 30

Tutorial: Youtube 

The Just Twist Twirls are these beautiful modular flowers created by Krystyna Burczyk. These twirly creations, when curled correctly and tightly, hold together very well and form quite sturdy structures.

This flower is made from 10 triangles cut out of a square on the diagonal. And there is absolutely no folding involved; only twirling :) The twirls come out much better when the paper is coated with a dab of water. The water helps the paper to bend much better and once it is dry, the shape is also held better.

Thick paper is recommended, since regular origami paper will not be sufficiently strong to hold the shape. I have used 120 gsm paper in 2 different colours and am very happy with the way these flowers turned out.

Model Details:

Model: Just Twist Flower 

Creator: Krystyna Burczyk

Difficulty Level: Low Intermediate

Paper Ratio: Triangle cut along the diagonal of a square

Paper Size: 3.5 inch squares

Modules: 10

Tutorial: Youtube 

The Blütenkreisel or the Floral Top, is designed by Carmen Sprung, the creator of the Kantenmodul. The origami starts from an octagon rather than a square. The flower is actually very realistic to look at (my photo does not do justice to the origami) and I enjoyed folding it.

The paper that I had used for this model was actually banana paper that I had bought during my last origami-paper-buying-spree. I loved the feel of the paper; it has a very crisp touch and folds beautifully and I just had to use it today. So there you have, a green coloured flower! :)

Model Details:

Model: Floral Top / Blütenkreisel 

Creator: Carmen Sprung

Difficulty Level: Low Intermediate

Paper Ratio: Octagon

Paper Size: 8 inches side

Instructions: Carmen's Origami Site 

Did you know that the Platonic Solids were named after the Greek philosopher Plato? He believed that these were the fundamental components of nature and associated fire to the tetrahedron, earth to the cube, air to the octahedron, water to the icosahedron and the element cosmos to the dodecahedron.

As the name suggests, the Octahedron has got 8 sides, each of them equilateral triangles. I had thought that folding it would be more difficult than the Cube, but surprisingly, I found it easier to fold this! It is completely folded as a 2-dimensional model, till the last step where it is inflated to form the 3-dimensional Octahedron. The dual of the Octahedron is the Cube.

Model Details:

Model: Octahedron 

Creator: John Montroll

Book: A Plethora of Polyhedra in Origami
 

Author: John Montroll
 

Difficulty Level: Low Intermediate

Paper Ratio: Square

Paper Size: 5 inch squares