Showing posts with label rectangle. Show all posts


Well, it's been a month since Valentine's Day and I finally did Meenakshmi Mukerji's Hearty cube!! 😅😅 I have procrastinated quite I know, but unfortunately work has been taking it's toll 😒

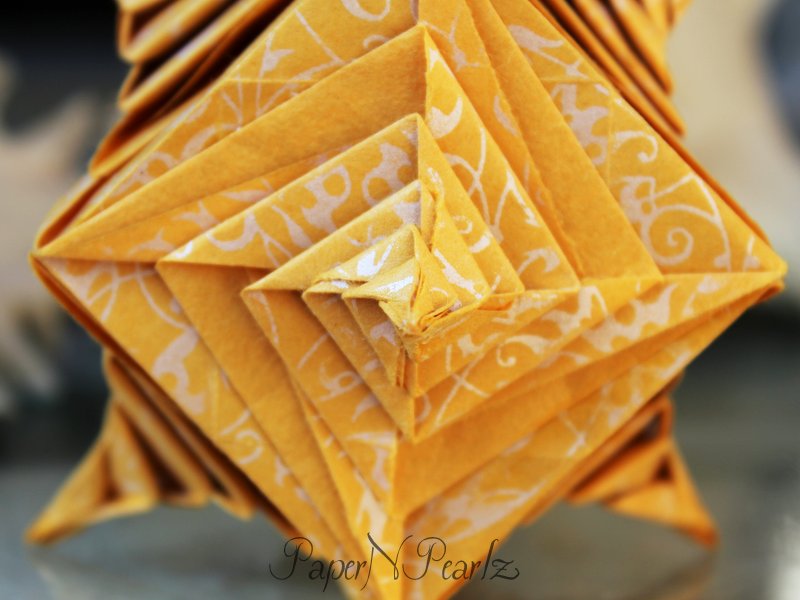
The cube, that has a heart on each side, is made from 6 modules. Each module is folded from half a square - a rectangle of ratio 1:2. So the easiest way to do it is to cut 3 squares into 6 modules. 

Origami paper with different colours work best, as that would mean the hearts would stand out. Instead of the traditional red, I decided to go with a light yellow origami paper, with little flowers on one side. Am quite pleased with the way this has turned out 💛

It is a simple modular origami and would be a great model to try out for beginner origamists. 


Model Details:

Model: Hearty Cube

Creator: Meenakshi Mukerji

Book: Exquisite Modular Origami II

Author: Meenakshi Mukerji

Difficulty Level: Low Intermediate

Paper Ratio: Rectangle in ratio 1:2

Paper Size: 6 inches * 3 inches

Model Size: ~ 1.5 inches in height

Tutorial: Instagram

Number of Modules: 6


As I had said in my previous post, while making the origami spiral cube, I wanted to retry this model using A5 paper instead of A4. A4 paper resulted in a fairly large cube which wasn't very appealing to me.

The coronavirus lockdown has given me ample time, so I decided to redo the model, using some lovely kami paper that I had. The paper turned out perfect for this model, since it was light enough that I could fold the spirals and assemble it easily.

Usually smaller origami models are more difficult to do than bigger ones, but in this model, I found the smaller one easier to assemble! Mainly because it was small enough to hold in hand while folding. I would definitely recommend the A5 size to the A4!


Model Details:

Model: Spiral Cube

Creator: Tomoko Fuse

Book: Let's Fold Spirals

Author: Tomoko Fuse

Difficulty Level: High Intermediate

Paper Ratio: Rectangle

Paper Size: 8.3 inches * 1.45 inches

Model Size: ~2.5 inches across

Number of Modules: 12

Tutorial: kusuda.ru


The Sweet Spring Kusudama is a very simple but very elegant looking origami kusudama, designed by Natalia Romanenko. Each unit is a combination of 2 or 3 smaller modules. Why do I say 2 or 3? Because, while the instructions I found online require 3 modules, you can make do with just 2 of them. 

The basic module is an origami pig base. This is formed from a square. To this module, we add 2 modules folded from a rectangle. This forms the star and a wavy loop on the star. Well, I didn't want the wavy bit, so I stopped with just the star. Hence had ended up with 2 instead of 3 modules. 

So once these units are assembled, the kusudama is formed by inserted 1 unit into the next. The assembly is very simple and the model holds well together. 

I have been meaning to use indigo coloured paper for a long time now, so I clubbed it with orange paper to give me a very bright sweet spring kusudama! 

Have you tried out this kusudama? Do give it a go, if you haven't. 


Model Details:

Model: Sweet Spring Kusudama

Creator: Natalia Romanenko

Difficulty Level: Low Intermediate

Paper Ratio: Square + Rectangle in ratio 1:2

Paper Size: 3 inches square / 3 inches by 1.5 inches rectangle

Model Size: ~4 inches in diameter

Modules: 60

Instructions: Paper Finger Cuts

Tutorial: Youtube


Recently I discovered another origami artist from Thailand, Sansanee Termtanasombat. As per her blog, PrwOrigami, her goal is to collect 1000 kusudamas. She also provides tutorials for a number of the models on her blog.

Of the models that have tutorials, I liked the heartbreak kusudama, for which the suggested colours are red and black. Naturally. But, I decided to go another way and chose pastel shades. I am not sure how well this combination of light blue, cream and white has turned out, but I quite like the pleasant colours. The individual modules are fairly easy to fold and so is the assembly, which is the traditional sonobe assembly.

In recent days, I seem to have developed a love for tassels, so I made a tassel for this kusudama too and made it into a hanging ornament.

Model Details:

Model: Heartbreak Kusudama 

Creator: Sansanee Termtanasombat (Praew)

Difficulty Level: High Intermediate

Paper Ratio: 1:2

Paper Size: 3 inches by 1.5 inches

Model Size: ~4 inches in diameter

Modules: 60

Tutorial: Youtube

The Graciosa wreath is a very simple origami wreath by Lidiane Siqueira. It is also very economical. The wreath is made from an odd number of modules - 7 of them. Each module is folded from half a square.

The size I liked is a 7.5 cms square cut into 2. So for my wreaths, I used one sheet of 15 cms square, double sided origami paper. From this, I got 7 rectangles, 7.5 cms by 3.75 cms. The modules are very easy to fold. Each module forms 2 spikes of the wreath, so that the final wreath actually has 14 spikes.

Assembly is also quite easy, it is just a matter of slotting one module into the next. It is held together with glue.


Model Details:

Model: Graciosa  

Creator: Lidiane Siqueira

Difficulty Level: Simple 

Paper Ratio: Rectangle

Paper Size: 3 inches * 1.5 inches (7.5 cms * 3.75 cms) 

Model Size: ~3 inches in diameter

Modules: 7

Diagram: Criativa'rte

Tomoko Fuse's spirals has always fascinated me. And since my last Tomoko Fuse origami was this pyramid box in May, I figured I would try out another of her spirals origami.

This origami spiral cube has been on my to-do list for quite a few years now! And finally I managed to do it! The cube is made from strips cut out of A4 paper. Each A4 sheet is cut into 4 strips. A total of 12 such strips are needed, which means 3 A4 sheets will be required.

As with most of Tomoko Fuse's models, the individual modules are fairly easy to fold. Assembly is a lot more challenging. I assembled the first three faces, on a flat surface. And I admit, I glued the tips of the spiral so that it didn't unravel easily. Once the three faces was done, the fourth face was decidedly more difficult but manageable. Then the top and bottom of the cube. Assembling one of the 2 ends was easy, because I could insert my hand inside the cube to hold the arms of the spiral and then continue with the assembly. The true challenge was, as always, in finishing the final face. I didn't have proper support, which meant I was forming the spiral in air! But finally, with a good deal of patience, I succeeded!

While I am happy with the cube, I find it too big for my taste. Hope to make another one from A5 paper. The principle remains the same. 4 strips from each A5, 12 strips in all.

Model Details:

Model: Spiral Cube

Creator: Tomoko Fuse

Book: Let's Fold Spirals

Author: Tomoko Fuse

Difficulty Level: High Intermediate

Paper Ratio: Rectangle

Paper Size: 11.7 inches * 2 inches

Model Size: ~3.5 inches across

Number of Modules: 12

Tutorial: kusuda.ru

After making this origami kusudama, designed by Ekaterina Lukasheva, I have a special respect for people who work with miniatures! For this model, I had some double-sided paper that was left over from a previous origami modular that I had done. So I decided to use that paper.

The size of those squares were 2 inches. Since this kusudama required paper in the ratio 1:2, I cut each of the squares in half which resulted in 30 pieces of 1 inch by 2 inches. And then proceeded with this kusudama.

While making the individual modules was quite simple, assembly was a real challenge, given the small sizes of the folded modules. Patience is of the essence and of course, a toothpick! I finally ended up gluing the modules to ensure that they did not come undone while assembling them.

Overall, an interesting kusudama. But I will think twice if I have to fold this one again! 😆😆

Model Details:

Model: Apricot

Creator: Ekaterina Lukasheva

Book: Modern Kusudama Origami

Author: Ekaterina Lukasheva

Difficulty Level: High Intermediate

Paper Ratio: Rectangle in ratio 1:2

Paper Size: 1 inch by 2 inches

Model Size: ~2 inches in diameter

Modules: 30


The Estrella Flor Kusudama is a modular origami created by Erny. Like my previous post, the Mt. Fuji Kusudama, the essential shape of this model is also a sonobe. And to form the sonobe modules, a total of 30 squares of paper is required. It works best if we use 15 squares of 1 colour and 15 squares of a second contrasting colour. That will bring out the flower pattern very well.

Each of the 15 squares are cut into 2 rectangles of ratio 1:2. So finally, to make the model, we will be folding 60 modules. 30 of these modules will form the flower shape and the other 30 will form the sonobe shape. The flower modules are slotted into the sonobe modules before starting the assembly. While the task seems quite daunting, the folding is not very difficult, though a little time consuming. Assembly is the usual sonobe assembly - 3 pyramids grouped in clusters of 5.

I quite like the colour choice I had made - dark purple and a light violet (or would that be mauve?) The final model is not too large, since I had used 7.5 cms squares. I decided to make it into a hanging ornament, so ended up with tassels and some beads to form the ornament.

Model Details:

Model: Kusudama Estrella Flor 

Creator: Erny

Difficulty Level: High Intermediate

Paper Ratio: 1:2

Paper Size: 3 inches by 1.5 inches

Model Size: ~4 inches in diameter

Modules: 60

Instructions: Folding in the air

Tutorial: Youtube

Recently I discovered a Youtube Origamist - Origami Kankichi. I later found out that he does have a blog and various other social media sites, but I prefer the youtube channel. Well, on his channel, he regularly posts tutorials on folding and assembling origami modulars. Most of this models are 30-unit assembly and of these, I especially like the sonobe variations - I have a particular fondness for sonobes. So after much deliberation, I decided to try out one of the sonobe variations that he has designed - the Mt. Fuji Kusudama.

The kusudama is a representation of Mt. Fujiyama in Japan. Naturally, it works best with blue and white paper. But, for me, the first time I saw this kusudama, I was reminded of Tomoko Fuse's Chrysanthemum Globe kusudama. So I decided to use a dark pink and white paper, to resemble a chrysanthemum covered mountain, I guess. Anyway, any contrasting colours should work out well for this kusudama.

The modular is made from 15 squares of dark pink and 15 squares of white origami paper. Each of the 15 squares are cut into 2 rectangles of ratio 1:2. So finally, to make the model, we will be folding 60 modules. 30 of these modules will form the mountain shape and the other 30 will form the sonobe base. The mountain modules are slotted into the sonobe bases before starting the assembly. While the task seems quite daunting, the folding is not very difficult, though a little time consuming. Assembly is the usual sonobe assembly - 3 pyramids grouped in clusters of 5.


Model Details:

Model: Mt. Fuji Kusudama  

Creator: Origami Kankichi

Difficulty Level: Low Intermediate

Paper Ratio: 1:2

Paper Size: 3 inches by 1.5 inches

Model Size: ~4 inches in diameter

Modules: 60

Tutorial: Youtube

Recently, I had the pleasure of being a part of a farewell party for outgoing students of a class. This was the culmination of a 2-year intense study for a masters degree. Naturally both the outgoing students and the students who were giving the farewell were very excited and at the same time emotional.

For me, it was a chance to be around young minds, marvel at their creativity and guide them when I could. Given that origami is one of my keen interests, the students wanted me to incorporate a little bit of origami in their celebrations. So when I came across this idea of making invitation boxes using origami, I went ahead and did exactly that!

Since black and white were the event colours and personalised invitations were the need of the hour, I chose a variety of black and white single sided paper to make the invites. The paper is fairly thick, 120 gsm, which means the folding is not very complex 😀

The photo above is the invitation in the closed position. The 2 halves of the heart serve as handles to open up the invite. See below for the open one.


Model Details:

Model: Invitation Box

Origin: Traditional 

Difficulty Level: Simple

Paper Ratio: Square or Rectangle

Paper Size: 12 inches * 7 inches (While the tutorial calls for a square sheet of paper, since I wanted a different size invitation (4*3 inches), I worked with a rectangle sheet of paper.

Model Size: ~4 * 3 inches

Tutorial: Youtube

As a gift for a friend, I had again folded the origami Patterned Icosahedron, created by Meenakshi Mukerji. I had previously folded it during the Christmas season. And enjoyed making it.

So this time, I decided to go with a pink and lavender duo-coloured paper, a favourite of my friend's, which resulted in a very pleasing modular origami. And I also went with smer unit sizes than my previous attempt and still was able to fold and assemble without any problems.

Model Details:

Model: Patterned Icosahedron

Creator: Meenakshi Mukerji

Book: Ornamental Origami

Author: Meenakshi Mukerji

Difficulty Level: High Intermediate

Paper Ratio: Rectangle in ratio 1:2

Paper Size: 3 inches * 1.5 inches

Model Size: ~ 2.5 inches in diameter

Tutorial: Youtube

Number of Modules: 30

The Origami Patterned Icosahedron has been on my to-do list for quite some time now. This pretty icosahedron is designed by the amazing Meenakshi Mukerji. The icosahedron is assembled using 30 modules and looks best with dual coloured paper. The same module can be assembled using 12 units to form the Patterned Octahedron.

The modules are pretty easy to fold and are folded from a rectangle in ratio 1:2 i.e., a square cut into two. I had used a green-red combination in the hopes of adding it to my Christmas Tree. But I get the impression that this looks more like a strawberry than an icosahedron, courtesy of the black dots on the red, I guess 😄😄 Nevertheless, it is a good modular to fold.

The assembly is, by modular origami standards, fairly easy. I would still recommend plenty of paper clips and an equal amount of patience when assembling this one!

Model Details:

Model: Patterned Icosahedron

Creator: Meenakshi Mukerji

Book: Ornamental Origami

Author: Meenakshi Mukerji

Difficulty Level: High Intermediate

Paper Ratio: Rectangle in ratio 1:2

Paper Size: 3.5 inches * 1.75 inches

Model Size: ~ 3 inches in diameter

Tutorial: Youtube

Number of Modules: 30
Yet another of Tomoko Fuse's models - this one from her book 'Floral Origami Globes', called Parallelogram Floral Globe.

The thing I love about this book is that each module is made of 2 parts - a basic unit (which looks like a sonobe module) called the 'Base',  and an insert, called the 'Face'. Each unit is assembled by joining the base and the face. So this basically means that I can use the single-sided paper, that I have plenty of, and still manage to get some colours in my model.

The other point about this book is that, in each section, there are only subtle differences in folding one model and the next. But these difference still result in new, really cool variations. And of course, the fact that you use only half a square for the base unit and a quarter for a face unit means the whole model is very economical!!

Model Details:

Model: Parallelogram Floral Globe 

Creator: Tomoko Fuse

Book: Floral Origami Globes
 

Author: Tomoko Fuse
 

Difficulty Level: Complex

Paper Ratio: Rectangles in ratio 1:2 for base and Squares cut into 4 quarters for face

Paper Size: 4 inch squares

Model Size: ~4 inches in diameter

Modules: 30 rectangles + 30 quarters

Since in recent days, I have been trying out many modular origami. I wanted to try out the inverse of the previous model I had folded - the 120-unit rhombic icosahedron using Tomoko Fuse's double-sided convex hexagonal rings. This time, I had used concave modules. As before, this one is also made of 120 modules.

This model turned out to be one of my most challenging. Mainly because this was like assembling the model upside down! And initially quite a few times, I started assembling the pieces as I would a regular icosahedron, with the cones pointing out. Then I had to undo and reassemble correctly. A lot of painful rework! Also, as the assembly progressed, I found that there were a few instances when I just couldn't get that little tab (the one that inserts into the adjourning section?) in place. Finally, I just gave up, but the model is so tight that there is no way the pieces will slip out. I can even use it as a football I think :)

Model Details:

Model: Double-sided Concave Hexagonal Ring 120 unit Rhombic Icosahedron 

Creator: Tomoko Fuse

Book: Unit Polyhedron Origami
 

Author: Tomoko Fuse
 

Difficulty Level: Complex

Paper Ratio: Rectangle in ratio 1:2

Paper Size: 3.4 inches by 1.7 inches

Model Size: ~4 inches in diameter

Modules: 120

The Rhombic Icosahedron from Tomoko Fuse's book 'Unit Polyhedron Origami' is folded from 120 rectangular units. The assembly of this model is a serious test of patience! Folding the units took me a couple of days - it is no joke folding 60 yellow and 60 blue units! Assembly took me nearly half a day, a whole lot of patience and the aid of a couple of toothpicks. I was so tempted to tear the whole thing when I was assembling the last few pieces. Only the thought of folding another 120 pieces kept from doing it :)

The model is very sturdy. Well, I had used 80 gsm paper, so that was a very good decision in my view. Before assembling the model, I completed the 12 5-unit yellow centers first. Then I proceeded to add the blue units in the 3 and 4-unit assembly. In fact, I think if I had assembled the 3-unit blue sets as well, that would have made it even easier.

Altogether, a good, challenging model for me. There is another 120-unit model made from concave units, which would be the inverse of this model. I hope to do it. Some time, hopefully in the near future!

Model Details:

Model: Double-sided Convex Hexagonal Ring 120 unit Rhombic Icosahedron 

Creator: Tomoko Fuse

Book: Unit Polyhedron Origami
 

Author: Tomoko Fuse
 

Difficulty Level: Complex

Paper Ratio: Rectangle in ratio 1:2

Paper Size: 3.4 inches by 1.7 inches

Model Size: ~6 inches in diameter

Modules: 120

Tutorial: Youtube

What is Valentine's Day without one of Francis Ow's hearts? So here you go, Ow's Double Hearts.

The 2 hearts are made from half a square and each heart displays one side of the paper. So naturally, double sided paper with contrasting colours work best.

I used a double-sided 120 gsm 8-inch paper cut into 2. This was the only double-sided paper I had, so had to make do. But regardless, I was able to make the origami. So yay!!

Model Details:

Model: Double Hearts

Creator: Francis Ow

Book: Origami - 30 Fold-by-fold Projects

Author: Paulo Mulatinho

Difficulty Level: Low Intermediate

Paper Ratio: Rectangle in ration 1:2

Paper Size: 4 * 8 inches

Tutorial: Youtube  
With Tomoko Fuse's lecture and workshop coming up this weekend, I decided to try out another of her popular designs - the Petals Kusudama (Type II). The kusudama is made from 30 units. Each unit has a base and an inset, which is folded into the base. The units are assembled like a sonobe. The kusudama holds well even without any glue, though, since I wanted to make it into a hanging ornament, I ended up gluing the joins.

A 3-colour combination works well for the kusudama. And for that, it is best to ensure that the paper used for the insets is single-sided - coloured on one side and white on the other. If it is double sided, then it works best if the paper has a different colour on both sides.

I used copy paper for the base and 60 gsm origami paper for the insets. So the model turned out pretty strong and sturdy. I also ended up making a tassel (this is pretty tedious work!) and string it along with a few beads and the kusudama to get myself a very pretty ornament :)

Model Details:

Model: Petals – Type II – Kusudama

Creator: Tomoko Fuse

Book: Floral Origami Globes

Author: Tomoko Fuse

Difficulty Level: Low Intermediate

Paper Ratio: Rectangle in ratio 1:2

Paper Size: 3.5 inches by 1.7 inches

Model Size: ~ 4 inches

Number of Modules: 15 rectangles of 1 colour and 15 rectangles of a second colour

Tutorial: Youtube

The Origami Star Dodecahedron is one of the many models that can be folded using the SIP (Six Intersection Pentagrams) Unit. The SIP model was co-discovered independently by Francesco Mancini, Jared Needle and Leong Cheng Chit. The same unit can be used to fold the Star Icosidodecahedron (60 units), the Star Dodecahedron (30 units) and the Star Prism (15 units). And since I tend to fold a lot of 30-unit models, I tried out the star dodecahedron :)

The units are fairly easy to fold and assemble. I had used handmade marble paper and am quite pleased with the way it turned out. And I absolutely love the ethnic feel that the background adds to the picture! 😍

Model Details:

Model: Star Dodecahedron

Creator: Francesco Mancini

Difficulty Level: High Intermediate

Paper Ratio: Rectangle in ratio 1:2

Paper Size: 4 inches * 2 inches

Model Size: 7 inches in diameter

Modules: 30

Diagram: Creating Origami (The pdf provides the instructions for the Six Integrating Pentagram model, but the first page of the pdf has the diagrams for folding the unit)

Tutorial: Youtube 

The Poinsettia Floral Ball is a beautiful kusudama from Meenakshi Mukerji's book 'Marvelous Modular Origami'. I have been wanting to make this model for quite some time, but never got around to it! So when I got some pretty pink wrapping paper, I finally gave it a go. Well, red paper would have been the obvious choice for a poinsettia flower, I do realize, but I kinda liked this paper for the model.

The modules are pretty easy to fold. Assembly is also fairly simple. The lock is quite strong, but I did end up adding a little glue to a few corners. All these ball-like modulars tend to get thrown about a bit, so always makes sense to add some glue at the joints. The floral ball is fairly large - mine was about 5.5 inches in diameter (I had used rectangle that were 4 inches by 2 inches).

The book provides quite a few variations in the floral balls and hopefully, I will soon get around to folding those as well :)

Model Details:

Model: Poinsettia Floral Ball

Creator: Meenakshi Mukerji

Book: Marvelous Modular Origami

Author: Meenakshi Mukerji

Difficulty Level: Low Intermediate

Paper Ratio: Rectangle in ratio 1:2

Paper Size: 4 inches * 2 inches

Model Size: ~5.5 inches in diameter

Modules: 30

I have not been the most active blogger these days, mainly because I am experimenting with paper jewelry and well, that is pretty time-consuming. Though I enjoy making paper jewelry, there is nothing like folding a good solid modular origami to get one back in the blogging game! This modular icosahedron is a fairly easy model to complete and is folded from half a square. So 15 squares, cut into half gives the 30 rectangles required for the icosahedron. The base unit is Lewis Simon's Triangle Edge Module.

Some points to note:

* I worked with coloured copy paper (80 gsm), which resulted in a good, sturdy model.

* If you are working with single sided paper, be sure to start with the coloured paper facing down (as given in the diagram).

* If your model is going to be tossed around (and believe me, this icosahedron very quickly becomes a football!), then be sure to add a dab of glue at the joints.

Model Details:

Model: Icosahedron from Triangle Edge Modules

Creator: Lewis Simon

Book: 3D Geometric Origami

Authors: Lewis Simon, Bennett Arnstein and Rona Gurkewitz

Difficulty Level: Low Intermediate

Paper Ratio: Rectangle

Paper Size: 3.5 inches * 1.75 inches

Model Size: ~3 inches

Modules: 30

Tutorial: Youtube