Showing posts with label origami. Show all posts


Well, it's been a month since Valentine's Day and I finally did Meenakshmi Mukerji's Hearty cube!! 😅😅 I have procrastinated quite I know, but unfortunately work has been taking it's toll 😒

The cube, that has a heart on each side, is made from 6 modules. Each module is folded from half a square - a rectangle of ratio 1:2. So the easiest way to do it is to cut 3 squares into 6 modules. 

Origami paper with different colours work best, as that would mean the hearts would stand out. Instead of the traditional red, I decided to go with a light yellow origami paper, with little flowers on one side. Am quite pleased with the way this has turned out 💛

It is a simple modular origami and would be a great model to try out for beginner origamists. 


Model Details:

Model: Hearty Cube

Creator: Meenakshi Mukerji

Book: Exquisite Modular Origami II

Author: Meenakshi Mukerji

Difficulty Level: Low Intermediate

Paper Ratio: Rectangle in ratio 1:2

Paper Size: 6 inches * 3 inches

Model Size: ~ 1.5 inches in height

Tutorial: Instagram

Number of Modules: 6


A little origami modular to start the New Year 2021! Happy new year! 

This nice little modular, called Origami Rain Star is designed by Aldo Marcell. I have folded a couple of his models before - the Origami Tornado and the Origami Cyclon. And so I was quite excited and scared of folding this one! The Origami Cyclon was really a difficult one to fold! But this turned out to be a joy to fold and assemble and very economical to boot! 

This model is folded from a rectangle 1:3 in ratio. So I used double sided origami paper, 7.5 cms in size. I divided the paper into 3, so the pieces I ended up with were 2.5 cms by 7.5 cms. The individual modules were quite easy to fold. And the assembly was also surprisingly easy!

 What surprised me the most about this model was the size of the finished model. 1-inch by 3-inch rectangles, I expected a small model. Turns out this model was quite different! The final model measured approximately 4 inches in diameter.

Double-sided paper works best and I love the way those little stars show up when the modules are assembled. 75 gsm origami paper works best for sizes that I usually fold. 

Model Details:

Model: Rain Star

Creator: Aldo Marcell

Difficulty Level: Low Intermediate

Paper Ratio: 1:3

Paper Size: 1 inch by 3 inches

Model Size: ~4 inches in diameter

Modules: 30

Instructions: Stranamasterov.ru

Tutorial: Youtube 


After folding the long-pending origami whale in my last post, I worked on another of my pending origami - this one is Armin Täubner's origami dragon. 

This very cute dragon (cute and dragon in the same sentence?? Talk about an oxymoron! 😆😅) is folded from a 15-cm square and will take about 20 minutes to complete! It starts with a fish base and builds up on that. The final shaping adds a lot of beauty to this model and I am quite delighted with the way it has turned out! 

Model Details:

Model: Dragon

Creator: Armin Täubner

Book: Kreativ Workshop Origami
 

Author: Armin Täubner
 

Difficulty Level: Low Intermediate

Paper Ratio: Square

Paper Size: 6 inch square

Model Size: ~ 4 inches across

Tutorial: Youtube


The idea of the "Inktober" art challenge is to improve drawing skills. One of the groups I am a part of (Artrangi United) has taken up this challenge. The participants are provided with a list of prompts - 1 per day for the month of October and are challenged to draw based on the prompt. 

Frankly speaking, I am very bad at drawing/painting etc! So what am I doing with this challenge?? Today's theme was "whale"! And there is this Robert Lang's whale that I have been thinking of folding for a long time now. So, I decided to take up the prompt for the Inktober challenge and finally, finally folding this long pending origami! 

The folding is fairly simple. Using black single-sided paper (15 cms in my case) gave me a nice little killer whale. You might be wondering why I have added all these bells and whistles in the pic?? 😆 That is because the Artrangis have been asked to post there creations on Instagram. And in case you have an Instagram account and wish to follow me, please do so! I would be delighted to have some followers!! 

Model Details:

Model: Whale

Creator: Robert Lang

Book: Origami Under the Sea
 

Author: John Montroll & Robert Lang
 

Difficulty Level: Low Intermediate

Paper Ratio: Square

Paper Size: 6 inch square

Model Size: ~4 inches in length 

Tutorial: Youtube


Origamists around the world seem to be putting the quarantine to good use! Instagram and Facebook are rife with origami enthusiasts teaching various models, origami conventions are being organized online and in general, a lot of people are putting their time to good use. 

Once such origami demonstration I happened upon was in Instagram. The author of the model, Fabian Correa was interviewed online and then he demonstrated to the host and to the viewers, how to fold this really cute hummingbird. The entire session was in Spanish, so I did not understand anything that was spoken, but origami is a universal language and the folding was something I understood quite well. It was well demonstrated and folding along wasn't a hardship. 

I used 6 inch origami single-sided paper. The final shaping took some time, but otherwise it was a good, fun origami to fold. 

Model Details:

Model: Hummingbird

Creator: Fabian Correa

Difficulty Level: Low Intermediate

Paper Ratio: Square

Paper Size: 6 inches

Model Size: ~2 inches across

Link to demonstration: Instagram


My mega Mette Ring project is finally completed! Whew!! After working on and off for nearly a year, I finally completed it! 

And I am absolutely thrilled by how well it has come through. I had made a total of 20 rings which were linked together to form a slinky. Finally inserted the last module into the first, forming a ring of ring of Mette rings. 
Absolutely love the colours that were chosen by Little Miss. Apparently, I am incapable of even choosing the rainbow colours for these rings 😄😄 But as always, she chose impeccably, the perfect colours that show a good gradation of colour.

While this has been a tiring bit of work, I think the final outcome would give anyone, absolute satisfaction! But not to be forgotten, there are 360 modules to be folded. Which makes this the biggest origami work that I have ever attempted!!

Model Details:

Model: Mette's Ring

Creator: Mette Pederson

Book: Mette Units

Author: Mette Pederson

Difficulty Level: Low Intermediate

Paper Ratio: Square

Paper Size: 3 inches

Diagram: Mette Units

Modules: 18

Paolo Bascetta's stellated dodecahedron, also known as the Bascetta Star is, I think, the most well-known of Bascetta's creations. I also love this Compass Rose folded quite some time back. 

During these coronavirus times, I tried out yet another of his modulars - a modular 2D star, called the New Year's Day Star. While folding it, I was wondering if it was possible to restart this year, minus the pandemic! 

Coming back to the modular, it is folded from 18 modules and is similar to the Mette Ring. In the mette ring, the final step is folding the module into 2. This step is not included in the New Year's star. Instead, the unfolded modules are slipped into the little pockets to form the star. Though I assembled it with glue, it can be done without glue. I used 2 inch squares and 2 colours, in the classic black and white combination. And I quite like the way it has turned out. 


Model Details:

Model: New Year's Day Star

Creator: Paolo Bascetta

Difficulty Level: Low Intermediate

Paper Ratio: Square

Paper Size: 2 inches

Model Size: ~ 4 inches across

Number of Modules: 18

Tutorial: Youtube

Diagram: Free Download

As I had said in my previous post, while making the origami spiral cube, I wanted to retry this model using A5 paper instead of A4. A4 paper resulted in a fairly large cube which wasn't very appealing to me.

The coronavirus lockdown has given me ample time, so I decided to redo the model, using some lovely kami paper that I had. The paper turned out perfect for this model, since it was light enough that I could fold the spirals and assemble it easily.

Usually smaller origami models are more difficult to do than bigger ones, but in this model, I found the smaller one easier to assemble! Mainly because it was small enough to hold in hand while folding. I would definitely recommend the A5 size to the A4!


Model Details:

Model: Spiral Cube

Creator: Tomoko Fuse

Book: Let's Fold Spirals

Author: Tomoko Fuse

Difficulty Level: High Intermediate

Paper Ratio: Rectangle

Paper Size: 8.3 inches * 1.45 inches

Model Size: ~2.5 inches across

Number of Modules: 12

Tutorial: kusuda.ru

Stay home, Stay safe is the need of the hour! Well, during this coronavirus lockdown, this little horse by Oriol Esteve is one of the first origami that I tried out. Check out his Facebook post on the origami horse.

What I liked best about the origami is the suddenness with which the horse turns up! I mean, up to the 15th step, we are just folding along and there is no sign of a horse. But in 2 steps, 16th and 17th, there are 2 reverse folds and boom! You have a horse! 😄 And a super-cute little fella at that.

60 gsm paper would be the best, I thought, since there are multiple layers that are folded in the reverse folds. I used some lovely Momigami paper that I had (15 cms) which turned out to be a good decision. The final horse was about 5.75 cms.


Model Details:

Model: Horse 

Creator: Oriol Esteve

Difficulty Level: Low Intermediate

Paper Ratio: Square

Paper Size: 6 inches

Model Size: ~2.2 inches in height

Diagram: Facebook


The Sweet Spring Kusudama is a very simple but very elegant looking origami kusudama, designed by Natalia Romanenko. Each unit is a combination of 2 or 3 smaller modules. Why do I say 2 or 3? Because, while the instructions I found online require 3 modules, you can make do with just 2 of them. 

The basic module is an origami pig base. This is formed from a square. To this module, we add 2 modules folded from a rectangle. This forms the star and a wavy loop on the star. Well, I didn't want the wavy bit, so I stopped with just the star. Hence had ended up with 2 instead of 3 modules. 

So once these units are assembled, the kusudama is formed by inserted 1 unit into the next. The assembly is very simple and the model holds well together. 

I have been meaning to use indigo coloured paper for a long time now, so I clubbed it with orange paper to give me a very bright sweet spring kusudama! 

Have you tried out this kusudama? Do give it a go, if you haven't. 


Model Details:

Model: Sweet Spring Kusudama

Creator: Natalia Romanenko

Difficulty Level: Low Intermediate

Paper Ratio: Square + Rectangle in ratio 1:2

Paper Size: 3 inches square / 3 inches by 1.5 inches rectangle

Model Size: ~4 inches in diameter

Modules: 60

Instructions: Paper Finger Cuts

Tutorial: Youtube


Roman Diaz's origami owl was a delight to fold, so this year, I wanted to try more of the origami from the book "Origami Essence". The origami Wren (Ratonera) is the third origami from the book and a little more complex than either the panda or the owl.

The suggested paper size is 5-6 inches but since I had some foil-backed origami paper of 4.5 inches size, I decided to go ahead with that. A colour change is seen near the neck of the wren and at the legs.

I enjoyed folding this little bird and am delighted that I started the year with this origami, even though origami life-forms are not generally my cup of tea. I loved the colour change, the shaping of the beak and the tail. A very lovely model to fold.

I hope I get the chance to fold more models from the book.. Hopefully the cardinal, provided I get red/black kami paper!


Model Details:

Model: Wren (Ratonera) 

Creator: Roman Diaz 

Book: Origami Essence

Author: Roman Diaz

Difficulty Level: Low Intermediate

Paper Ratio: Square

Paper Size: 4.5 inches

Model Size: ~3 inches in height


After trying out this modular wreath by Lidiane Siqueira, I attempted another of her wreaths, the Marieta Madala, a Christmas themed wreath, folded from 8 modules.  

It would, of course, look best with paper coloured red on one side and green on the other. Since I didn't this paper, I decided to go for red and green single sided origami paper. I like the way this has turned out and I think it would make a great addition to my Christmas tree. 

Model Details:

Model: Marieta Mandala 

Creator: Lidiane Siqueira

Difficulty Level: Simple 

Paper Ratio: Square

Paper Size: 3 inches (7.5 cms) 

Model Size: ~4 inches across

Modules: 8

Diagram: Criativa'rte

After starting my Mette Rings project in July, here is the current status of the project. I have succeeded in completing 10 of these rings. I have to make another 10! At the speed at which I am progressing, I have serious doubts that I will finish by the end of the year, but hey, nothing wrong in hoping 😄

I still have a few colour gradients in yellow, followed by orange, red and pink. Apparently, according to Little Miss, I am missing a couple of colours in the blue-green transition. If I do get those colours, I will need to do some rearrangements. But as for me, I am quite happy with the colour progression right now.


Model Details:

Model: Mette's Ring

Creator: Mette Pederson

Book: Mette Units

Author: Mette Pederson

Difficulty Level: Low Intermediate

Paper Ratio: Square

Paper Size: 2 inches

Diagram: Mette Units

Modules: 18

The origami wedge cube is a visually captivating modular origami that I had wanted to fold for some time now. This model, designed by Miyuki Kawamura, is assembled from 20 modules - 8 of the corner modules and 12 of the pyramid structures.

I found it a fun model to fold and assemble. Neither the folding nor the assembly is too complicated. Assembly is by sliding a pocket into a flap. It is assembled without any glue and holds together very well.

Loved the colour combination, chosen by Little Miss. The brown and the pink contrast very well, I thought and the final model is really eye-catching!


Model Details:

Model: Wedge Cube

Creator: Miyuki Kawamura

Book: Origami Tanteidan 9

Difficulty Level: Low Intermediate

Paper Ratio: Square

Paper Size: 3 inches

Model Size: 2.7 inches

Number of Modules: 20

The Graciosa wreath is a very simple origami wreath by Lidiane Siqueira. It is also very economical. The wreath is made from an odd number of modules - 7 of them. Each module is folded from half a square.

The size I liked is a 7.5 cms square cut into 2. So for my wreaths, I used one sheet of 15 cms square, double sided origami paper. From this, I got 7 rectangles, 7.5 cms by 3.75 cms. The modules are very easy to fold. Each module forms 2 spikes of the wreath, so that the final wreath actually has 14 spikes.

Assembly is also quite easy, it is just a matter of slotting one module into the next. It is held together with glue.


Model Details:

Model: Graciosa  

Creator: Lidiane Siqueira

Difficulty Level: Simple 

Paper Ratio: Rectangle

Paper Size: 3 inches * 1.5 inches (7.5 cms * 3.75 cms) 

Model Size: ~3 inches in diameter

Modules: 7

Diagram: Criativa'rte

So while folding the mette ring units for my Mette Ring of Rings project, I tried out some small variations to it and ended up with a neat variation.

Here the little triangles shows a colour variation that I found interesting. Anyway, will update soon on my progress. Till then!

Model Details:

Model: Mette's Ring Variation

Creator: Mette Pederson

Book: Mette Units

Author: Mette Pederson

Difficulty Level: Low Intermediate

Paper Ratio: Square

Paper Size: 3 inches

Diagram: Mette Units

Modules: 18

Tomoko Fuse's spirals has always fascinated me. And since my last Tomoko Fuse origami was this pyramid box in May, I figured I would try out another of her spirals origami.

This origami spiral cube has been on my to-do list for quite a few years now! And finally I managed to do it! The cube is made from strips cut out of A4 paper. Each A4 sheet is cut into 4 strips. A total of 12 such strips are needed, which means 3 A4 sheets will be required.

As with most of Tomoko Fuse's models, the individual modules are fairly easy to fold. Assembly is a lot more challenging. I assembled the first three faces, on a flat surface. And I admit, I glued the tips of the spiral so that it didn't unravel easily. Once the three faces was done, the fourth face was decidedly more difficult but manageable. Then the top and bottom of the cube. Assembling one of the 2 ends was easy, because I could insert my hand inside the cube to hold the arms of the spiral and then continue with the assembly. The true challenge was, as always, in finishing the final face. I didn't have proper support, which meant I was forming the spiral in air! But finally, with a good deal of patience, I succeeded!

While I am happy with the cube, I find it too big for my taste. Hope to make another one from A5 paper. The principle remains the same. 4 strips from each A5, 12 strips in all.

Model Details:

Model: Spiral Cube

Creator: Tomoko Fuse

Book: Let's Fold Spirals

Author: Tomoko Fuse

Difficulty Level: High Intermediate

Paper Ratio: Rectangle

Paper Size: 11.7 inches * 2 inches

Model Size: ~3.5 inches across

Number of Modules: 12

Tutorial: kusuda.ru

After making this origami kusudama, designed by Ekaterina Lukasheva, I have a special respect for people who work with miniatures! For this model, I had some double-sided paper that was left over from a previous origami modular that I had done. So I decided to use that paper.

The size of those squares were 2 inches. Since this kusudama required paper in the ratio 1:2, I cut each of the squares in half which resulted in 30 pieces of 1 inch by 2 inches. And then proceeded with this kusudama.

While making the individual modules was quite simple, assembly was a real challenge, given the small sizes of the folded modules. Patience is of the essence and of course, a toothpick! I finally ended up gluing the modules to ensure that they did not come undone while assembling them.

Overall, an interesting kusudama. But I will think twice if I have to fold this one again! 😆😆

Model Details:

Model: Apricot

Creator: Ekaterina Lukasheva

Book: Modern Kusudama Origami

Author: Ekaterina Lukasheva

Difficulty Level: High Intermediate

Paper Ratio: Rectangle in ratio 1:2

Paper Size: 1 inch by 2 inches

Model Size: ~2 inches in diameter

Modules: 30


Recently I discovered a Youtube Origamist - Origami Kankichi. I later found out that he does have a blog and various other social media sites, but I prefer the youtube channel. Well, on his channel, he regularly posts tutorials on folding and assembling origami modulars. Most of this models are 30-unit assembly and of these, I especially like the sonobe variations - I have a particular fondness for sonobes. So after much deliberation, I decided to try out one of the sonobe variations that he has designed - the Mt. Fuji Kusudama.

The kusudama is a representation of Mt. Fujiyama in Japan. Naturally, it works best with blue and white paper. But, for me, the first time I saw this kusudama, I was reminded of Tomoko Fuse's Chrysanthemum Globe kusudama. So I decided to use a dark pink and white paper, to resemble a chrysanthemum covered mountain, I guess. Anyway, any contrasting colours should work out well for this kusudama.

The modular is made from 15 squares of dark pink and 15 squares of white origami paper. Each of the 15 squares are cut into 2 rectangles of ratio 1:2. So finally, to make the model, we will be folding 60 modules. 30 of these modules will form the mountain shape and the other 30 will form the sonobe base. The mountain modules are slotted into the sonobe bases before starting the assembly. While the task seems quite daunting, the folding is not very difficult, though a little time consuming. Assembly is the usual sonobe assembly - 3 pyramids grouped in clusters of 5.


Model Details:

Model: Mt. Fuji Kusudama  

Creator: Origami Kankichi

Difficulty Level: Low Intermediate

Paper Ratio: 1:2

Paper Size: 3 inches by 1.5 inches

Model Size: ~4 inches in diameter

Modules: 60

Tutorial: Youtube

For the very first time, Little Miss went on a trip without me! She had gone on a weekend trip with her grand parents and her uncle's family. Well, more heart-rending for the mom than for the daughter, I think! 😆

Anyway, during this trip, my wonderfully thoughtful little girl decided to buy something for my husband and for me. She put in a lot of thought into the gifts and we feel blessed to receive them. For my husband, she got a shirt in his favourite colour and for me, she bought some gorgeous origami washi paper in a variety of colours! I am truly touched.

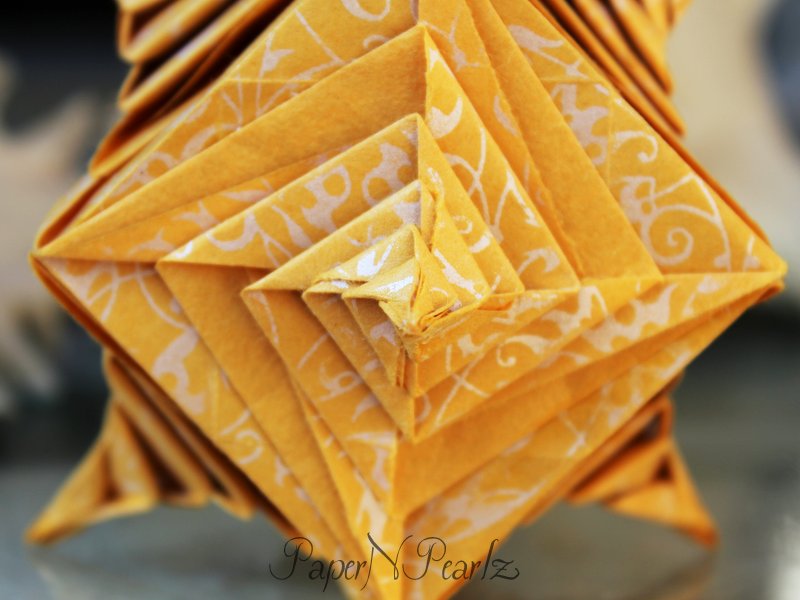
So such a thoughtful gift required a well thought-out origami. So after a lot of research - and I assure you I did quite a bit of research - I decided to make this beautiful pyramid box by the wonderfully amazing Tomoko Fuse.

Absolutely love the way it has turned out. And Little Miss also liked what I finally came up with :) The model is taken from the book 'Origami Boxes' by Tomoko Fuse and is published by Tuttle Publishing. The first part of the book starts with a lot of variations to the traditional Masu box, followed by the Pyramid Box and finally, the Dome Box. Part 2 deals with modular boxes from square sheets of paper. Finally, Part 3 deals with modular boxes made from rectangular sheets of paper. It is a very good book, I thought, with a lot of colourful pictures to help one visualise better.

As for the Pyramid Box, each box is made from 2 sheets of origami paper, 6 inches squares. The steps are not very difficult to follow, though the final collapse when making the lid might prove a little challenging initially. A variation is also shown for the lid - that is the yellow box in the picture above. For the base, Tomoko Fuse has also kindly provided instructions for increasing the size of the base and also instructions to make it more sturdy. The base is, of course, easier to make than the lid.

Altogether, a good origami project to work on and I thought, a fitting use of some lovely washi paper.

Model Details:

Model: Pyramid Box

Creator: Tomoko Fuse

Book: Origami Boxes

Author: Tomoko Fuse

Difficulty Level: Low Intermediate

Paper Ratio: Square

Paper Size: 6 inches

Model Size: 2.5 inches across and 2.5 inches in height