Showing posts with label modular. Show all posts


My final sonobe variation for now, from the book "Marvelous Modular Origami" by Meenakshi Mukerji is the Origami Swan Sonobe, assembled into an icosahedron, made from 30 modules. 

The icosahedron assembly is another that I love making. And in this icosahedron, you can see the swan pattern visible in each of the face. 

Recently, Meenakshi Mukerji, in her Instagram account, had announced a giveaway. Check out the post to find out details of the giveaway. The idea is folding as many of her models as possible, so that gives me added motivation to fold her models!! Though I think I am done folding the sonobes for now. Anyway, do participate if possible and take part in the giveaway :)

Model Details:

Model: Swan Sonobe - Icosahedron

Creator: Meenakshi Mukerji

Book: Marvelous Modular Origami

Author: Meenakshi Mukerji

Difficulty Level: Low Intermediate

Paper Ratio: Square

Paper Size: 3 inches

Model Size: ~3 inches across

Modules: 30

 The third of the models that I tried was the Origami Striped Sonobe, assembled into an Octahedron, from 12 modules. The assembly is, of course, different from the Large Cube assembly from my last post. 

The Octahedron is formed from pyramids, in rings of 4 pyramids. I love this assembly - it is easy but at the same time, looks quite complex. And the striped sonobe modules give it a nice touch. 

The colour combination is the same as my previous models - deep blue, light blue and yellow. The size remains the same - 3-inch squares. The resulting octahedron is about 3.5 cms (~1.4 inches). It fits nicely into the palm of my hand! A super-cute model :)

Model Details:

Model: Striped Sonobe - Octahedron

Creator: Meenakshi Mukerji

Book: Marvelous Modular Origami

Author: Meenakshi Mukerji

Difficulty Level: Low Intermediate

Paper Ratio: Square

Paper Size: 3 inches

Model Size: ~1.4 inches side

Modules: 12

 Continuing my theme from my last post, I folded the Snow-Capped Sonobe this time. The assembly is in a large cube, made from 12 units. This is the first Snow-capped sonobe. There is a second one too, but that required folding thirds at one point, so I gave that a miss!!

I have previously folded this model, but had assembled it into an octahedron. But this time, since I am trying to go as sequentially as possible, I assembled the large cube. By the way, this is the third model in the book, the second one being the Striped Sonobe.

This is also folded from 3-inch squares. While the large cube is larger than the cube, it really isn't that much bigger! Each side measures ~1.1 inch - not much different from 0.8 inch, is it?? 


Model Details:

Model: Snow-capped Sonobe - Large Cube

Creator: Meenakshi Mukerji

Book: Marvelous Modular Origami

Author: Meenakshi Mukerji

Difficulty Level: Low Intermediate

Paper Ratio: Square

Paper Size: 3 inches

Model Size: ~1.1 inches side

Modules: 12


After working on the Origami Hearty Cube by Meenakshi Mukerji, I decided to delve back into my other origami books by the same author and decided to try out some of her Sonobe Variations. 

I love folding the Sonobe and am quite excited about folding some of the variations in the book "Marvelous Modular Origami". Check out my Poinsettia, one of the models that I had previously folded from this book. 

So this time, I started with the very first model in the book, the Daisy Sonobe. This is folded from a square and is not too difficult to fold. Different assemblies are possible - the cube, large cube, octahedron, icosahedron and dodecahedron. While I love folding the octahedron and the icosahedron, I decided to start with the cube. The cube is, of course, folded from 6 units. 

The assembly is pretty straight forward, It is easiest to assemble 4 in a straight line, then connect the end units and finally attach 2 units - 1 at the top and 1 at the bottom. 

I have used 3-inch squares to fold and this resulted in a really small cube - about 2 cms side (~0.8 inches). So if folding a cube, a square of at least 5 inches is advisable. 

I hope to try the other assemblies using the other variations in the book. Hopefully soon!

Model Details:

Model: Daisy Sonobe Cube

Creator: Meenakshi Mukerji

Book: Marvelous Modular Origami

Author: Meenakshi Mukerji

Difficulty Level: Low Intermediate

Paper Ratio: Square

Paper Size: 3 inches

Model Size: ~0.8 inches side

Modules: 6


Paolo Bascetta's stellated dodecahedron, also known as the Bascetta Star is, I think, the most well-known of Bascetta's creations. I also love this Compass Rose folded quite some time back. 

During these coronavirus times, I tried out yet another of his modulars - a modular 2D star, called the New Year's Day Star. While folding it, I was wondering if it was possible to restart this year, minus the pandemic! 

Coming back to the modular, it is folded from 18 modules and is similar to the Mette Ring. In the mette ring, the final step is folding the module into 2. This step is not included in the New Year's star. Instead, the unfolded modules are slipped into the little pockets to form the star. Though I assembled it with glue, it can be done without glue. I used 2 inch squares and 2 colours, in the classic black and white combination. And I quite like the way it has turned out. 


Model Details:

Model: New Year's Day Star

Creator: Paolo Bascetta

Difficulty Level: Low Intermediate

Paper Ratio: Square

Paper Size: 2 inches

Model Size: ~ 4 inches across

Number of Modules: 18

Tutorial: Youtube

Diagram: Free Download

As I had said in my previous post, while making the origami spiral cube, I wanted to retry this model using A5 paper instead of A4. A4 paper resulted in a fairly large cube which wasn't very appealing to me.

The coronavirus lockdown has given me ample time, so I decided to redo the model, using some lovely kami paper that I had. The paper turned out perfect for this model, since it was light enough that I could fold the spirals and assemble it easily.

Usually smaller origami models are more difficult to do than bigger ones, but in this model, I found the smaller one easier to assemble! Mainly because it was small enough to hold in hand while folding. I would definitely recommend the A5 size to the A4!


Model Details:

Model: Spiral Cube

Creator: Tomoko Fuse

Book: Let's Fold Spirals

Author: Tomoko Fuse

Difficulty Level: High Intermediate

Paper Ratio: Rectangle

Paper Size: 8.3 inches * 1.45 inches

Model Size: ~2.5 inches across

Number of Modules: 12

Tutorial: kusuda.ru

Happy New Year 2020!

The old year has passed and as we step into a new year, here's to a wonderful, peaceful and blessed new year to everyone out there!

PaperNPearlz has been doing pretty well this year! Posts have been fairly regular, with many posts on the wonderfully challenging technique of newspaper weaving.

We have started off for the first time on Instagram, became more active on Facebook and Pinterest. And a dormant account on Flickr! came to life finally!

The most liked posts on the various social media sites is what is posted here. As expected, Tomoko Fuse's modulars featured widely.

In this new year, hopefully we will see more origami modulars and other challenging projects. And I also hope to see some woven products. And maybe some tutorials too!

Once again, a happy New Year 2020!

Here is the list of models with links to more detailed posts:
1. Tornado designed by Aldo Marcell
2. Cassiopeia Kusudama by Uniya Filonova
3. Butterfly Kusudama by Tomoko Fuse
4. Little Turtle Kusudama by Tomoko Fuse
5. Octagonal Box by Tomoko Fuse
6. Petals Type II Kusudama by Tomoko Fuse
7. Hacky Sack by Winson Chan
8. Little Turtle Kusudama Variation by Tomoko Fuse
9. Patterned Icosahedron by Meenakshi Mukerji

After making this origami kusudama, designed by Ekaterina Lukasheva, I have a special respect for people who work with miniatures! For this model, I had some double-sided paper that was left over from a previous origami modular that I had done. So I decided to use that paper.

The size of those squares were 2 inches. Since this kusudama required paper in the ratio 1:2, I cut each of the squares in half which resulted in 30 pieces of 1 inch by 2 inches. And then proceeded with this kusudama.

While making the individual modules was quite simple, assembly was a real challenge, given the small sizes of the folded modules. Patience is of the essence and of course, a toothpick! I finally ended up gluing the modules to ensure that they did not come undone while assembling them.

Overall, an interesting kusudama. But I will think twice if I have to fold this one again! 😆😆

Model Details:

Model: Apricot

Creator: Ekaterina Lukasheva

Book: Modern Kusudama Origami

Author: Ekaterina Lukasheva

Difficulty Level: High Intermediate

Paper Ratio: Rectangle in ratio 1:2

Paper Size: 1 inch by 2 inches

Model Size: ~2 inches in diameter

Modules: 30


Uniya Filonova's Cassiopeia Kusudama has been on my to-do list for quite some time. Finally, this Mother's Day seemed to be the right occasion to try out this eye-catching design.

Did you know that Cassiopeia is actually the name of a constellation? Yep! And in the kusudama, the stars do stand out, but this modular reminds me more of a flower than a constellation. What do you think?

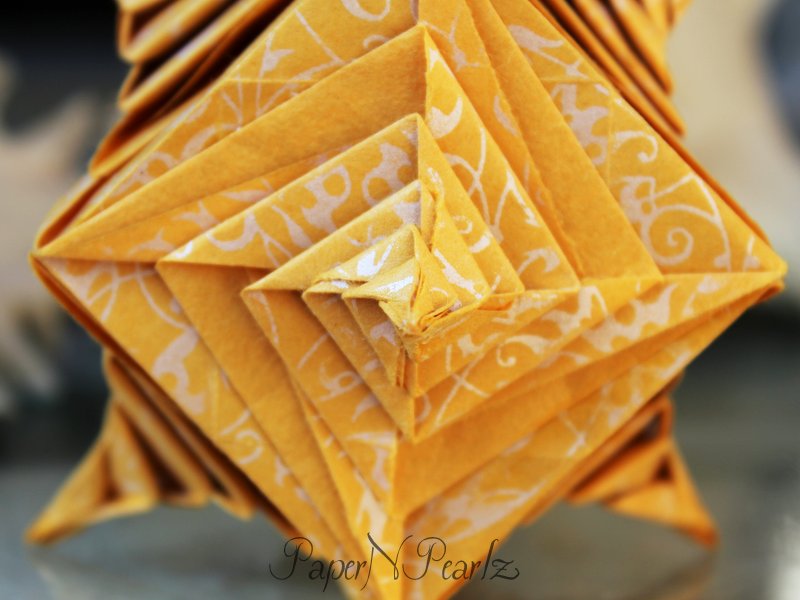
Getting back to the kusudama, it is made from 30 modules, with each module folded from a rectangle in the ratio 1:3. So one square will yield you 3 modules. I had used 3 inches (7.5 cms) squares that I cut into 3 rectangles. So each rectangle measured 1 inch (2.5 cms)  by 3 inches (7.5 cms). The end result was a ball about 3 inches (7.5 cms) in diameter.

While I did find both the instructions and the tutorial (links below) a little confusing initially, once you get the hang of it, the modules are very easy to fold. And even with the size I had chosen, it was not difficult to fold the individual modules.

Double sided paper works best to bring out the star. I had used some very precious paper that I absolutely love - red with white dots on one side and yellow on the other. Very happy with the selection and with the result.

The assembly is interesting - you have to try it out to appreciate it. It does not involve the usual pocket and flap assembly that you usually see in modulars, rather, one petal is folded into the adjoining petal. Very interesting and very robust. Assembly is without any glue.

Finally, a happy Mother's Day to all the moms out there! Little Miss has decided that this modular is going to be her gift for me!! 😆😆

Model Details:

Model: Cassiopeia Kusudama 

Creator: Uniya Filonova

Difficulty Level: High Intermediate

Paper Ratio: 1:3

Paper Size: 1 inch by 3 inches

Model Size: ~3 inches in diameter

Modules: 30

Instructions: Stranamasterov.ru

Tutorial: Youtube

Once I finished the clown fish, a.k.a Nemo, I found that there was a similar modular version of Nemo's friend - Dory, who is a Blue Tang. So I ended up making this one too. This model is even easier to do than Nemo, because of the bigger size of this fish.

Similar to the clown fish, this one is also not a pure origami model, since it involves gluing of the pieces. And this one is also made from 4 different sized squares, albeit different colours - 2 of the squares are yellow, one blue and one black, since these are the colours of the blue tang fish. This model is also created by Mariko Miyamoto of Oriart.

While each module is folded from a square, the size of the square varies.  So the body is made from a blue 15 cm square, the black section is made from black 10 cm square, the little yellow fin between the black and blue sections is made from a yellow square of 3.75 cms and finally, the tail is made from a yellow square, 7.5 cms side. The different modules are held together by glue or tape.

So, have a go at it. It is a fun model and is sure to attract a young audience!


Model Details:

Model: Blue Tang 

Creator: Mariko Miyamoto

Difficulty Level: Low Intermediate

Paper Ratio: Square

Paper Size: Blue 15 cm square | Black 10 cm square | Yellow 3.75 cm square | Yellow 7.5 cm square

Model Size: ~5 inches across

Tutorial: Youtube Part 1 and Part 2


After folding the Jaciara from the book 'Modern Kusudama Origami' by Ekaterina Lukasheva, I decided to give it another go. Only this time I tried out one of the variations of the model. And I used a smaller square, since I wasn't too happy with how big my previous model turned out to be!

This variation is the second variation for the model. The author states that the variation seems pointless till you open up the petals. And while this might be true, I must say I adored this model even in the closed-petal state! I quite liked the elegance of the closed kusudama.

But of course, when you open up the petals, it really looks like a blossomed flower. Be sure to use double-sided paper, so that the print on the other side becomes visible when it is opened.


The Jaciara is the last model in the book. There are 2 variations and another couple of Jaciara variables. Hopefully I will get a chance to try some more of these models in the future.

Model Details:

Model: Jaciara - Variation 2

Creator: Ekaterina Lukasheva

Book: Modern Kusudama Origami

Author: Ekaterina Lukasheva

Difficulty Level: High Intermediate

Paper Ratio: Square

Paper Size: 2 inch squares

Model Size: ~2.5 inches in diameter

Modules: 30

'Modern Kusudama Origami' by Ekaterina Lukasheva is an excellent book on modular origami. To date I have already tried out 3 models and here is the fourth one - the Jaciara.

For the first attempt, I went ahead with the recommended paper size - 4 inches square. The finished model was about 5 inches in diameter - a tad too big for my liking. The next time I try, I will attempt a much smaller size, probably 2 inches or so.

The individual modules are not too difficult to fold, though it looks kinda scary at first! I liked the way the modules locked together.

There are a couple of variations mentioned. Hopefully I will get a chance to fold those as well.

Model Details:

Model: Jaciara 

Creator: Ekaterina Lukasheva

Book: Modern Kusudama Origami

Author: Ekaterina Lukasheva

Difficulty Level: High Intermediate

Paper Ratio: Square

Paper Size: 4 inch squares

Model Size: ~5 inches in diameter

Modules: 30

Tutorial: Youtube

Here's a wreath that I made for Christmas. The problem is that I had made use of a tutorial that I had saved a long time back, but unfortunately I know neither the name nor the creator of the wreath. Hmm.. Big problem!

But I can say one thing - it is an easy wreath to make and looks excellent with double sided paper!!

Merry Christmas 🎄🎄

Model Details:

Model: Wreath 

Difficulty Level: Simple

Paper Ratio: Rectangle, 1:2 ratio

Paper Size: 3 inch by 1.5 inches

Model Size: ~3 inches in diameter

Modules: 8

Aldo Marcell's modular origami models are really, really pretty to look at! I had previously done the ever-popular Tornado.

So this time, I decided to work on the Cyclon model. Overall, the model is very economical, in that, the paper is in the ratio 1:3. Which means from 1 square, I managed to get 3 modules. Considering I was using some of my precious double-sided paper, this was very nice!

And folding the individual modules was also pretty easy. But the assembly is a whole different story altogether! It is seriously difficult! And this was aggravated by the size of the modules. Since I had divided up a 3-inch square into 3, I was working with small pieces of paper and, while I have folded really tiny pieces for my origami jewellery, it was obvious I have lost the touch of handling small pieces.

So to reiterate, the modules are easy to fold but really difficult to assemble! At one point, I was fairly certain that I was just going to lose patience and crush the whole thing 😔 It was only the thought of folding 30 modules again that stopped me from flinging it all away!

Anyway, I am glad I persisted. I am happy with the outcome. But going forward, I will doubly careful before choosing any of Aldo Marcell's models to fold 😆😆


Model Details:

Model: Cyclon 

Creator: Aldo Marcell

Difficulty Level: High Intermediate

Paper Ratio: 1:3

Paper Size: 1 inch by 3 inches

Model Size: ~2.5 inches in diameter

Modules: 30

Instructions: Stranamasterov.ru 

Restarted folding some models from Ekaterina Lukasheva's book 'Modern Kusudama Origami'. The model I tried now is titled 'Serenade', found on page 28.

The modules are pretty easy to fold. Either 12 modules or 30 modules are needed for assembly. As always, I did the 30-unit Icosahedron assembly.

The instructions suggest using origami paper with colour gradient. Surprisingly, I did have such paper, so I went right ahead and used it! And as can be seen, the paper is lighter at the centre points and gradually get darker near the curls.

The other models I have folded from this book are Rio and Centaurea Cyanus.

Model Details:

Model: Serenade 

Creator: Ekaterina Lukasheva

Book: Modern Kusudama Origami

Author: Ekaterina Lukasheva

Difficulty Level: Low Intermediate

Paper Ratio: Square

Paper Size: 3 inch squares

Model Size: ~4 inches in diameter

Modules: 30

Well, Little Miss's interest in origami continues. But now it is more managerial - which means she decides what I should fold and what colours I should use and then she waits for me to complete folding it before she proceeds to 'teach' me how to photograph them 😄 

So this is her next pick - a heart bracelet. This is designed by Henry Pham. While most of his origami is complex, this heart bracelet is pretty easy to do. 

Little Miss picked out the colours. We decided we wanted small hearts, so used 2 inch squares and ended up with each module measuring about 1.5 inches in length. Connecting the modules is just a matter of sliding one into the next. We glued the connecting points so they do not slide out. We used a total of 6 hearts (7 would have been more comfortable for Little Miss) to form the bracelet. 

Little Miss is as thrilled with the bracelet as she was with the backpacks. And I await more instructions from Her Highness 😀 

Model Details:

Model: Heart Bracelet

Creator: Henry Pham

Difficulty Level: Low Intermediate

Paper Ratio: Square

Paper Size: 2 inch squares

Model Size: ~6 inches in length

Modules: 6

Tutorial: Youtube 
Yet another of Tomoko Fuse's models - this one from her book 'Floral Origami Globes', called Parallelogram Floral Globe.

The thing I love about this book is that each module is made of 2 parts - a basic unit (which looks like a sonobe module) called the 'Base',  and an insert, called the 'Face'. Each unit is assembled by joining the base and the face. So this basically means that I can use the single-sided paper, that I have plenty of, and still manage to get some colours in my model.

The other point about this book is that, in each section, there are only subtle differences in folding one model and the next. But these difference still result in new, really cool variations. And of course, the fact that you use only half a square for the base unit and a quarter for a face unit means the whole model is very economical!!

Model Details:

Model: Parallelogram Floral Globe 

Creator: Tomoko Fuse

Book: Floral Origami Globes
 

Author: Tomoko Fuse
 

Difficulty Level: Complex

Paper Ratio: Rectangles in ratio 1:2 for base and Squares cut into 4 quarters for face

Paper Size: 4 inch squares

Model Size: ~4 inches in diameter

Modules: 30 rectangles + 30 quarters

Every once in a while, I get obsessed with an origami design and keep making it again and again. My last one was Dasa Severova's Origami Woven Star, a modular star made from 16 units.

I tried the model with ombré shades of green, blue and pink and would have continued if I had managed to get my hands on more colours!!

The design is simple and works well with small squares - I had used 3 inch squares and this resulted in a star of about 5.5 inches diameter. The star is also very stable and the units lock well, so no glue required.


Model Details:

Model: Woven Star  

Creator: Dasa Severova

Difficulty Level: Low Intermediate

Paper Ratio: Square

Paper Size: 3 inches

Model Size: ~5.5 inches in diameter

Modules: 16

Tutorial: How to fold the units, How to join the units 


After completing my last 2 Tomoko Fuse designs made from 120 units each, I decided to try one of her simpler models - this simple open frame cube, made from 12 square units.

I have used 3 colours and 4 units of each colour. The squares had a side of 4 inches and the end result was a frame of about 3 inches.

Model Details:

Model: Open Frame - Cube

Creator: Tomoko Fuse

Book: Unit Origami

Difficulty Level: Low Intermediate

Paper Ratio: Square

Paper Size: 4 inches

Model Size: ~3 inches in diameter

Modules: 12

Tutorial: Youtube
Recently, I purchased the book 'Geometric Origami' by Faye G. Goldman. The book contains various models based on Heinz Strobl's Snapology method.

A few years back, I had tried my first snapology origami and made an icosahedron. And now with the purchase of this book, I decided to work on the model titled 'Egg'. It was interesting for me because it was the only asymmetrical model in the book. On completing the project, I think it will make a good Easter egg. Maybe one can add some chocolates inside the egg - though I have no clue how we can get them out!!

The principal for the Egg Snapology remains the same and requires a total of 2 squares, 8 pentagons and 16 flower-like units, assembled from 6 triangles. The 2 squares form the top and bottom of the egg. The flower units surround the 4 arms of the square and the 8 pentagons.

I had used 1-inch quilling strips for the whole project, so while theoretically the egg was an easy project, the size of the strips made it pretty challenging for me. On a side note, kudos to all the origamists who make tiny, micro origami!

Model Details:

Model: Snapology Egg

Creator: Heinz Strobl

Book: Geometric Origami

Author: Faye Goldman

Difficulty Level: High Intermediate

Paper Ratio: 1-inch quilling strips

Model Size: ~4 inches in diameter