Showing posts with label newspaper rolls. Show all posts


Stay Home Stay Safe! Who would have thought that a microscopic virus could bring the world virtually to a halt?? While this pandemic has had a terrible impact around the globe, it is during the lockdown that I have been able to connect with friends from long back, get back into my blogging, work on some incomplete projects.

One of the projects is this newspaper weaving project - Making coasters from newspaper tubes, using the root weaving or coiling technique. I was kinda bored of circular shapes, so attempted something a little different. Not sure how well it turned out, but I can say for certain that the coasters are rock solid.


The holder was a last minute idea, since I had plenty of rolls left over. Turned out pretty useful too, since I didn't end up losing a coaster or two, just because they were left lying around! The edges of the holder leaves a lot to be desired and even now, I am not too sure how to go about making this, but hopefully in the future, it will get better.

On the whole, I am happy with the outcome.


Model Details:

Model: Coiled Coasters with Holder

Difficulty Level: Complex

Tutorial (making newspaper tubes): Youtube

Tutorial (coiling or root-weaving technique): Youtube

A few months back, I had made a leaf-shaped tray using the technique of coiling with newspaper tubes. I decided to revisit the tray, this time using wood-stained tubes, the same ones I had used for this box with lid. This tray is bigger than my previous attempt, measuring about 15 inches at the longest length.


I had sprayed the tubes with water mixed with a little fabric softener, about half an hour before I started weaving. This resulted in very flexible tubes that did not break or crack while weaving. I will try out other methods of coating the tubes as I make other objects using the same technique.

Very happy with how even the weaving turned out. The closeup of the tray brings that out very well.


Finally tried out a new finish. I came across this style of finishing the edges, during my usual perusals on Pinterest and was quite fascinated by this. I feel this style is much better than the usual edging. This gives a very professional look to the product and has a very leathery appearance. I messed up the ending, but I have learnt from that and should do better next time.

Model Details:

Model: Tray

Difficulty Level: Complex

Tutorial (making newspaper tubes): Youtube

Tutorial (coiling or root-weaving technique): Youtube 

Tutorial for the edge: Youtube


More newspaper weaving, this time using magazine rolls. I had rolled up these tubes in the fond hope of making a pen holder. But for one reason or the other, I never got around to making them. So finally, thanks to new year resolutions, I decided to use them to make another attempt at coiling or root weaving.

This time, I decided to try out a rectangular shape, so that I could make it into a tray instead of a pencil holder. I had no particular idea of how big or how long the tray should be. I just coiled till I was happy with the size and till the tubes lasted!

The shape is a little wonky. As you can see, one side is a little larger than the other. But other than that, I think it a fairly good attempt.

The plus point of using magazine tubes is that the end result is very colourful and more cheerful than newspaper tubes that are painted a single colour! The end result is to be sent to a dear friend of mine, who had been asking me to sell one of my newspaper projects. I think this colourful tray will be a good addition to my friend's desk 💖


Model Details:

Model: Tray 


Difficulty Level: Complex

Tutorial (making newspaper tubes): Youtube

Tutorial (coiling or root-weaving technique): Youtube
So, after the last post on all the popular origami from last year, I realised that newspaper weaving was lagging behind. So I decided to try and complete at least 12 projects of newspaper weaving this year.

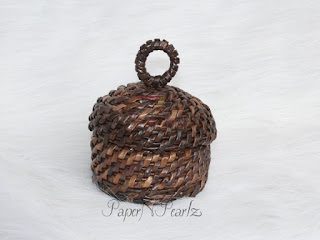
With that goal in mind, this is my first attempt - a newspaper woven little jewellery box with a lid. This is the first time I am attempting a proper lid, which will fit the box. My last attempt was rather rudimentary and I was not at all happy with that. While this is a definite improvement, I have ways to go before I can be really happy with this.

As is evident, this was also woven using the coiling technique. I guess I will attempt a few more projects using the same method. These tubes were coloured dark brown, using wood stain.


 Model Details:

Model: Coiled Box with lid

Difficulty Level: Complex

Tutorial (making newspaper tubes): Youtube

Tutorial (coiling or root-weaving technique): Youtube


Merry Christmas 2019, dear blog readers! 

It feels like the year had just begun and we are already at the end and looking forward to a new decade! Time does fly, doesn't it? 

Anyway, in the Christmas tradition, I decided to do something in the traditional colours of green and red. I had rolled a number of newspaper tubes some time back and had been wondering on the project to work on. So I decided to go ahead with the new style of weaving that I have been trying out these days. In case you, dear reader, haven't had an opportunity to see what I have been up to, do check out this blue leaf tray that I had done a few months back. Also check out the previous box and lid, done using the same red/green tubes. 

This style of newspaper weaving, called coiling or root-weaving, is tedious but results in really cool newspaper products that are absolutely eye-catching! The weave is without any form, so it is with some trial and error that I manage to do this style of free-form weaving. 


This bowl or rather, tray is about 7.5 inches in diameter and made entirely from newspaper tubes, coloured red and green. As with my previous blue tray attempt, here too, I attempted to paint both plain tubes and tubes with print still visible. Since the colours were both dark ones, I was able to obliterate most of the print after painting the tubes twice. With a single coat of paint, the colour is not very rich and the print is clearly visible. But with a second coat, the colour also becomes richer and most of the font are pretty much invisible! And what little is visible, is hardly seen in this style of weaving anyway! So that was a good discovery for me.

In total, to make this bowl, I have used a total of 50 plain green tubes, 25 green tubes with print visible, 100 plain red tubes and 30 red tubes with print visible. And as expected, with this style of dense weaving, the end product is very robust and strong. A coat of polyurethene and I have an absolutely amazing product!

So what do you think?


Model Details:

Model: Coiled Christmas Bowl

Difficulty Level: Complex

Tutorial (making newspaper tubes): Youtube

Tutorial (coiling or root-weaving technique): Youtube

I have rolled up tubes for a Christmas project but before that, decided to try out a little box with lid using the red/green combination. I have tried this method before, when I made a blue tray, but since it's been a long time since I did that, this box and lid is kind of a refresher course for me 😀
I liked the way this box came out. I added a little ring to the lid so that it is easy to open the box. The overall size is about 4 inches in diameter and about 3 inches in height.

The problem I faced was making a little indent for the lid so that it doesn't slide off easily. I am still to  figure out how to weave the lid. For this box, all I did was stick a couple of tubes to form the indent.

For this box, instead of using white tubes, I used tubes with print, painted red and green. In the close up shot, a little bit of the print is still visible, but of course, this cannot be avoided. I think the only colour which will completely obliterate the print is black.


Model Details:

Model: Coiled Box with lid

Difficulty Level: Complex

Tutorial (making newspaper tubes): Youtube

Tutorial (coiling or root-weaving technique): Youtube

After the strenuous coiled or root-woven tray from my last post, I was more than happy to try out this acorn box made from black newspaper tubes.

I have been trying out various acrylic colours which will completely blot out any print in my newspaper tubes. For the lighter colours, I have no choice but to use white or mostly-white tubes. Otherwise the print is very obviously visible and I just don't like it. As a consequence, I find that I am left out with a  lot of tubes that have newspaper print/coloured pictures on them.

One way to go is to use them as-is and weave my boxes with the print and pictures visible in the end product. I find that there are a lot of people who like this and I have had some orders where I have been specifically asked to use the newspaper tubes without any colours added.

On the other hand, I have also been experimenting with dark colours that I can use on these tubes, to hide the print, and the very best colour is, of course, black. Other than black, dark blue, prussian blue, deep red and dark green also work well.


So for my acorn box, I have used black tubes to form the base and the lid. The base was woven with a form, which was a plastic bowl of the required size. I tried out a 3-strand weaving, which I liked very much. The lid started off as a flat plate, with the edges turned down to convert into a lid. I added the little knob at the very end.

Model Details:

Model: Black Acorn Box

Difficulty Level: High Intermediate

Tutorial (making newspaper tubes): Youtube


One of the traditional methods of basket-weaving involves a technique called coiling. This technique combines a process of coiling materials such as grass and binding them together using flexible fibres.

The same process can be applied to tubes made from newspaper or magazines. Here the tubes are used in both the processes - they are wound and held together by other tubes. I first came across this technique of weaving in Pinterest and have since been fascinated by the method.

When I got an opportunity to try it out, I first attempted it using newspaper tubes. Needless to say, it wasn't much of a success! My coiling was loose and the tubes that held the coils together were not placed close enough to give a tight weave. And once you fail, even in something like craft work, it takes a lot of courage to get back on the proverbial horse, doesn't it?

So, after many months and with a lot of hesitation, I tried out this blue tray, in the shape of a leaf. The tubes are made from newspaper strips, around 10 mm in width and 260 mm in length, rolled around a 2mm skewer. I painted it prussian blue, since that was the colour I had in abundance! This time, since I knew what to expect, I was able to coil much better. Overall, it gave me much better results than my first attempt. The shaping is still a problem and that takes more practise I guess. On the whole, I am quite pleased with this attempt.

While this technique is more challenging than regular weaving, the result if much more pleasing. But I would not attempt this type of weaving unless I had a lot of time, because without doubt, it is much more time-consuming that the regular weaving that I do. This tray took me a good 3 days to complete! And that is just the coiling part. Time taken for rolling the tubes, painting and glazing the final product also needs to be considered.


Model Details:

Model: Coiled Blue Leaf Tray

Difficulty Level: Complex

Tutorial (making newspaper tubes): Youtube

Tutorial (coiling or root-weaving technique): Youtube

Shades of Blue is my current version of the bowl that I had initially tried out a few days back. I am very pleased with the way this bowl has turned out. The base of smoother than my previous efforts and the weaving is much improved, even if it is not where I want it to be!

As in my previous attempt, I went ahead with a gradation in colour. The paper I have used is without any print, so the lighter colours have turned out clear and without any marking. For the darker blue, of course, the tubes with print works just as well as the tubes without print, since the print is barely visible.

To achieve a more graded colour change, I weaved a couple of rows with a mix of dark and light blue, before switching to the lighter colour. I like the effect this produces.


The side view gives a good view of the rim of the bowl. The weaving pattern is the same as the base (tutorial link at the end of the post). The rim is harder to weave than the base, because it is narrower than the base. But that gives a fuller and smoother appearance I thought. What do you think?

The bottom of the bowl is by far, my favourite part of this project! I love the evenness of the base and I think I have much improved in this one area. Of course, this is the part that is lease visible! 😆😆 But that doesn't stop me from admiring my improved attempts!! 😂😂

So what do you think? Do you like it? Should I try other colours? Do drop a comment 😀


Model Details:

Model: Woven Bowl - Shades of Blue

Difficulty Level: High Intermediate

Tutorial (making newspaper tubes): Youtube

Picture Tutorial for the thick rimmed bottom: Stranamasterov


My second attempt at making a bowl was a better success I think! I have been repeatedly told that the tubes in which the print is visible, are much more unique in appearance. So I went ahead with printed tubes which were coloured in shades of blue.

The base started off with a deep blue, which forms the rim of the bowl. As in my previous post, the base is formed using the same method. One thing I noticed is that, the deeper the colour, the lesser the print is visible.

I had used 3 shades of blue. Deep blue at the base, a lighter version in the middle and finally, a light blue to finish it off. The finish needs some work and hopefully this will become better in the subsequent attempts!

Once the bowl was complete, since I had some more tubes, I decided to go ahead and make a pen stand. This turned out quite sturdy and useful.

Finally, a coating of varnish to strengthen and protect the pieces and I am all set!

Ok, New Year and new trials! 😆 So my latest trial in newspaper weaving involved attempting a bowl. And this has been a project of new attempts!

First, till now, my problem has been getting a good bowl shape. Why? Because one cannot use a base form when weaving the top half of the bowl. This is more of weaving by look-and-feel and frankly speaking, I am not yet very good at this look-and-feel weaving!! But, I am getting there. I hope!! 😄😄 And this bowl was my first attempt at that.

In addition, I tried out a new way of moving from the base to the walls of the bowl. This gives a nice, thick rim to the base, which makes the bowl much more stable than usual. I found this style of weaving quite difficult, but in the days to come I hope to master this technique.

And last, I ended up using a mix of 2 colours randomly! A rust-coloured base with a orange coloured tubes in the rim of the bowl. Well, this is my attempt to try out new combinations in the hopes of striking something interesting! I don't know if I have achieved what I hoped for, but at least I had a go at it!!


Model Details:

Model: Woven Bowl

Difficulty Level: High Intermediate

Tutorial (making newspaper tubes): Youtube

Picture Tutorial for the thick rimmed bottom: Stranamasterov

So, turns out that newspaper tubes that actually show the newspaper are very popular. I have had repeated demands to make more such products and that is exactly what I have done.

This box, made from brown and yellow newspaper tubes, is about 6 inches tall and has a diameter of around 4 inches. For relief, I added some brown wooden beads. And I am also figuring out how to add an indent at the edge, so that the lid fits in well. I still have not perfected this bit, but I believe I will eventually get it 😊


Altogether, I am pleased with the outcome. Still some way to go before I am perfectly happy with what I make, but not too shabby for now, huh? 

Since I am fairly confident of making circular dishes using newspaper weaving, I decided to venture a little further and try my hand at other shapes. The model I had readily available with me was a square dish, so I decided to use that to make these knick-knack dishes.

I made a series of them. The first was made using pastel coloured newspaper tubes, that were actually left-overs from previous projects. I must say I was pleasantly surprised by how well it turned out!


For the next couple, I used a mix of brown and yellow tubes with the newspaper print visible. I have come to realise that people are more attracted to the products which show the print, rather than those made from the plain, coloured tubes. I guess when the print is visible, it provides additional proof that it is really made from paper? I don't know, that is just a guess 😀


Anyway, I have also developed a liking for these rolls, so I hope to make more products using similar paper. For now, I am happy with the way these dishes have turned out. The brown ones have been confiscated as soon as they were done - apparently my brother absolutely needs them to organise his office desk!  And the pastel one has, naturally, been taken over by Little Miss. So that was that. 3 dishes done and I still lack dishes to organise my own desk! 😄

Well, a recent order for a pot holder made from newspaper rolls with order to 'go crazy!' gave me the liberty to try out this cute snail pot holder. Since I wanted the newspaper print to be visible, I coloured the paper with print in brown and cream and ended up with a real cute holder.

To hold the snail shape, I threaded the tubes with wire - that meant I was able to shape it well and it also made the weaving a lot easier! Finally 2 too big eyes and a coat of varnish and the holder was ready 😊


Here is the holder with a small pot in it. The picture really does not do justice to how well it turned out! And once the order was complete, I needed to make one more, since Little Miss had fallen in love with it. So the next one I made was smaller and was more of a pen stand. I reused some of the newspaper tubes from another project and ended up with a yellow and purple snail pen holder.


By far, my most professional attempt at my paper weaving projects, this orange and grey newspaper woven cup and saucer is my personal favourite. 

The tubes were actually part of my previous project - a coffee themed oval container. I loved the colour combination, so decided to make another project using the same. 

A lot of planning went into this set - from the way to start off and the method to interchange the colours, the reverse rope pattern in the centre, the edging of the saucer and also the cup - everything was planned. And I must say I am quite happy with the way it turned out. Specifically, I love the cross-pattern of the bottom and the beauty of the edging for both saucer and cup. 

To add durability to the handle, I ended up threading a wire through the 2 main anchoring tubes. So once I varnished it, the handle became incredibly strong. And overall, the cup can hold quite a bit of weight. 


I believe I have waxed eloquent about the project!! I do realise that the height is not even and this is my biggest problem. I am yet to figure out a way to maintain consistency, but I believe I will get there 😊

Of late, I have been making paper reeds in the fond hopes of making a bowl. I had previously made a paper woven bowl and basket and after coating it with a mixture of fevicol and water, I have found it to be quite robust!

Since rolling the paper reeds was the most time consuming part of making the bowl, I have been making these reeds as and when time permitted. So finally, when I had about 100 of these reeds, I figured it was time to make my next bowl.

This bowl is larger and more sturdy than my previous one. I have still not learnt how to end the bowl! I had no clue what to do at the end, so finished it rather abruptly!

A lot more practice is required, if I wish to end up with a smoother, more refined finish. Starting the bowl requires more precision. It is difficult to hold all the strands at the beginning and as a result, the beginning isn't very smooth. The sides were pretty easy to do, except for the end of course :) Over all, am neither happy nor unhappy with my effort.

If you would like to give these paper weaves a try, this video should be of help. The language is not English, but the video is still very useful 😊
SaveSave