Continuing from my previous post on handmade envelopes, here are more of these envelopes. I made a couple of sets of these envelopes with little origami decorations. The paper used, both for the envelopes and the decorations, is thick, handmade paper in antique gold and copper gold. Thick paper = simple origami! So I had to discard quite a few ideas I had. I am sure I will try more of these envelopes with slightly more complex origami decorations soon :)

The first of them have a little cherry blossom in one corner of the cover. The toughest part of folding these little flowers, turned out to be snipping off the corners, since I had to cut with multiple folds, without distorting the shape. Quite a task!


The last set of envelopes had a little origami hearts in them. The hearts were pretty simple to fold. And while the cherry blossom envelopes look lovely, I love the sentimentality of a little heart on the cover 💓

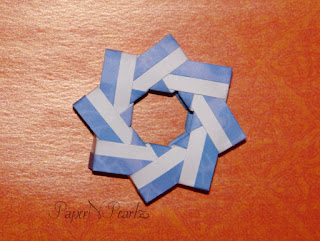
I love folding wreaths and rings, especially the 3D variety. And recently, I found this Alpha Centauri Ring, designed by Martin Sejer Andersen, a good and easy ring to fold. It is a 3D ring, made from 8 units. The fold starts with dividing the paper into thirds. You can of course, approximate it and fold, but much simpler to fold a template and use that to fold the other modules. The Youtube tutorial (link towards the end of the post) clearly demonstrates the way to go about it.

A great Christmas decoration I think. And with Christmas fast approaching, I think I should get busy making these in Christmas colours :)


Model Details:

Model: Alpha Centauri Ring 

Creator: Martin Sejer Andersen

Difficulty Level: Low Intermediate

Paper Ratio: Square

Paper Size: 2.75 inches

Model Size: 2.5 inch diameter

Tutorial: Youtube

Modules: 8

I am sure you are wondering whatever I have been doing for the past one month, without posting anything on the blog!

I have actually been quite busy working on quite a few pieces made to order. While making the pieces haven't been a problem, for some reason I am having quite a bit of trouble photographing them and posting pics on the blog!


These little gift envelopes are made from copper gold and antique gold handmade paper and decorated with little punched decorations and origami flowers and hearts.

In this post, I have added the envelopes with punched decorations. I'll post another one with the envelopes with origami decor. Punching tiny little decorations isn't that easy, I now realise! They are packed in set of 4, with 2 envelopes in copper gold and 2 of them in antique gold. 


The origami lotus is yet another traditional, modular model and one that I had tried out recently. The assembly for the lotus is different from what I had done till date.

After folding the individual modules (there are a total of 8 modules for the flower and 4 for the leaves), we assemble the modules in sets of 3 (2 flower modules and 1 leaf module) and tie them together. Once everything is held tight in place, then we start forming the petals and leaves.

The beauty of the flower lies in the way the petals are shaped. The inner petals can be closed into the centre to give the appearance of a flower just starting to bloom. I think mine has the look of a fully opened flower.

Altogether, an interesting and ingenious model to fold.

Model Details:

Model: Lotus

Origin: Traditional

Difficulty Level: Low Intermediate

Paper Ratio: Rectangle

Paper Size: 5.5 inches * 3.5 inches

Model Size: ~4 inches

Modules: 12

Tutorial: Youtube 

The peacock is a beautiful bird and I have been trying to fold it for quite some time now - ever since I got the book 'Origami Sculptures' by John Montroll. And I did manage to fold it on 15th August. That is the Indian Independence Day, and in case you did not know this, the peacock is the national bird of India - an added incentive to fold!

The paper I had used was blue/dark blue origami paper, 9 inches square. The resulting bird had a height of about 6.5 inches and a wing span of 6 inches. Double-sided paper works well, especially the colour combination I had selected :)

Making the peacock stand by itself was quite impossible for me. The reason being that the wings turn out to be quite heavy. So the bird kept falling backwards! But other than that, I am pleased with this peacock..

Model Details:

Model: Peacock 

Creator: John Montroll

Book: Origami Sculptures
 

Author: John Montroll
 

Difficulty Level: High Intermediate

Paper Ratio: Square

Paper Size: 9 inch squares

Model Size: 6.5 inches tall, 6 inches wing span


In case you are wondering what I have been doing with that bunch of cherry blossoms I had done previously, here you go..

All those cherry blossoms were made specifically for some special invites. My brother and sister-in-law had recently constructed their office (till now they have been renting out a place) and were planning a small ceremony for dedicating the office to our Lord Jesus Christ. So these invites were sent out to some relatives, some of their clients and other well-wishers.

Both of them had wanted a handmade card which would imply a personal touch. So, being creative people, they made these beautifully personal, hand crafted invites. The paper used was handmade paper in lavender and white. As you can see, the invite was made of 2 layers, the one on top was slightly shorter than the layer below. We had used brown twigs for the cherry blossoms, to give it a more authentic feel. The company logo and name (Capstone) were visible in the left corner, along with the words 'You are cordially invited'. The inside of the card has the actual invite and a list of services provided by Capstone.

I grew quite fond of this card - my sister-in-law and my brother at their creative best, and I quite enjoyed helping out with the card. And lot of those who received the invite were also very appreciative of it :)


One of the first earrings that I tried was, naturally, the origami star earrings. Once I became more adept at making these tiny earrings, I tried my hand at more complex pieces and that is when these rainbow earrings came into existence.

These are made with 16 units each and once assembled, I glazed them to give them added strength. The best part about origami earrings is that they are super light! So Little Miss is quite delighted to possess it, though it is a tad too big for her little ears!!

Origami Lemon and Green Sun Earrings