Showing posts with label upcycle. Show all posts


Stay Home Stay Safe! Who would have thought that a microscopic virus could bring the world virtually to a halt?? While this pandemic has had a terrible impact around the globe, it is during the lockdown that I have been able to connect with friends from long back, get back into my blogging, work on some incomplete projects.

One of the projects is this newspaper weaving project - Making coasters from newspaper tubes, using the root weaving or coiling technique. I was kinda bored of circular shapes, so attempted something a little different. Not sure how well it turned out, but I can say for certain that the coasters are rock solid.


The holder was a last minute idea, since I had plenty of rolls left over. Turned out pretty useful too, since I didn't end up losing a coaster or two, just because they were left lying around! The edges of the holder leaves a lot to be desired and even now, I am not too sure how to go about making this, but hopefully in the future, it will get better.

On the whole, I am happy with the outcome.


Model Details:

Model: Coiled Coasters with Holder

Difficulty Level: Complex

Tutorial (making newspaper tubes): Youtube

Tutorial (coiling or root-weaving technique): Youtube


Given the intense newspaper weaving session from the last post, I decided to do something a little simpler. So here is my pair of pot holders, made in aqua and white - the colours of my parents' living room. For quite some time now, they have been asking me to weave them something that goes with their room colours. And for a looong time now, I have been putting it off - mainly because I wasn't too sure that I would do justice to their aesthetically pleasing room! 

 So finally, after much deliberation, I decided to try out a couple of pot holders, to be kept over their piano, along with a candle stand in the same colour combination. Since I needed a pair, I used the exact opposite colours, in the same pattern. 

I am quite pleased with the way it has turned out. The centre portion, made from a single tube that is twisted around the base tube, was something new. While this is not always even, I quite like the effect produced. I believe I will use the same pattern in a few more weaves in the future!


More newspaper weaving, this time using magazine rolls. I had rolled up these tubes in the fond hope of making a pen holder. But for one reason or the other, I never got around to making them. So finally, thanks to new year resolutions, I decided to use them to make another attempt at coiling or root weaving.

This time, I decided to try out a rectangular shape, so that I could make it into a tray instead of a pencil holder. I had no particular idea of how big or how long the tray should be. I just coiled till I was happy with the size and till the tubes lasted!

The shape is a little wonky. As you can see, one side is a little larger than the other. But other than that, I think it a fairly good attempt.

The plus point of using magazine tubes is that the end result is very colourful and more cheerful than newspaper tubes that are painted a single colour! The end result is to be sent to a dear friend of mine, who had been asking me to sell one of my newspaper projects. I think this colourful tray will be a good addition to my friend's desk 💖


Model Details:

Model: Tray 


Difficulty Level: Complex

Tutorial (making newspaper tubes): Youtube

Tutorial (coiling or root-weaving technique): Youtube
So, after the last post on all the popular origami from last year, I realised that newspaper weaving was lagging behind. So I decided to try and complete at least 12 projects of newspaper weaving this year.

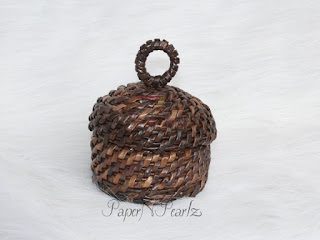
With that goal in mind, this is my first attempt - a newspaper woven little jewellery box with a lid. This is the first time I am attempting a proper lid, which will fit the box. My last attempt was rather rudimentary and I was not at all happy with that. While this is a definite improvement, I have ways to go before I can be really happy with this.

As is evident, this was also woven using the coiling technique. I guess I will attempt a few more projects using the same method. These tubes were coloured dark brown, using wood stain.


 Model Details:

Model: Coiled Box with lid

Difficulty Level: Complex

Tutorial (making newspaper tubes): Youtube

Tutorial (coiling or root-weaving technique): Youtube


I have rolled up tubes for a Christmas project but before that, decided to try out a little box with lid using the red/green combination. I have tried this method before, when I made a blue tray, but since it's been a long time since I did that, this box and lid is kind of a refresher course for me 😀
I liked the way this box came out. I added a little ring to the lid so that it is easy to open the box. The overall size is about 4 inches in diameter and about 3 inches in height.

The problem I faced was making a little indent for the lid so that it doesn't slide off easily. I am still to  figure out how to weave the lid. For this box, all I did was stick a couple of tubes to form the indent.

For this box, instead of using white tubes, I used tubes with print, painted red and green. In the close up shot, a little bit of the print is still visible, but of course, this cannot be avoided. I think the only colour which will completely obliterate the print is black.


Model Details:

Model: Coiled Box with lid

Difficulty Level: Complex

Tutorial (making newspaper tubes): Youtube

Tutorial (coiling or root-weaving technique): Youtube

This little heart box is my attempt to organise my desktop with a few recycled boxes. For the first one, tried out a heart box. The base is made from cardboard, since I wasn't too sure I would be capable of weaving a heart shaped base!! 😄😄 The heart-shaped cardboard was covered with newspaper that was then painted the same colour as the tubes.

Based on the size of the box, I started with tubes placed at an interval of 1.5 cms. I find this is the ideal placement of tubes. I tried 2 cms distance but I found the weaving to be too spaced out. Smaller distances makes weaving difficult for me! So 1.5 cms it is.

After that, it was a very simple weave with 2 tubes. Finishing off was also pretty easy. Then it was just a matter of glazing the box to give me a really hard and sturdy heart-shaped organiser for my desk.

Model Details:

Model: Heart Shaped Desk Organiser

Difficulty Level: High Intermediate

Tutorial (making newspaper tubes): Youtube

Tutorial for making the edge: Youtube

Shades of Blue is my current version of the bowl that I had initially tried out a few days back. I am very pleased with the way this bowl has turned out. The base of smoother than my previous efforts and the weaving is much improved, even if it is not where I want it to be!

As in my previous attempt, I went ahead with a gradation in colour. The paper I have used is without any print, so the lighter colours have turned out clear and without any marking. For the darker blue, of course, the tubes with print works just as well as the tubes without print, since the print is barely visible.

To achieve a more graded colour change, I weaved a couple of rows with a mix of dark and light blue, before switching to the lighter colour. I like the effect this produces.


The side view gives a good view of the rim of the bowl. The weaving pattern is the same as the base (tutorial link at the end of the post). The rim is harder to weave than the base, because it is narrower than the base. But that gives a fuller and smoother appearance I thought. What do you think?

The bottom of the bowl is by far, my favourite part of this project! I love the evenness of the base and I think I have much improved in this one area. Of course, this is the part that is lease visible! 😆😆 But that doesn't stop me from admiring my improved attempts!! 😂😂

So what do you think? Do you like it? Should I try other colours? Do drop a comment 😀


Model Details:

Model: Woven Bowl - Shades of Blue

Difficulty Level: High Intermediate

Tutorial (making newspaper tubes): Youtube

Picture Tutorial for the thick rimmed bottom: Stranamasterov


My second attempt at making a bowl was a better success I think! I have been repeatedly told that the tubes in which the print is visible, are much more unique in appearance. So I went ahead with printed tubes which were coloured in shades of blue.

The base started off with a deep blue, which forms the rim of the bowl. As in my previous post, the base is formed using the same method. One thing I noticed is that, the deeper the colour, the lesser the print is visible.

I had used 3 shades of blue. Deep blue at the base, a lighter version in the middle and finally, a light blue to finish it off. The finish needs some work and hopefully this will become better in the subsequent attempts!

Once the bowl was complete, since I had some more tubes, I decided to go ahead and make a pen stand. This turned out quite sturdy and useful.

Finally, a coating of varnish to strengthen and protect the pieces and I am all set!

Well, a recent order for a pot holder made from newspaper rolls with order to 'go crazy!' gave me the liberty to try out this cute snail pot holder. Since I wanted the newspaper print to be visible, I coloured the paper with print in brown and cream and ended up with a real cute holder.

To hold the snail shape, I threaded the tubes with wire - that meant I was able to shape it well and it also made the weaving a lot easier! Finally 2 too big eyes and a coat of varnish and the holder was ready 😊


Here is the holder with a small pot in it. The picture really does not do justice to how well it turned out! And once the order was complete, I needed to make one more, since Little Miss had fallen in love with it. So the next one I made was smaller and was more of a pen stand. I reused some of the newspaper tubes from another project and ended up with a yellow and purple snail pen holder.


My second attempt at making an oval container has been quite a success, if I do say so myself! My first attempt was the blue box which was not that great, frankly speaking. Naturally, I wanted to retry it, but this time I decided to go with a decoupaged cardboard base. And I wanted a closed box, so decided to try the lid as well.

The decoupage tissue was in orange and grey, with a coffee theme, so I went for the same colour combination for my paper tubes as well. The orange came out very well. The grey was a hit and a miss - it looks a little grey and a little brown!


The style of weaving remains the same as before - a Layer-wise Rope Style Pattern. I used 3 grey tubes followed by an orange tube for a total of 32 tubes. The lid was a basic lid with a little loop to help open it. Finally, I double-glazed the entire thing to make it real hard. In addition to making it hard, it made it a little glossy as well, which I am not too happy about. I prefer a matt finish to a gloss one.