Showing posts with label high intermediate. Show all posts

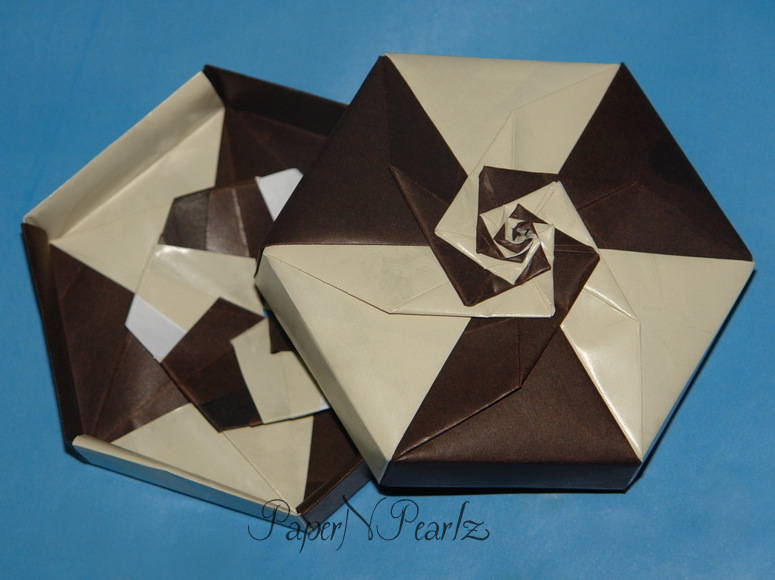
This absolutely stunning variation of the Octagonal box from Tomoko Fuse's 'Joyful Origami Boxes' is my third attempt at folding the octagonal boxes. Each of these boxes that I have folded, I feel, is prettier than the previous one!

For this origami, I used some of my precious supply of double-sided paper - paper that is plain coloured on one side and printed with little flowers on the other. I absolutely love this paper and tend to use it very, very judiciously.

Page 72 of the book gives the directions for folding the variations - that is to say, Tomoko Fuse gives us the final module and it is left to us to figure out how to arrive at the module. But given that she has already described the makings of 4 other octagonal boxes, this is not that tough a challenge. A little bit of fiddling around using existing steps should bring us to the module.


Each paper square that I have used is 3 inches in size and the end result is an attractive box, about 2.5 inches across. The picture above shows the inside of the lid, which I think is as pretty as the outside! For the base, instead of using the same double-sided paper, I used red 3-inch squares of printer paper. That ensured that the base was very sturdy.

By the way, this module is the 4th variation shown in the book. I hope to try out more of the variations in the coming days.


Model Details:

Model: Octagon Box - 4th Variation

Creator: Tomoko Fuse

Book: Joyful Origami Boxes

Author: Tomoko Fuse

Difficulty Level: High Intermediate

Paper Ratio: Square

Paper Size: 3 inches

Model Size: 2.5 inches across

Number of Modules: 16

Well, after completing the Plain Octagon Box from last week, I couldn't wait to try one more of the boxes from Tomoko Fuse's 'Joyful Origami Boxes'. 

This time, I tried out the Double Pinwheel box described on page 70. For the assembly, I tried the second assembly, since I wanted the back of the paper to be visible as much as the front. The folding and assembly are not too difficult.

So now, I just have to try the variations on Page 72 😊


Model Details:

Model: Octagon Double Pinwheel Box

Creator: Tomoko Fuse

Book: Joyful Origami Boxes

Author: Tomoko Fuse

Difficulty Level: High Intermediate

Paper Ratio: Square

Paper Size: 3.5 inches

Model Size: 3.5 inches across

Number of Modules: 16
With summer just around the corner, Little Miss decided that she wanted me to weave her a hat.. So naturally, I got cracking and used my trial tubes to make a trial hat.

Whenever I roll tubes, I segregate them into 3-4 categories - the no-print tubes, tubes with only black print and the rest of the coloured tubes. The coloured tubes are used for all my trials. I don't paint them, so they are not very strong. Anyway, I always have a couple of bunches of these trial tubes.

The procedure was pretty elementary - round box for form, started with 16 tubes in the centre and wove around the form till I was happy with the size, then I flattened out the tubes and wove the rim of the hat.


Here's Little Miss, modelling the hat. Unfortunately, a round hat doesn't really fit our heads! I did not realise this till she tried it out. Apparently, according to a few hat-related videos that I subsequently watched, the top of the hat needs to be more oval than rounded. So though I am happy with the initial output, there is much work to do before I can start making hats in various colours for Little Miss. She has already given me the colour combinations that I need to start working on 😄
Since my last couple of woven projects have been fairly successful, I decided to try out another shape - an oval container. I used a used oval ice-cream box as the base and started working on the box. My primary reason for trying out this shape was to figure out how to weave the base. Since the base is not circular, there are some calculations involved to figure out the initial weave.

Suffice it to say, for me, the base was a disaster (hence the absence of photos of the base!! 😀). But once the walls were formed, the task was much simpler. Since I had two shades of blue, I wanted to use both and so decided on using the Layer-wise Rope Style pattern. A detailed MK (MasterKlass, for the uninitiated) on Youtube (link below) by the talented Elena Tishchenko provided all the help I needed.

Overall, not too bad for a first attempt. One area that I really need to work on is uniformity of height! As is obvious from the picture, in some places, it is too short and in others, too tall! I also need to figure out how to hide the cut ends near the top edge. Well, practise makes perfect and I really need to practise! 😊

Model Details:

Model: Woven Oval Container

Difficulty Level: High Intermediate

Tutorial (Layer-wise Rope Style Pattern): Youtube (Part 1, Part 2)

We had recently been on a short trip to the sea, for the summer. And while doing some shopping, I came across an amazing shop which had some fabulous wrapper paper in some awesome colours and patterns. So I ended up picking up a whole lot of paper and now I have enough to last me a lifetime!!

The cream and chocolate brown papers in this hexagon box were a couple of sheets I picked up there. The moment I saw the paper, I fell in love with it and have been trying to decide on the model. Finally I decided to make one of Tomoko Fuse’s beautiful boxes from her book on spirals.

The paper was thicker than regular origami paper, so the box turned out to be quite sturdy, though it required more effort in folding and assembling. The spirals were difficult because of handling 6 arms simultaneously but the end result was so satisfying that I just sat and admired the box for about half an hour after I had completed it!


Model Details:

Model: Hexagon Box 

Creator: Tomoko Fuse

Book: Let’s Fold Spirals
 

Author: Tomoko Fuse
 

Difficulty Level: High Intermediate

Paper Ratio: Square

Paper Size: 6 inches

Modules: 12 (6 + 6)

I have started the year 2018 with a bang! I completed my first paper weaving project (a magazine holder) and here is my first origami of this year. This model is one of Tomoko Fuse's kusudamas, named Fuufuki Asagao Kusudama. It is taken from her book Unit Origami Fantasy. 

The kusudama is made from 30 smaller squares, folded and assembled together (I did the assembly with glue). I used fairly thick paper, by origami standards - 80 gsm regular printer paper, cut into 3*3 inch squares. I am not sure 60 gsm paper would have worked quite so well. 

What I loved about this kusudama was its angular, sharp appearance, something you don't usually see in kusudamas. Kusudamas, I think, are usually more flowery, soft and flowing. But here, I love the sharp dips that reveal the stars and the triangular peaks that remind me of Fuse's Little Turtle kusudama

Model Details:

Model: Fuufuki Asagao Kusudama 

Creator: Tomoko Fuse

Book: Unit Origami Fantasy
 

Author: Tomoko Fuse
 

Difficulty Level: High Intermediate

Paper Ratio: Square

Paper Size: 3 inch squares

Model Size: ~5 inches in diameter

Modules: 30

Tutorial: Youtube 

A few months, my daughter, Little Miss and I had made a few pen holders using rainbow coloured newspaper tubes. I had a few tubes left over from that project, so this trial turned out to be a good use of those tubes. 

This project almost turned out to be too much for me, a beginner, but I was determined to see it through! The difference between this and the usual weaving I have done is that there are multiple working tubes in this style, so keeping track of which tubes I was working with was quite a challenge initially. Maybe once I have gained more experience, I will attempt this weave again. 

I had made a few errors in my calculations, so there is some slight discrepancy in the arrangement of tubes, though this isn't really noticeable. Another error was in the way I finished up at the end. This turned out to be more obvious, especially in the second pic - the circle is slightly flattened in one place. 


Model Details:

Model: Woven Wall Hanging

Difficulty Level: High Intermediate

Tutorial (making newspaper tubes): Youtube

Picture Tutorial for this weave: GoldenerWidder

After my Christmas bells made from newspaper tubes, I have been working with a fair amount of enthusiasm, on a rather large project! Making a trash can!!

It has been a fairly large project for me, because everything about this is new! I am new to newspaper weaving, so rolling the tubes itself is a challenge. The shape I have chosen is also new - till date, I have only attempted round structures, so a square is another challenge. Then there is the painting - as you can see, I have used lavender, green and white tubes. The white tubes were tricky because they weren't as bright white as I wanted them to be; hopefully I will get there in my next few attempts. Finally, I am not sure how clear it is, but I have used lavender/white paper beads around the middle of the basket. For some time I had the feeling that I had bitten off more than I could chew, but finally, I managed to complete the basket 😀 And really really proud of what I have done. I do realise there are a lot of faults, but at least I completed it!! So yay me!!


Model Details:

Model: Woven waste basket

Difficulty Level: High Intermediate

Model Size: ~15 inches tall 

Tutorial (making newspaper tubes): Youtube 

Recently, I purchased the book 'Geometric Origami' by Faye G. Goldman. The book contains various models based on Heinz Strobl's Snapology method.

A few years back, I had tried my first snapology origami and made an icosahedron. And now with the purchase of this book, I decided to work on the model titled 'Egg'. It was interesting for me because it was the only asymmetrical model in the book. On completing the project, I think it will make a good Easter egg. Maybe one can add some chocolates inside the egg - though I have no clue how we can get them out!!

The principal for the Egg Snapology remains the same and requires a total of 2 squares, 8 pentagons and 16 flower-like units, assembled from 6 triangles. The 2 squares form the top and bottom of the egg. The flower units surround the 4 arms of the square and the 8 pentagons.

I had used 1-inch quilling strips for the whole project, so while theoretically the egg was an easy project, the size of the strips made it pretty challenging for me. On a side note, kudos to all the origamists who make tiny, micro origami!

Model Details:

Model: Snapology Egg

Creator: Heinz Strobl

Book: Geometric Origami

Author: Faye Goldman

Difficulty Level: High Intermediate

Paper Ratio: 1-inch quilling strips

Model Size: ~4 inches in diameter

The Icosahedral Kit is yet another of the Polyhedron kits from Miyuki Kawamura's book 'Polyhedron Origami'. In this modular origami, 2 kinds of modules are used - the Edge module and the Vertex module. The icosahedron kit is made from a total of 12 vertex modules and 30 edge modules - a grand total of 42 modules.

Double-sided paper works best, since the back of the vertices are visible through all those gaps. The modules are fairly easy to fold and assemble. I used glue as a precaution, but it is not absolutely needed. The size of the paper that I had used was 3 inches and it resulted in a fairly big icosahedron - about 6 inches in diameter.

Model Details:

Model: Icosahedron Kit

Creator: Miyuki Kawamura

Book: Polyhedron Origami

Author: Miyuki Kawamura

Difficulty Level: High Intermediate

Paper Ratio: Square

Paper Size: 3 inches

Model Size: 6 inches diameter

Number of Modules: 42

Tutorial: Youtube

After attempting Fumiaki Kawahata's Diplodocus in my previous post, I decided to try the origami dinosaur earrings for my Little Miss.

I tried out different sizes and finally this was the pair that I liked the best. I used red kami paper with print on it.

How do you like it? As for my daughter, she is very pleased! So yay for mummy!! 😀

Model Details:

Model: Dinosaur Earrings 

Creator: Fumiaki Kawahata

Book: Origami Dinosaurs 2

Author: Fumiaki Kawahata

Difficulty Level: High Intermediate

Paper Ratio: Square

I know zilch about dinosaurs! But Little Miss happened to see some origami dinosaur earrings on Etsy and wanted one for herself.

So I set about experimenting, since single-sheet origami isn't my cup of tea. Fumiaki Kawahata's book on Origami Dinosaurs has this folding for the Diplodocus, which was an interesting origami to fold. For the uninitiated, a diplodocus is a large, long-necked dinosaur, with a long tail. The animal is said to grow to a length of 24 metres (79 feet!!)

Since I wanted to make a small earring, I started of with a fairly large square first, just to see if I was able to fold it. The big grape coloured one is folded from a 7-inch square. And then, using progressively smaller squares, I refolded the origami. My smallest is folded from a 2-inch square. It is still too big to be an earring, but I will get there!


Model Details:

Model: Diplodocus (Dinosaur)

Creator: Fumiaki Kawahata

Book: Origami Dinosaurs 2

Author: Fumiaki Kawahata

Difficulty Level: High Intermediate

Paper Ratio: Square
The origami spiral is yet another beautiful modular origami by Tomoko Fuse. Because of how colourful it looks, I had tried this out a long time back - about 3 years back, when I was pretty much a newbie to origami. While folding the modules was pretty easy, I just couldn't figure out how to connect one unit with the next. And finally gave up.

Now, since I have gained a little more experience, I gave it another try. It still required some figuring out, but I was able to get the principle at last :)

I wanted to make a spiral with at least 10 rings in it. Since each ring has 8 modules, I needed at least 80 modules. I added a few more, till I had 100 modules in all and finally set about assembling the modules. So now, based on the number of modules used in a model, the spirals is my biggest project!


The basis for the spiral is the ring which is made from 8 modules. The ring itself will make a good Christmas decoration I think. It would be better to use 80 gsm paper, though this might make it a little difficult to assemble the modules. If making the spiral, I would suggest 60 gsm origami paper. Colourful paper is best for the spirals, resulting in some very colourful and attractive origami.

Be sure to glue the joints, especially for the spirals - rest assured, everyone who sees it will want to handle it and you will end up with many modules that have come undone, unless it is glued in place.

I had used 3-inch squares for making the modules and ended up with a spiral that measured about 6 inches in diameter - a little too big to be used as a slinky! But in spite of that, everyone who has seen it has attempted using it as a slinky!


Model Details:

Model: Rings and Spirals

Creator: Tomoko Fuse

Book: Floral Origami Globes

Author: Tomoko Fuse

Difficulty Level: High Intermediate

Paper Ratio: Square

Paper Size: 3

Model Size: ~ 6 inches in diameter

Diagram: OrigamiModular


The Origami Star Dodecahedron is one of the many models that can be folded using the SIP (Six Intersection Pentagrams) Unit. The SIP model was co-discovered independently by Francesco Mancini, Jared Needle and Leong Cheng Chit. The same unit can be used to fold the Star Icosidodecahedron (60 units), the Star Dodecahedron (30 units) and the Star Prism (15 units). And since I tend to fold a lot of 30-unit models, I tried out the star dodecahedron :)

The units are fairly easy to fold and assemble. I had used handmade marble paper and am quite pleased with the way it turned out. And I absolutely love the ethnic feel that the background adds to the picture! 😍

Model Details:

Model: Star Dodecahedron

Creator: Francesco Mancini

Difficulty Level: High Intermediate

Paper Ratio: Rectangle in ratio 1:2

Paper Size: 4 inches * 2 inches

Model Size: 7 inches in diameter

Modules: 30

Diagram: Creating Origami (The pdf provides the instructions for the Six Integrating Pentagram model, but the first page of the pdf has the diagrams for folding the unit)

Tutorial: Youtube 

The kusudama spiral, which looks to me to be less of a kusudama and more of a modular design, is created by Irina Krivyakina. The design is very similar to Tomoko Fuse's spiral origami.

In this design, the 6 sides of the cube are first assembled individually and then put together using connecting units. Each side of the cube is made up of 4 units which are folded together to form the spiral. A total of 24 units are required for the cube faces. The connecting unit is basically a bird base. 12 such units are required for assembling the cube.

3 inch squares are the perfect size for making the cube. I would not suggest a single-sided paper for the units used for assembling the cube. When using single-sided paper, while forming the spiral, I discovered to my dismay, that however I folded it, a little bit of the white was visible at the corners of the spirals. And it was very obviously seen in the completed cube :(

Model Details:

Model: Kusudama Spiral

Creator: Irina Krivyakina

Difficulty Level: High Intermediate

Paper Ratio: Square

Paper Size: 3 inches

Model Size: ~4 inches

Modules: 36

Photo Tutorial: Stranamasterov

Tutorial: Youtube


If you are familiar with folding the traditional origami crane and the origami Kawasaki rose, then why not try out the Origami Tsuri Rose - a modified crane with a rose in the centre.

The tsuru rose has been on my to-do list for quite some time. And finally I was able to try it out - mostly because the monthly theme at the Origami Society of Madras is a crane and I didn't want to end up folding the traditional crane :)

The crane is not easy to fold - I would rate it as a high intermediate. And the reason for is, once the pre-creasing is over, immediately on starting the folds, the model becomes 3D. So almost from the beginning (Step 10 in the diagram), we end up folding in the air. And as the folding progresses, there are quite a few layers of paper to fold, which makes it harder to fold or get crisp creases. And getting a good, well-creased crane without crushing the rose in the centre was pretty challenging for me. That said, after I had tried it a couple of times, I was quite happy with the outcome :)


Model Details:

Model: Tsuru Rose

Creator: Satoshi Kamiya

Difficulty Level: High Intermediate

Paper Ratio: Square

Paper Size: 6 inches

Model Size: ~ 5 inches wingspan and 4 inch from head to tail

Instructions: Coisas de papel

After folding the octagonal box from 4 units, I tried the 8-unit box. While folding, I realized that the 4-unit version is actually an extension of the 8-unit box. So folding the individual modules was pretty easy.

The assembly was not as easy as the 4-unit box. Mainly because there are 8 arms that have to be folded together to form the spiral at the top. And obviously, dealing with 4 spiral arms was way easier :)

I had used 3 inch squares to make the modules. So the result was a fairly small, octagonal box which is the perfect size for gifting jewelry in.

Model Details:

Model: Octogon Box 

Creator: Tomoko Fuse

Book: Let's Fold Spirals
 

Author: Tomoko Fuse
 

Difficulty Level: High Intermediate

Paper Ratio: Square

Paper Size: 3 inches

Model Size: ~ 2.5 inches across and 1.25 inches tall (including spiral)

Modules: 16 (8 for base and 8 for lid)

This month's theme at the Origami Society of Madras is Boxes! Yay! Love it :)

So I got cracking with this octagonal box by the ever-prolific Tomoko Fuse. I have this absolute fascination for boxes with spirals. I am always astounded by how beautifully elegant they look! So I worked on this spiral box from Tomoko Fuse's 'Let's Fold Spirals'.

A couple of years back, I had completed yet another spiral box - a hexagon and I love that box. I still have it and it is still as sturdy as ever. The octagon box, though, isn't as sturdy as the hexagon box because of the way it is constructed. This box is made from 4 modules for the lid and 4 for the base. And each module forms 2 sides of the octagon.

I had used 80 gsm paper (love the rather Christmassy look that the red/green combination brings in!) which gave stability to the box. Thicker paper should work much better though.

Model Details:

Model: Octagonal Box with Spirals 

Creator: Tomoko Fuse

Book: Let's Fold Spirals
 

Author: Tomoko Fuse
 

Difficulty Level: High Intermediate

Paper Ratio: Square

Paper Size: 5 inches

Model Size: ~4 inches across and 2 inches tall (including spiral)

Modules: 8 (4 + 4)

In preparation of Valentine's Day next month, I thought I would try out something new. The Kawasaki rose has always been challenging for me, so I decided to make it even more challenging by making a rose ring using the same rose.

I have tried out the rose ring before, but I wasn't too happy with the way it turned out then. But after some practise and some fails, here is one I absolutely love. Goes to a good friend of mine too. Hope she likes it 😀

The paper I have used is pearlized washi paper in a soft peach colour with tinges of gold woven into the paper. The final ring was glazed to strengthen it.


The yellow rose is another one I made using similar paper. I used a bronze ring, which I thought went better with the rose. This was even more challenging, since the paper was smaller than the peach ring. But well, I am happy with the final outcome!! 😃

Model Details:

Model: Rose Ring 

Creator: Toshikazu Kawasaki

Book: Origami Dream World - Flowers and Animals
 

Author: Toshikazu Kawasaki
 

Difficulty Level: High Intermediate

Paper Ratio: Square

Tutorial: Youtube

The Origami Tornado Kusudama is a beautiful modular origami designed by Aldo Marcell, an amazing Nicaraguan origami artist. This model is assembled from 30 modules. It works best with duo-coloured paper. In recent days, I have developed a special fondness for purple/lavender colour combination and I went for the same combination again. And am quite happy with the way it has turned out!

The model reminds me of Enrica Drey's Dodecahedron Kusudama, which is made from 60 modules. But the change in colour in the Tornado beautifully brings out the swirls, which I like very much :)

Folding the individual modules was easy. But I did find that the assembly was more difficult than most other kusudamas I have folded. I had to use a lot more paper clips than usual! And finally I ended up gluing some of the more untameable bits down!

Model Details:

Model: Tornado 

Creator: Aldo Marcell

Difficulty Level: High Intermediate

Paper Ratio: Square

Paper Size: 3 inch squares

Model Size: ~4 inches in diameter

Modules: 30

Tutorial: Youtube