Showing posts with label A4. Show all posts

Tomoko Fuse's spirals has always fascinated me. And since my last Tomoko Fuse origami was this pyramid box in May, I figured I would try out another of her spirals origami.

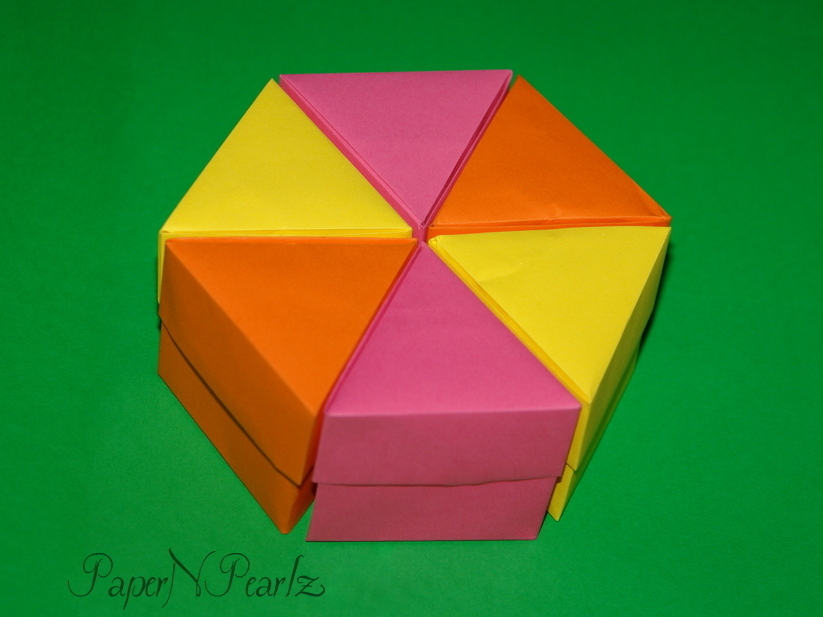
This origami spiral cube has been on my to-do list for quite a few years now! And finally I managed to do it! The cube is made from strips cut out of A4 paper. Each A4 sheet is cut into 4 strips. A total of 12 such strips are needed, which means 3 A4 sheets will be required.

As with most of Tomoko Fuse's models, the individual modules are fairly easy to fold. Assembly is a lot more challenging. I assembled the first three faces, on a flat surface. And I admit, I glued the tips of the spiral so that it didn't unravel easily. Once the three faces was done, the fourth face was decidedly more difficult but manageable. Then the top and bottom of the cube. Assembling one of the 2 ends was easy, because I could insert my hand inside the cube to hold the arms of the spiral and then continue with the assembly. The true challenge was, as always, in finishing the final face. I didn't have proper support, which meant I was forming the spiral in air! But finally, with a good deal of patience, I succeeded!

While I am happy with the cube, I find it too big for my taste. Hope to make another one from A5 paper. The principle remains the same. 4 strips from each A5, 12 strips in all.

Model Details:

Model: Spiral Cube

Creator: Tomoko Fuse

Book: Let's Fold Spirals

Author: Tomoko Fuse

Difficulty Level: High Intermediate

Paper Ratio: Rectangle

Paper Size: 11.7 inches * 2 inches

Model Size: ~3.5 inches across

Number of Modules: 12

Tutorial: kusuda.ru

Let me start off by saying that the more I read about origami snapology, the more information I find! Plenty of tutorials are available to make the basic snapology unit. As for assembling the units into various polyhedra, there are tutorials for assembling the Icosahedron but all other polyhedra are strictly DIYs :) But once we understand the polyhedral shapes, using snapology units to form those shapes is fascinating, though challenging.

To start off with the basics, snapology is a term coined by Heinz Strobl and involves folding units from paper strips. The beauty of snapology is that, these units can be used to form any polyhedra, starting from the Tetrahedron (4 vertices and 4 triangular faces) to the complex Truncated Icosidodecahedron (120 vertices and 63 polygonal faces!).

The basic snapology units are assembled along the wire frame of a polyhedra (for a polyhedral solid, when the faces of the solid are removed, the edges along remain. These edges, that retain the shape of the solid, is the wire frame) to form the various shapes. Each unit has 2 parts - a strip that forms the basic shape (a triangle for the icosahedra in this post) and a second strip that acts as a connector and links 2 shapes.

The icosahedra has a total of 12 vertices and 20 triangular faces. So we need 20 strips to form the 20 triangles. To determine the number of connector units, we need to determine the number of edges that the polyhedron has. Here's where a little Maths helps - the Euler's formula, which goes thus:

Euler's Formula:

V + F - E = 2
where V = number of vertices, F = number of faces and E = number of edges

We need E, so the formula works out as
E = V + F - 2

For the icosahedron, E = 12 + 20 - 2 = 30.

So, we need a total of 50 strips (20 for the triangles and 30 for the connectors). I used A4 sized paper, cut into 8 strips each, which I then cut into halves. So a single A4 gave me 16 strips. So 3 A4 sheets + 1 additional strip gave me the 50 strips I required.


Model Details:

Model: Icosahedron using Snapology 

Creator: Heinz Strobl

Difficulty Level: Low Intermediate

Paper Ratio: A4 paper cut into 8 strips

Model Size: ~4 inches tall

Instructions: Haligami

Tutorial: Youtube

The Stand in the Corner of the Desk Drawer Box (Whew! That is a mouthful!) is deceptively simple box/pen stand designed by Thoki Yenn, the well known designer of origami magic rings.

The stand is folded from a A4 sheet. I would suggest regular copy paper or something thicker for folding this model. Copy paper results in a pretty good stand, but the best stand is from scrapbooking paper (160 gsm or more).

Some things that I did incorrectly the first time (Diagram link below):

1. In Step 2, when making the 3 vertical folds, start from the left. The first fold is made at the diagonal nick made in Step 1.

2. Step 4 - easier if these are made as mountain folds rather than valley folds.

3. In Step 6, the little crease between the first vertical and the 3rd horizontal creases does not extend up to the 2rd horizontal crease, but with the crease before that.

4. Same with the next crease (between the first vertical and 4th horizontal creases). This is not so well defined as the previous crease and the first time I folded the box, I didn't make this crease, rather folded it while collapsing along the other pre creases.

In case you are giving this model a try, I hope that helps :)


Model Details:

Model: Stand In The Corner Box

Creator: Thoki Yenn

Difficulty Level: Low Intermediate

Paper Ratio: A4

Model Size: ~2.5 inches tall

Instructions: Erik Demaine
Well, after a long time I worked on some modular origami - the origami football (soccerball). Absence really does make the heart grow fonder, cos I absolutely loved making the football. It helped that it very closely resembles a real football, so much so that my daughter wanted to kick it around! And everyone in my house is in love with it 😊

Unlike most modular origami, the individual modules are made from equilateral triangles. For my football, I had used A5 sheets (If you have A4 ie., the regular copy paper, cut it in half horizontally to give 2 A5 sheet). Each A5 sheet gives 2 white triangles and 3 black triangles. A total of 20 white pieces and 12 black pieces are needed. So that makes it 10 white A5 sheets and 4 black A5 sheets (In A4 terms, it is 5 white and 2 black A4 sheets).

The white and black pieces are folded differently, as we need white hexagons and black pentagons. While assembling the ball, each black pentagon will be surrounded by 6 white hexagons. You should be aware that of these 6 white hexagons, one side will have a pocket which will be empty. That is because of the combination of hexagons and pentagons and nothing to worry about :)

So give it a go and have fun with the football. It is pretty robust, so you can even throw it around a bit!

Unfortunately I am no longer able to find the diagram for this model. It used to be hosted on Mark Leonard's site but it is no longer available. But all is not lost! I have linked below a youtube tutorial for making said football.

Model Details:

Model: Football

Creator: Mark Leonard

Difficulty Level: High Intermediate

Paper Ratio: Triangle

Paper Size: A4 and A5 paper

Model Size: ~4 inches in diameter

Modules: 32

Tutorial: Youtube

The Dodecaedro Traforato or Perforated Dodecahedron is a modular origami by Silvana Betti Mamino. Like most modular origami, the modules are pretty easy to fold. They are folded from a A4 sheet. Well, the A4 is actually cut into 4 rectangles horizontally. I felt A4 strips would be too big, so worked with A5 sheet cut into 4 rectangles. Worked perfectly well :) I used printer paper - 5 colours and 6 strips in each colour.

Folding printer paper wasn't that easy - 80 gsm paper requires more effort to fold than 60 gsm, doesn't it? Assembling for me, was the most challenging part. The reason was because of the colours. I wanted to ensure that there was some kind of uniformity in the assembly and after 3 attempts, I finally managed it I think.

The modules hold together without glue once fully assembled. But I didn't find it terribly stable, so if you will be moving it about, then a little glue helps. If you are assembling without glue, ensure you have a whole bunch of paper clips to hold the modules in place.

Model Details:

Model: Dodecaedro Traforato

Creator: Silvana Betti Mamino

Difficulty Level: High Intermediate

Paper Ratio: Rectangles from A5

Paper Size: 2.1 inches by 5.8 inches

Model Size: 4.5 inches diameter

Number of Modules: 30

Instruction: Modulandia.it

This origami leaf card is folded from an A4 or A5 paper. The leaf design is formed by pleating the paper.

Paper with print on one side and solid colour on the other works well for design. The only issue was that, I would have loved it if the leaf could have been made from the same print, rather than the solid colour. But if I interchanged the colours, the inside of the paper would have the print, so wouldn't be of much use if there is an intention to write something on the inside.

Another point to note is that, once the card is opened out, refolding it isn't really elementary. So if you are gifting it to someone, ensure that they understand how it should be folded back. Else they might end up quite frustrated, trying to do so :)

I tried the design first with A4 paper. The result was a fairly big card. I found an A5 size much more to my liking.

Model Details:

Model: Leaf Card 

Origin: Traditional

Difficulty Level: Low Intermediate

Paper Ratio: A4 or A5 paper

Tutorial: Youtube


I have previously made triangular boxes from 3 modules and wanted to try out one from a single sheet of paper. And found out Thoki Yenn's triangular box, where both the box and the lid are made from a single sheet of A4 size paper.

I love how economical the box and lid is! The box is made from half the A4 paper and the lid from half a square from the same sheet. The instructions sound quite complex, but making these boxes is actually quite simple.

Model Details:

Model: Triangular Boxes

Creator: Thoki Yenn

Difficulty Level: Low Intermediate

Paper Ratio: A4

Instructions: Erik Demaine

I like making boxes from single sheets of paper. For one thing, they are quite economical and for another, you can just grab a piece of paper and start working on the box!

This pentagonal box is designed by Rikki Donachie and is made from a single A4 sheet of paper. It is quite easy to fold. I folded the base such that the height was a little more than the lid. Otherwise, both base and lid were the same.

Model Details:

Model: Pentagonal Boxes

Creator: Rikki Donachie

Difficulty Level: Low Intermediate

Paper Ratio: A4

Paper Size: 7 inches

Tutorial: Youtube
Most origami boxes are modular pieces and to get a box this size, you would need really small modular units, which could turn out to be tedious to make. But this box is just perfect in size!

One thing that I would suggest is that, if you are giving this to someone, it would be better to glue the little pocket that is on the inside of the box. I also glued the join at the top of the box to prevent it from opening up!

Model Details:

Model: Heart Box 

Creator: Robin Glynn

Difficulty Level: High Intermediate

Paper Ratio: A4 (297 mm * 210 mm)

Model Size: ~4 inches

Diagram: Origami Diagram

Tutorial: Youtube (Part 1 and Part 2)