Showing posts with label origami. Show all posts


This origami star, designed by Enrica Dray, is a modular star made from 8 modules. It is really simple to fold and beautiful and elegant when completed. The star has a slight 3-D effect, since the top layer does not lie flat against the lower layer. The back of the star (Second pic), I thought, was as beautiful as the front!

2 contrasting colours work best for this model. Since I have a very bad eye for colour selection, I used the net to find out 2-colour combinations and liked the black-beige yellow the best. Origami 60 gsm paper, 3 inch squares, 4 of black and 4 of beige yellow, resulted in a star about 4 inches across.

Previously, I have folded the Mina Kusudama, also designed by Enrica Dray. Like the star, the mina kusudama was also easy to fold and assemble. It is of course, made from 30 modules, so it is more time-consuming than the star, but equally satisfying to work on.


Model Details:

Model: Star 

Creator: Enrica Dray

Difficulty Level: Low Intermediate

Paper Ratio: Square

Paper Size: 3 inch squares

Model Size: ~4 inches across

Modules: 8

Tutorial: Youtube 

We had recently been on a short trip to the sea, for the summer. And while doing some shopping, I came across an amazing shop which had some fabulous wrapper paper in some awesome colours and patterns. So I ended up picking up a whole lot of paper and now I have enough to last me a lifetime!!

The cream and chocolate brown papers in this hexagon box were a couple of sheets I picked up there. The moment I saw the paper, I fell in love with it and have been trying to decide on the model. Finally I decided to make one of Tomoko Fuse’s beautiful boxes from her book on spirals.

The paper was thicker than regular origami paper, so the box turned out to be quite sturdy, though it required more effort in folding and assembling. The spirals were difficult because of handling 6 arms simultaneously but the end result was so satisfying that I just sat and admired the box for about half an hour after I had completed it!


Model Details:

Model: Hexagon Box 

Creator: Tomoko Fuse

Book: Let’s Fold Spirals
 

Author: Tomoko Fuse
 

Difficulty Level: High Intermediate

Paper Ratio: Square

Paper Size: 6 inches

Modules: 12 (6 + 6)

Sonobes are beautiful, decorative origami created by Mitsunobu Sonobe. In addition to the original sonobe, thanks to its versatility and ease of folding, there are many, many variations created by Tomoko Fuse, Meenakshi Mukerji and quite a few other origamists.  

Narong Krined's variations caught my eye, while I was searching for my next model to fold. The one I have folded is the first of his variations that I was able to find. 

I used 7.5 cms squares, 30 in all for this model. As for the eye-popping colours, well, I wanted something attractive and multi-coloured. Since I am not very good with colour selections, Internet gave me this suggestion - Dark Purple, Mustard Yellow and Dark Coral. How does it look? Attractive or too candy-coloured? 

Model Details:

Model: Narong Krined's Sonobe Variation 1 

Creator: Narong Krined

Difficulty Level: Low Intermediate

Paper Ratio: Square

Paper Size: 3 inch squares

Model Size: ~3 inches in diameter

Modules: 30

Tutorial: Origamee.net 
Every once in a while, I get obsessed with an origami design and keep making it again and again. My last one was Dasa Severova's Origami Woven Star, a modular star made from 16 units.

I tried the model with ombré shades of green, blue and pink and would have continued if I had managed to get my hands on more colours!!

The design is simple and works well with small squares - I had used 3 inch squares and this resulted in a star of about 5.5 inches diameter. The star is also very stable and the units lock well, so no glue required.


Model Details:

Model: Woven Star  

Creator: Dasa Severova

Difficulty Level: Low Intermediate

Paper Ratio: Square

Paper Size: 3 inches

Model Size: ~5.5 inches in diameter

Modules: 16

Tutorial: How to fold the units, How to join the units 


After completing my last 2 Tomoko Fuse designs made from 120 units each, I decided to try one of her simpler models - this simple open frame cube, made from 12 square units.

I have used 3 colours and 4 units of each colour. The squares had a side of 4 inches and the end result was a frame of about 3 inches.

Model Details:

Model: Open Frame - Cube

Creator: Tomoko Fuse

Book: Unit Origami

Difficulty Level: Low Intermediate

Paper Ratio: Square

Paper Size: 4 inches

Model Size: ~3 inches in diameter

Modules: 12

Tutorial: Youtube
Recently, I purchased the book 'Geometric Origami' by Faye G. Goldman. The book contains various models based on Heinz Strobl's Snapology method.

A few years back, I had tried my first snapology origami and made an icosahedron. And now with the purchase of this book, I decided to work on the model titled 'Egg'. It was interesting for me because it was the only asymmetrical model in the book. On completing the project, I think it will make a good Easter egg. Maybe one can add some chocolates inside the egg - though I have no clue how we can get them out!!

The principal for the Egg Snapology remains the same and requires a total of 2 squares, 8 pentagons and 16 flower-like units, assembled from 6 triangles. The 2 squares form the top and bottom of the egg. The flower units surround the 4 arms of the square and the 8 pentagons.

I had used 1-inch quilling strips for the whole project, so while theoretically the egg was an easy project, the size of the strips made it pretty challenging for me. On a side note, kudos to all the origamists who make tiny, micro origami!

Model Details:

Model: Snapology Egg

Creator: Heinz Strobl

Book: Geometric Origami

Author: Faye Goldman

Difficulty Level: High Intermediate

Paper Ratio: 1-inch quilling strips

Model Size: ~4 inches in diameter
The Rhombic Icosahedron from Tomoko Fuse's book 'Unit Polyhedron Origami' is folded from 120 rectangular units. The assembly of this model is a serious test of patience! Folding the units took me a couple of days - it is no joke folding 60 yellow and 60 blue units! Assembly took me nearly half a day, a whole lot of patience and the aid of a couple of toothpicks. I was so tempted to tear the whole thing when I was assembling the last few pieces. Only the thought of folding another 120 pieces kept from doing it :)

The model is very sturdy. Well, I had used 80 gsm paper, so that was a very good decision in my view. Before assembling the model, I completed the 12 5-unit yellow centers first. Then I proceeded to add the blue units in the 3 and 4-unit assembly. In fact, I think if I had assembled the 3-unit blue sets as well, that would have made it even easier.

Altogether, a good, challenging model for me. There is another 120-unit model made from concave units, which would be the inverse of this model. I hope to do it. Some time, hopefully in the near future!

Model Details:

Model: Double-sided Convex Hexagonal Ring 120 unit Rhombic Icosahedron 

Creator: Tomoko Fuse

Book: Unit Polyhedron Origami
 

Author: Tomoko Fuse
 

Difficulty Level: Complex

Paper Ratio: Rectangle in ratio 1:2

Paper Size: 3.4 inches by 1.7 inches

Model Size: ~6 inches in diameter

Modules: 120

Tutorial: Youtube
Maria Vakhrusheva's Fiesta Kusudama origami is a model that I discovered recently. It is a fairly simple and elegant model and I love the way mine has turned out. I had used origami paper that was dark blue on one side and light blue on the other.

There are 2 ways of assembly - the 3-unit cones look more traditional, so I opted for the 5-unit cone.

Model Details:

Model: Fiesta Kusudama

Creator: Maria Vakhrusheva

Diagram: The Fold Magazine (for registered members only)

Difficulty Level: Low Intermediate

Paper Ratio: Square

Paper Size: 3 inches

Model Size: 5 inches diameter

Number of Modules: 30

Tutorial: Youtube
The next model that I tried from my recently bought copy of Ekaterina Lukasheva’s new book ‘Modern Kusudama Origami' is the Centaurea Flower. It is a very pleasant looking model which requires duo-coloured paper. I used paper that was solid pink on one side and had little flowers on the other.

The model was of intermediate difficulty. I liked the way the petals shaped up. While the suggested paper size was 7 cms, I used 7.5 cm squares. The end result was a kusudama ball, about 5 inches in diameter.

Model Details:

Model: Centaurea Cyanus

Model: Ekaterina Lukasheva

Book: Modern Kusudama Origami

Author: Ekaterina Lukasheva

Difficulty Level: Low Intermediate

Paper Ratio: Square

Paper Size: 3 inches

Model Size: 5 inches diameter

Number of Modules: 30

After a long gap, I am back to folding and updating my blog! Recently I bought Ekaterina Lukasheva's new book 'Modern Kusudama Origami'. And now I am enjoying folding the models. I decided I will start folding from the beginning and start with the models that needed square sheets of paper. There are quite a few models folded from rectangles too.

The first few models are stars and flowerets which I haven't tried out as yet. I was more keen on trying the actual kusudamas and started with the model named 'Rio'. It reminds me of Mio Tsugawa's 'Arabesque'.

The kusudama is made from 30 square modules. The book recommends paper of size 7 cm * 7 cm. I used 7.5 cm by 7.5 cm, orange/yellow paper. For some reason, initially I found connecting the modules very difficult. I think my origami brain has rusted! Finally I did figure out how the flap goes into the pocket. After that, the process was quite easy.

Model Details:

Model: Rio

Creator: Ekaterina Lukasheva

Book: Modern Kusudama Origami

Author: Ekaterina Lukasheva

Difficulty Level: Low Intermediate

Paper Ratio: Square

Paper Size: 3 inches

Model Size: 6 inches diameter

Number of Modules: 30

Thanks be unto God for His unspeakable gift. 2 Corinthians 9:15

May this Christmas be a time of reconciliation and peace, may the love of Christ be with us and His peace surround us. May our Christmas be a time of healing, giving and sharing.

Merry Christmas!

And here are a couple of really adorable Christmas earrings that I had recently folded. I absolutely love how well they have turned out!

The first pair is made with red beads and oxidised bead caps. And of course, red and white washi paper. The second pair is made from kami paper with wooden beads to add some green relief.


A very cute mouse folded from a square. It is not very difficult to fold and works well with origami paper, 6 inch square.

I like these little guys, they are about 3 inches in size, excluding the tail.

This is the second model I am folding from the book 'Origami - 30 Fold-by-Fold Projects'. The other one I have folded was Francis Ow's Double Hearts. So far I have found the models fairly easy to fold. Hopefully I will try out a few more in the days to come. Specifically the elephant!

Model Details:

Model: Mouse

Creator: Eduardo Clemente

Book: Origami - 30 Fold-by-fold Projects

Author: Paulo Mulatinho

Difficulty Level: Low Intermediate

Paper Ratio: Square

Paper Size: 6 inches

Tutorial: Youtube 

What is Valentine's Day without one of Francis Ow's hearts? So here you go, Ow's Double Hearts.

The 2 hearts are made from half a square and each heart displays one side of the paper. So naturally, double sided paper with contrasting colours work best.

I used a double-sided 120 gsm 8-inch paper cut into 2. This was the only double-sided paper I had, so had to make do. But regardless, I was able to make the origami. So yay!!

Model Details:

Model: Double Hearts

Creator: Francis Ow

Book: Origami - 30 Fold-by-fold Projects

Author: Paulo Mulatinho

Difficulty Level: Low Intermediate

Paper Ratio: Rectangle in ration 1:2

Paper Size: 4 * 8 inches

Tutorial: Youtube  
Fumiaki Kawahata's most well-known origami is probably the Origami Yoda. But, I doubt I will ever make it - for one, I am not very clear on who exactly Yoda is (Star Wars and I are galaxies apart!!) and two, I am not really good at folding people/animals/birds from paper. Somehow my models don't come out with a smooth finish and end up looking very unrealistic!

The modular ball, on the other hand, is one of only 3 modular origami designed by Fumiaki Kawahata. I have always been put off by how complex it looks, until I finally gave it a try today. Surprisingly, it is pretty easy to make. There are 6 modules that are basically pleated. Each corner is folded perpendicularly to the initial pleat, to form 2 perpendicular arms.

Now the way the model is put together is something I have not seen before! There is none of the usual tabs and pockets to assemble the model. Instead, 2 modules are placed facing each other, so that their perpendicular arms meet in the centre. Now, these 2 arms hold in place a third module. It is a little tricky initially, but pretty simple once you get the hang of it. Only thing to remember is that, if one module is taken out, the whole model will come undone.

Model Details:

Model: Modular Ball

Creator: Fumiaki Kawahata

Difficulty Level: Low Intermediate

Paper Ratio: Square

Paper Size: 3.5 inches

Model Size: ~ 3 inches

Tutorial - Modules: Youtube

Tutorial - Assembly: Youtube
Christmas is another 2 months away, but Christmas exhibitions and craft bazaars are sooner and well, I hope to participate in at least 2 Christmas events! So I have been busy making origami jewelry. 

These origami angel earrings, are something new that I have trying out this year. And going from the response on my Facebook page, I am sure this will sell well :)

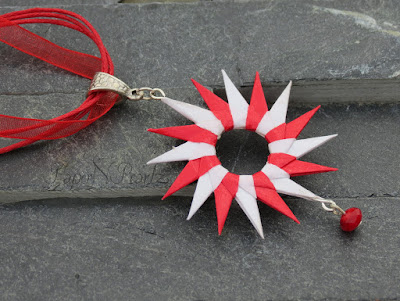
This chain with a modular wreath as a pendant, is a favourite of mine. And I am in love with this colour combination too! I added the pendant to an 18 inch red organza ribbon necklace, using a very cute bail that I have been wanting to use for a long time now and finally got a chance to.

I went for the vintage look with this bracelet. Each star is made from paper that I cut from a discarded book, strung together with black beads and crystals. I almost always finish my bracelets with toggles - they are so much easier to close than lobster clasps I think. I used heart toggles for this bracelet. We do want to spread love this Christmas, don't we??

I regularly post my origami jewelry on my Facebook page. So if you haven't liked my page, do head over and take a look :)
With Tomoko Fuse's lecture and workshop coming up this weekend, I decided to try out another of her popular designs - the Petals Kusudama (Type II). The kusudama is made from 30 units. Each unit has a base and an inset, which is folded into the base. The units are assembled like a sonobe. The kusudama holds well even without any glue, though, since I wanted to make it into a hanging ornament, I ended up gluing the joins.

A 3-colour combination works well for the kusudama. And for that, it is best to ensure that the paper used for the insets is single-sided - coloured on one side and white on the other. If it is double sided, then it works best if the paper has a different colour on both sides.

I used copy paper for the base and 60 gsm origami paper for the insets. So the model turned out pretty strong and sturdy. I also ended up making a tassel (this is pretty tedious work!) and string it along with a few beads and the kusudama to get myself a very pretty ornament :)

Model Details:

Model: Petals – Type II – Kusudama

Creator: Tomoko Fuse

Book: Floral Origami Globes

Author: Tomoko Fuse

Difficulty Level: Low Intermediate

Paper Ratio: Rectangle in ratio 1:2

Paper Size: 3.5 inches by 1.7 inches

Model Size: ~ 4 inches

Number of Modules: 15 rectangles of 1 colour and 15 rectangles of a second colour

Tutorial: Youtube
We have a very exciting day coming up here in India! On 21st September, the origami master, Tomoko Fuse, is all set to conduct a lecture followed by a workshop, here in Bangalore, India :)

Tomoko Fuse's visit to India is a part of the World Assembly of Women in Tokyo, a symposium that takes place between 12th to 14th September. The period before and after the symposium, 8th – 19th September, has been positioned as the Shine Weeks and a series of women-related events will be held in Japan and overseas. The Japan Foundation, New Delhi is organizing these events in India.

Tomoko Fuse's first workshop will be held in Delhi on 18th September. This will be followed by her lecture and workshop in Bangalore on 21st September. The best part of the workshop is that the entry is free! Yay! So I am all set and raring to go :)

After attempting Fumiaki Kawahata's Diplodocus in my previous post, I decided to try the origami dinosaur earrings for my Little Miss.

I tried out different sizes and finally this was the pair that I liked the best. I used red kami paper with print on it.

How do you like it? As for my daughter, she is very pleased! So yay for mummy!! 😀

Model Details:

Model: Dinosaur Earrings 

Creator: Fumiaki Kawahata

Book: Origami Dinosaurs 2

Author: Fumiaki Kawahata

Difficulty Level: High Intermediate

Paper Ratio: Square

I know zilch about dinosaurs! But Little Miss happened to see some origami dinosaur earrings on Etsy and wanted one for herself.

So I set about experimenting, since single-sheet origami isn't my cup of tea. Fumiaki Kawahata's book on Origami Dinosaurs has this folding for the Diplodocus, which was an interesting origami to fold. For the uninitiated, a diplodocus is a large, long-necked dinosaur, with a long tail. The animal is said to grow to a length of 24 metres (79 feet!!)

Since I wanted to make a small earring, I started of with a fairly large square first, just to see if I was able to fold it. The big grape coloured one is folded from a 7-inch square. And then, using progressively smaller squares, I refolded the origami. My smallest is folded from a 2-inch square. It is still too big to be an earring, but I will get there!


Model Details:

Model: Diplodocus (Dinosaur)

Creator: Fumiaki Kawahata

Book: Origami Dinosaurs 2

Author: Fumiaki Kawahata

Difficulty Level: High Intermediate

Paper Ratio: Square
The origami spiral is yet another beautiful modular origami by Tomoko Fuse. Because of how colourful it looks, I had tried this out a long time back - about 3 years back, when I was pretty much a newbie to origami. While folding the modules was pretty easy, I just couldn't figure out how to connect one unit with the next. And finally gave up.

Now, since I have gained a little more experience, I gave it another try. It still required some figuring out, but I was able to get the principle at last :)

I wanted to make a spiral with at least 10 rings in it. Since each ring has 8 modules, I needed at least 80 modules. I added a few more, till I had 100 modules in all and finally set about assembling the modules. So now, based on the number of modules used in a model, the spirals is my biggest project!


The basis for the spiral is the ring which is made from 8 modules. The ring itself will make a good Christmas decoration I think. It would be better to use 80 gsm paper, though this might make it a little difficult to assemble the modules. If making the spiral, I would suggest 60 gsm origami paper. Colourful paper is best for the spirals, resulting in some very colourful and attractive origami.

Be sure to glue the joints, especially for the spirals - rest assured, everyone who sees it will want to handle it and you will end up with many modules that have come undone, unless it is glued in place.

I had used 3-inch squares for making the modules and ended up with a spiral that measured about 6 inches in diameter - a little too big to be used as a slinky! But in spite of that, everyone who has seen it has attempted using it as a slinky!


Model Details:

Model: Rings and Spirals

Creator: Tomoko Fuse

Book: Floral Origami Globes

Author: Tomoko Fuse

Difficulty Level: High Intermediate

Paper Ratio: Square

Paper Size: 3

Model Size: ~ 6 inches in diameter

Diagram: OrigamiModular