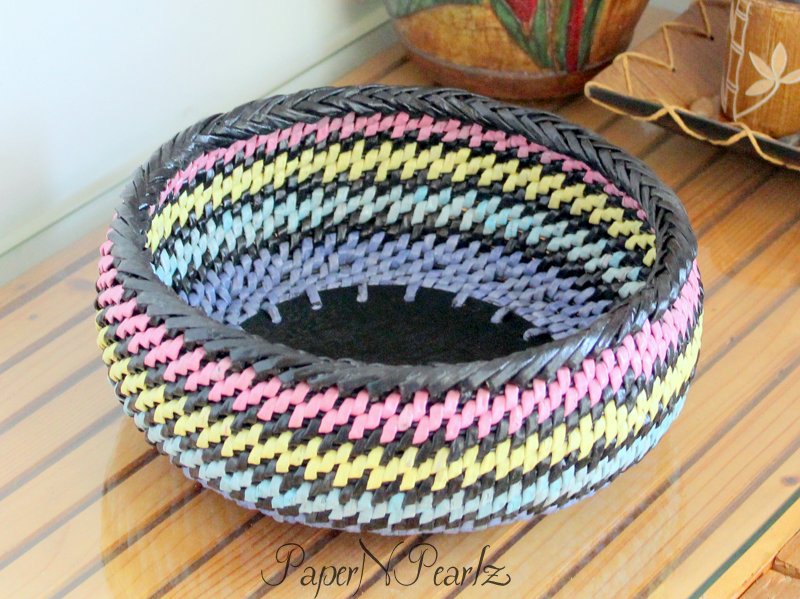
Today being Mother's Day, I wanted to make something for my mom. Well, with the lockdown in place due to the coronavirus, shopping was out of question. Which means, I decided to try out one of my newspaper weaving projects. And so was born the Mother's Day Bowl.

The idea behind the bowl was to use one theme colour, in this case black, along with other coordinating colours, for which I chose blue, yellow and pink.

I also wanted a very sturdy base, so made use of some plywood and drilled holes into them to form the centre of the bowl. I then coated them with black acrylic paint. This was the starting point of the bowl. From there, I decided on going with the coiling or root weaving technique. This is woven freestyle, without any form.

While I love the colour combination, the finish is still not up to the mark. Naturally, this will only come with practice and as the lockdown continues, hopefully I will master this technique of newspaper weaving!


Model Details:

Model: Mother's Day Bowl

Difficulty Level: Complex

Tutorial (making newspaper tubes): Youtube

Tutorial (coiling or root-weaving technique): Youtube

As I had said in my previous post, while making the origami spiral cube, I wanted to retry this model using A5 paper instead of A4. A4 paper resulted in a fairly large cube which wasn't very appealing to me.

The coronavirus lockdown has given me ample time, so I decided to redo the model, using some lovely kami paper that I had. The paper turned out perfect for this model, since it was light enough that I could fold the spirals and assemble it easily.

Usually smaller origami models are more difficult to do than bigger ones, but in this model, I found the smaller one easier to assemble! Mainly because it was small enough to hold in hand while folding. I would definitely recommend the A5 size to the A4!


Model Details:

Model: Spiral Cube

Creator: Tomoko Fuse

Book: Let's Fold Spirals

Author: Tomoko Fuse

Difficulty Level: High Intermediate

Paper Ratio: Rectangle

Paper Size: 8.3 inches * 1.45 inches

Model Size: ~2.5 inches across

Number of Modules: 12

Tutorial: kusuda.ru

Stay home, Stay safe is the need of the hour! Well, during this coronavirus lockdown, this little horse by Oriol Esteve is one of the first origami that I tried out. Check out his Facebook post on the origami horse.

What I liked best about the origami is the suddenness with which the horse turns up! I mean, up to the 15th step, we are just folding along and there is no sign of a horse. But in 2 steps, 16th and 17th, there are 2 reverse folds and boom! You have a horse! 😄 And a super-cute little fella at that.

60 gsm paper would be the best, I thought, since there are multiple layers that are folded in the reverse folds. I used some lovely Momigami paper that I had (15 cms) which turned out to be a good decision. The final horse was about 5.75 cms.


Model Details:

Model: Horse 

Creator: Oriol Esteve

Difficulty Level: Low Intermediate

Paper Ratio: Square

Paper Size: 6 inches

Model Size: ~2.2 inches in height

Diagram: Facebook


Stay Home Stay Safe! Who would have thought that a microscopic virus could bring the world virtually to a halt?? While this pandemic has had a terrible impact around the globe, it is during the lockdown that I have been able to connect with friends from long back, get back into my blogging, work on some incomplete projects.

One of the projects is this newspaper weaving project - Making coasters from newspaper tubes, using the root weaving or coiling technique. I was kinda bored of circular shapes, so attempted something a little different. Not sure how well it turned out, but I can say for certain that the coasters are rock solid.


The holder was a last minute idea, since I had plenty of rolls left over. Turned out pretty useful too, since I didn't end up losing a coaster or two, just because they were left lying around! The edges of the holder leaves a lot to be desired and even now, I am not too sure how to go about making this, but hopefully in the future, it will get better.

On the whole, I am happy with the outcome.


Model Details:

Model: Coiled Coasters with Holder

Difficulty Level: Complex

Tutorial (making newspaper tubes): Youtube

Tutorial (coiling or root-weaving technique): Youtube


Here is another of my newspaper weaving trials - a tissue holder shaped like a snail! A couple of years back, I had tried a pot holder shaped like a snail. And had been quite happy with the way it had turned out. So, this is my next attempt to use a snail shape in my weaving. Can't say I have succeeded quite well this time! 

Anyway, my lessons learnt - need to make it bigger next time, so that the entire tissue fits in well! 

Notice in the background, my pot holder from my last post? Complete with its pot?? Quite liked how it turned out 😄


Given the intense newspaper weaving session from the last post, I decided to do something a little simpler. So here is my pair of pot holders, made in aqua and white - the colours of my parents' living room. For quite some time now, they have been asking me to weave them something that goes with their room colours. And for a looong time now, I have been putting it off - mainly because I wasn't too sure that I would do justice to their aesthetically pleasing room! 

 So finally, after much deliberation, I decided to try out a couple of pot holders, to be kept over their piano, along with a candle stand in the same colour combination. Since I needed a pair, I used the exact opposite colours, in the same pattern. 

I am quite pleased with the way it has turned out. The centre portion, made from a single tube that is twisted around the base tube, was something new. While this is not always even, I quite like the effect produced. I believe I will use the same pattern in a few more weaves in the future!


A few months back, I had made a leaf-shaped tray using the technique of coiling with newspaper tubes. I decided to revisit the tray, this time using wood-stained tubes, the same ones I had used for this box with lid. This tray is bigger than my previous attempt, measuring about 15 inches at the longest length.


I had sprayed the tubes with water mixed with a little fabric softener, about half an hour before I started weaving. This resulted in very flexible tubes that did not break or crack while weaving. I will try out other methods of coating the tubes as I make other objects using the same technique.

Very happy with how even the weaving turned out. The closeup of the tray brings that out very well.


Finally tried out a new finish. I came across this style of finishing the edges, during my usual perusals on Pinterest and was quite fascinated by this. I feel this style is much better than the usual edging. This gives a very professional look to the product and has a very leathery appearance. I messed up the ending, but I have learnt from that and should do better next time.

Model Details:

Model: Tray

Difficulty Level: Complex

Tutorial (making newspaper tubes): Youtube

Tutorial (coiling or root-weaving technique): Youtube 

Tutorial for the edge: Youtube