Showing posts with label wreath. Show all posts


After trying out this modular wreath by Lidiane Siqueira, I attempted another of her wreaths, the Marieta Madala, a Christmas themed wreath, folded from 8 modules.  

It would, of course, look best with paper coloured red on one side and green on the other. Since I didn't this paper, I decided to go for red and green single sided origami paper. I like the way this has turned out and I think it would make a great addition to my Christmas tree. 

Model Details:

Model: Marieta Mandala 

Creator: Lidiane Siqueira

Difficulty Level: Simple 

Paper Ratio: Square

Paper Size: 3 inches (7.5 cms) 

Model Size: ~4 inches across

Modules: 8

Diagram: Criativa'rte

With Christmas in the air, I decided to make a little Christmas wreath for my Christmas tree. This wreath is designed by Francesco Guarnieri and is made from 8 modules. It is pretty easy  and quick to do and makes a great addition for the Christmas Tree.

My first attempt was using white washi paper with red flowers, contrasted with plain red paper. Quite liked the contrast in this. But for a more traditional Christmas look, I guess the usual red-green combination works best. The model works best with double-sided paper. 3.5 inches squares were ideal for my requirements, and resulted in a great about 6 inches in diameter.


Model Details:

Model: Stella Ghirlanda / Star Garland

Creator: Francesco Guarnieri 

Difficulty Level: Low Intermediate

Paper Ratio: Square

Paper Size: 3.5 inches square

Model Size: ~6 inches in diameter

Modules: 8

Instructions: Origami poesie di carta

Tutorial: Youtube

The Graciosa wreath is a very simple origami wreath by Lidiane Siqueira. It is also very economical. The wreath is made from an odd number of modules - 7 of them. Each module is folded from half a square.

The size I liked is a 7.5 cms square cut into 2. So for my wreaths, I used one sheet of 15 cms square, double sided origami paper. From this, I got 7 rectangles, 7.5 cms by 3.75 cms. The modules are very easy to fold. Each module forms 2 spikes of the wreath, so that the final wreath actually has 14 spikes.

Assembly is also quite easy, it is just a matter of slotting one module into the next. It is held together with glue.


Model Details:

Model: Graciosa  

Creator: Lidiane Siqueira

Difficulty Level: Simple 

Paper Ratio: Rectangle

Paper Size: 3 inches * 1.5 inches (7.5 cms * 3.75 cms) 

Model Size: ~3 inches in diameter

Modules: 7

Diagram: Criativa'rte

If you are wondering if I have abandoned the blog, well, that isn't happening any time soon! But I haven't been making a lot of origami per se. More of origami jewelry and experimenting with paper - what paper to use for what, size - what size is good for adults/children, design - what design is easy to work on and so on and on.

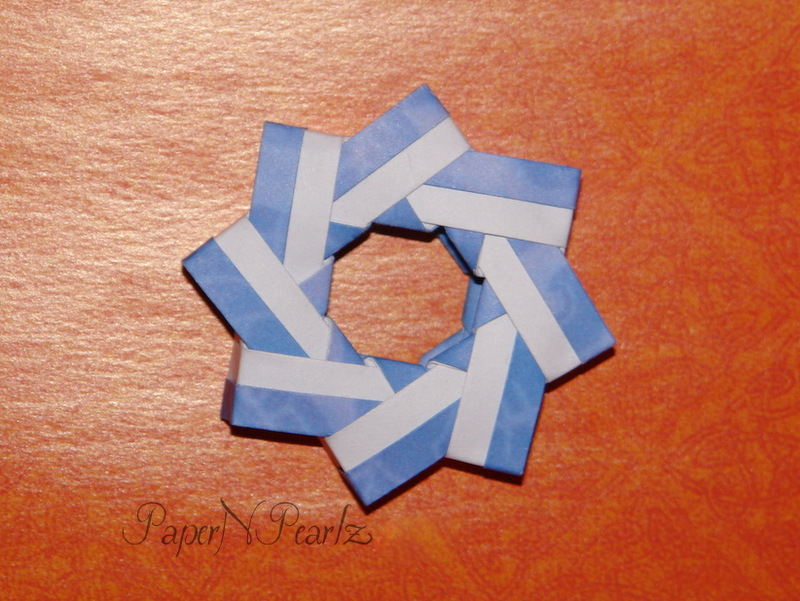
And the result of those experiments are the earrings and the bracelet. The butterfly earrings, I have found, are liked by children, but are much too large for them. So now I need to figure out a good size for kids. And folding such small sizes isn't a lot of fun either. And requires practise. The wreath earrings are also adult sized and I absolutely love them!  I have made them in a variety of colours and these are my favourites.


Coming to the bracelet, this was a complete experiment. And I am quite pleased with the result :) I have wanted to make these bracelets for a long time, but never did find the toggle clasps, till recently. Unfortunately my length measurements were off target, and the bracelet is a little small for adults but will fit a child perfectly - much to my daughter's delight! More bracelets on the way..


And I also ended  up making a rose ring - a tiny little kawasaki rose, fit on a ring base with a little pearl at the centre. I admit it does require a little tweaking though. Folding a kawasaki rose from such a tiny square requires more practise than I have had.

I put the ring through a stress test by mistake - washed my hands while wearing the ring, but thankfully I had glazed it before. The ring got completely drenched, so I set it aside to dry fully. And wonder of wonders, once dry, absolutely nothing happened to the ring! So if you are worried about buying paper jewelry, do remember that they are pretty water-resistant once glazed and if you do get them wet, just allow them to dry completely before using them again.

This month has been a busy time for me, as I am getting ready for an event. And here is what I have been working on..

These stars set in spirals are decided difficult to make! I wish there were some instrument that would make this easier, but for now, I make these spirals by hand. And those spirals add so much of beauty to these earrings. I have also made star earrings with a single crystal and a few with a coil as a dangler but these, I hope, will be the highlight of my star earrings. In addition to red, I am also making these earrings in rainbow colours.


Another of the star earrings. I must admit this is the first time I am attempting any wire work. And simple as it should be, it has its own challenges for a beginner. Considering the number I am planning on making, I think I should soon turn out to be fairly good at making these spirals! And these star earrings in spirals are by far my favourite in this collection! 


These heart earrings are another favourite of mine. Most of these earrings have a little dangle and are about 5-6 cms in height. Little Miss insisted that I make a few smaller ones too - she is very sure that kids will want to buy them and the ones with the dangle might be too big for them! :) 


Leaf earrings always, always catch the eye. Any time I have worn my leaf earrings, I always receive compliments on my earrings. And people find it so hard to believe that it is paper! I am making these earrings in 2 sizes - 3 cms and 4 cms. Most of them are made from pearlescent momigami paper which adds a beautiful sheen to the earrings. Once again, I am making them in a variety of colours. The little pearl on the top goes well with the pearlized paper :)


And finally, wreath earrings are something that I always make. Made from 16 little bits of paper, they are pretty difficult to handle but look great when worn! I am making these earrings in a variety of washi and chiyogami paper. The gold accents in the chiyogami paper adds definite appeal to the earrings. I am also trying to turn them into studs (earrings on posts instead of fish hooks), though I might not be able to work it out in time for the event. But even on fish hooks, these earrings aren't all that dangly or large.

I have more earrings that I am working on and will post them soon.

I love folding wreaths and rings, especially the 3D variety. And recently, I found this Alpha Centauri Ring, designed by Martin Sejer Andersen, a good and easy ring to fold. It is a 3D ring, made from 8 units. The fold starts with dividing the paper into thirds. You can of course, approximate it and fold, but much simpler to fold a template and use that to fold the other modules. The Youtube tutorial (link towards the end of the post) clearly demonstrates the way to go about it.

A great Christmas decoration I think. And with Christmas fast approaching, I think I should get busy making these in Christmas colours :)


Model Details:

Model: Alpha Centauri Ring 

Creator: Martin Sejer Andersen

Difficulty Level: Low Intermediate

Paper Ratio: Square

Paper Size: 2.75 inches

Model Size: 2.5 inch diameter

Tutorial: Youtube

Modules: 8

One of the first earrings that I tried was, naturally, the origami star earrings. Once I became more adept at making these tiny earrings, I tried my hand at more complex pieces and that is when these rainbow earrings came into existence.

These are made with 16 units each and once assembled, I glazed them to give them added strength. The best part about origami earrings is that they are super light! So Little Miss is quite delighted to possess it, though it is a tad too big for her little ears!!

Origami Lemon and Green Sun Earrings


This wreath is from David Petty's book 'Origami 1-2-3'. I have previously tried out a few projects from this book and promptly lost the book! That is, till I found it during some house cleaning :)

This modular piece sounded interesting, so I tried it out. But as per the design, the wreath does not end with pointed ends. The ends are folded down into the neighbouring module to form a kinda blunted wreath. Check out the next picture for the actual wreath - the one in yellow is the way to go. The pointed end one is not very stable and needs to be glued in place if you actually want to use it somewhere.

I used regular copy paper, cut into 2 inch squares. It resulted in a pointy wreath measuring about 4 inches in diameter and a blunted wreath about 2.5 inches in diameter.

The most curious thing for me, about this wreath was that it requires 13 units! I have never come across another model that required 13 modules :) For the blue one, I did add 14 modules though - it was just a tad more stable with 14!


Model Details:

Model: Wreaths / Flower Wheel

Creator: David Petty

Book: Origami A-B-C

Author: David Petty

Difficulty Level: Low Intermediate

Paper Ratio: Square

Paper Size: 2 inch squares

Model Size: ~4 inches (blue one) and 2.5 inches (yellow one)

Modules: 13 or 14

This modular wreath is a great project for beginner origamist who are just starting off with modular origami. It is a traditional design and quite simple.

I love how eye-catching the end result is! I had placed this at my desk in office and everyone who passed by, had a couple of remarks to make on the star :)

Model Details:

Model: Spiky Wreath 

Origin: Traditional

Difficulty Level: Simple

Paper Ratio: Square

Paper Size: 2 inch squares

No of Modules: 16

Tutorial: Youtube

Instructions: Tavin's Origami
Trialling out a bunch of paper earrings, made from Japanese washi paper. I still have ways to go, but I think I have made a good start. 


I used predominantly green paper for this set. The biggest problem with making paper jewellery is dealing with the size of the modules. But while the going in difficult, the end result is very good.


Most of the designs are from Ayako Brodek's book on Origami Jewellery, a real keeper if you are inclined towards making such jewellery. The most useful part was the size details provided for each design.


I also tried out some traditional, simple designs such as the star and the wreath. The only problem with these designs was that I had to experiment quite a bit to arrive at the optimum size of paper.


All the earrings are made sturdy by glazing. And this also makes them water resistant.


Tomoko Fuse's book 'Origami Rings and Wreaths' is an absolute treasure trove if you are interested in making origami rings and wreaths.

This model that I tried out, called the Ring 16, is made up of 12 modules. It works best with double-sided paper, so I used some of my very precious, very new double-sided paper to make this pretty ring.

Folding the individual modules is also simple but does involve popping out paper a couple of times. This should be done with care, since the paper might tear quite easily while pulling it out.

So, with yet another ring/wreath, it appears that I am getting ready early for Christmas this year!!

Model Details:

Model: Ring 16

Creator: Tomoko Fuse

Book: Origami Rings and Wreaths

Author: Tomoko Fuse

Difficulty Level: Low Intermediate

Paper Ratio: Square

Paper Size: 3 inches

Number of Modules: 12

Yet another ring from the book 'Origami Rings and Wreaths' by Tomoko Fuse. This one is just the perfect thickness that makes it a perfect addition to my Christmas wreath collection.

I had used some Christmas wrapping paper and I love the mix of red and green in the ring. The ring is made from 16 squares. I had used 3 inch squares and the final ring measured about 4.5 inches in diameter - not big enough to hang on the door, but would look good on our Christmas tree. I even added a loop at one end to help hang it up.

Model Details:

Model: Ring 10

Creator: Tomoko Fuse

Book: Origami Rings and Wreaths

Author: Tomoko Fuse

Difficulty Level: Low Intermediate

Paper Ratio: Square

Paper Size: 3 inches

Model Size: 4.5 inches in diameter

Number of Modules: 16

Tomoko Fuse's modular ring from her book 'Origami Rings and Wreaths'. This is among the first wreaths described in the book and is made from double sided paper.

I used some lovely double-sided paper, with pastel shades on one side and flowers on the other. The wreath is made form 8 modules and will make a great addition to my Christmas crafts!

Model Details:

Model: Wreath 

Creator: Tomoko Fuse

Book: Origami Rings and Wreaths
 

Author: Tomoko Fuse
 

Difficulty Level: Low Intermediate

Paper Ratio: Square

Paper Size: 3 inches