Showing posts with label mauve. Show all posts

Continuing with the project from my last post, I worked on a pen stand, using the same colour combination - dark purple, mauve and cream. It was again done using the coiling technique, using newspaper tubes.

Weaving the tray was easier because of the larger surface area. And another problem was maintaining evenness in the sides of the pen stand. I haven't completely succeeded in this regard!


The close up shows the colours and the smooth weave. And once I glazed it, I ended up with an incredibly strong pen stand! I just hope my brother likes it and finds it useful :)

And finally, here is a picture of the pen stand and the tray. I am quite pleased with how they have both turned out, but I think I will take a break from weaving using the coiling technique! It is quite time-consuming and frankly speaking, very addicting 😅😅


Model Details:

Model: Triangular Pen Stand

Difficulty Level: Complex

Tutorial (making newspaper tubes): Youtube

Tutorial (coiling or root-weaving technique): Youtube

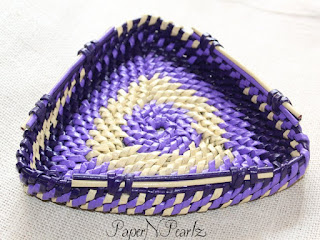
After completing the woven Mother's Day bowl, it appears that I still am a glutton for punishment 😅😅 I tried out more of the coiling technique, using newspaper tubes. Well, I had a second reason for going ahead with this tray - my brother's birthday had just gone by and thanks to coronavirus, I was unable to gift him what I had wanted. So handmade it was!

The triangle is a shape I haven't attempted before and I am happy with the way it has turned out. I love the slight curve in the sides. I also added some tubes in the edge, as handles for the tray. I don't know what purpose they would serve, but I like the way they look!


As far as the colours go, I went with a combination of purple and cream tubes. The purple was in 2 shades, since I wanted to do a gradient in the weaving. The darker purple was achieved by adding a little black acrylic to mauve acrylic paint. This resulted in a rich dark purple which was a pleasure to work with! The lighter purple was mauve with a dab of white acrylic paint mixed in. I wasn't too happy with the way the cream turned out! I wanted a mellower version. I need to experiment more with this colour.


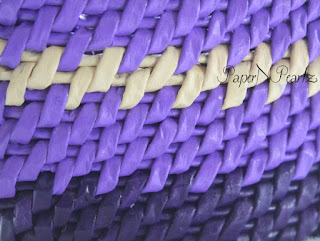
I love this closeup of the weaving! Absolutely adore the way it has turned out. The weaving is the smoothest I have achieved since I started experimenting with coiling or root weaving technique.

I have also decided on weaving a pen stand, using the same technique and the same colours. Will have to see how that works out!

Model Details:

Model: Triangular Tray

Difficulty Level: Complex

Tutorial (making newspaper tubes): Youtube

Tutorial (coiling or root-weaving technique): Youtube
The Estrella Flor Kusudama is a modular origami created by Erny. Like my previous post, the Mt. Fuji Kusudama, the essential shape of this model is also a sonobe. And to form the sonobe modules, a total of 30 squares of paper is required. It works best if we use 15 squares of 1 colour and 15 squares of a second contrasting colour. That will bring out the flower pattern very well.

Each of the 15 squares are cut into 2 rectangles of ratio 1:2. So finally, to make the model, we will be folding 60 modules. 30 of these modules will form the flower shape and the other 30 will form the sonobe shape. The flower modules are slotted into the sonobe modules before starting the assembly. While the task seems quite daunting, the folding is not very difficult, though a little time consuming. Assembly is the usual sonobe assembly - 3 pyramids grouped in clusters of 5.

I quite like the colour choice I had made - dark purple and a light violet (or would that be mauve?) The final model is not too large, since I had used 7.5 cms squares. I decided to make it into a hanging ornament, so ended up with tassels and some beads to form the ornament.

Model Details:

Model: Kusudama Estrella Flor 

Creator: Erny

Difficulty Level: High Intermediate

Paper Ratio: 1:2

Paper Size: 3 inches by 1.5 inches

Model Size: ~4 inches in diameter

Modules: 60

Instructions: Folding in the air

Tutorial: Youtube